I don't think this is
(necessarily) GM Tony Miles's best game,
but it was one of his greatest triumphs.
Dozens of people have written me and asked me to annotate this game, especially since it appeared in one of my lists on my Geo-Cities page on the best games ever played. (See the second list under the book: "The Complete Chess Addict.")
I have made a lot of promises ... and even mumbled in tournaments ... "I will get to it ... I guess ... eventually." Time to make good on those promises.
This
is a game that is mainly just (in) text-score - with only a few diagrams.
You
will probably want (or need)
a chessboard. (!)
Click HERE to see this game in a java-script re-play format.
*** Click HERE to see an explanation of some of the symbols ... that I use in annotating chess games. ***
[A.J. Goldsby I]
******************************
An exciting and complex struggle.
I remember when this game was played ... at that time Karpov seemed almost unbeatable ... for something like five years, he towered over other GM's, and won most of the tourney's he played in. (I was a spectator at a simul he gave in the late 70's - most players seemed completely in awe of him.)
This
game was something of a
wake-up call. (For me anyway.)
Either as a joke, or to prove a point, GM Tony Miles plays
1...P-QR3; (...a6) on his very first move.
(as Black) Had he been defeated horribly, this game would have been quickly
forgotten. (I think.)
In the end, Miles won a very interesting game. Both sides may have had some chances, but Tony won out. While I am sure Karpov wants to forget this game, for Miles it was fondly remembered. (He told me this personally. He also said it was a terrific struggle, ... ... ... and that it was NEVER easy to beat Karpov!)
*******
According to Jeff Sonas's web site, Karpov - at the end of 1979 - was the Number One Player in the World ... with a 2802 rating. (Garry Kasparov had not yet made his mark in the world of chess.)
GM Tony Miles was # 64 in the world, (Just behind American GM Walter Browne!); with a rating of 2584. (The ratings here are the ones given by FIDE, I do believe.)
******************************
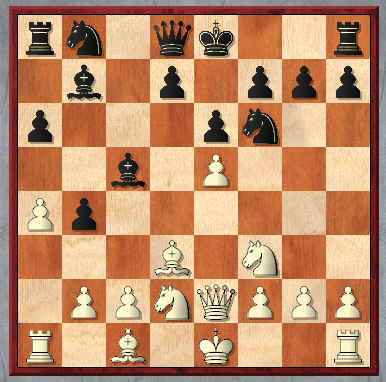
1.e4
a6!?;
Why Miles played this move will
never be 100% clear. But - it was
considered to be less than best ... to say the least.
In a way, this was as good a try as any, and it at least avoids the huge bulk of Karpov's theoretical knowledge, at a time when Karpov was easily one of the most 'booked-out' players in the entire world!! (Miles was fond of doing this. He rather liked throwing a player on his own resources.)
Miles caused an explosion in the popularity of this opening. Before this game, there were perhaps only a handful of games with this move. After this game, it seemed everybody was playing it. (Over 950 examples in ChessBase's on-line database. And most of these occur AFTER 1980!)
A 17th century (!) Cardinal
recommended this (1...a6) as a way
to avoid an opponent's opening
preparation.
But the first known example in the
database I could find was the
encounter:
Wilhelm Steinitz - Jonathan Baker; Great Britain Simultaneous Tour
London, England; 1868.
(Steinitz LOST this game, and in
a mere 33 moves!!! But to be fair, Steinitz probably played this game
blindfold.)
[ I found several more games that
precede this one ... for example:
John Cochrane - A.L. Deschappelles;
Paris, France; 1821.
Black won an impressive game.) ]
The best source for these old
games is the book:
"The Oxford Encyclopedia
Of Chess
Games, Volume One (# 1.)"
by D.N.L. Levy and
K.J. O'Connell.
[ More normal would be: 1...c5!?;
{Diagram?}
with a Sicilian Defense. ]
2.d4,
Grabbing the center ... this is
probably the most natural reaction, and the best move in this position.
[ Nf3 used to be considered a
trifle better, but here is a game
that
could not have helped that
moves reputation:
2.Nf3 b5; 3.d3!? Bb7;
4.Be2 g6; 5.Bd2?! Bg7; 6.Bc3 Nf6; 7.Nbd2 0-0;
8.h3!? c5; 9.a3!? d5!;
10.exd5 Nxd5; 11.Bxg7 Kxg7; 12.Ne4 Nd7;
13.Qd2 h6!?; 14.g4 Qc7;
15.h4?!, ('?') A lousy waste of time.
(Better was: >/= 15.0-0-0, "~")
15...Qf4; 16.Qxf4 Nxf4; "=/+" 17.Rg1 Rac8;
{Diagram?}
This is OK.
(Better was: >/= 17...c4!; "=/+")
18.Nfd2 Ne5!?; 19.f3 Bd5!?; 20.Rg3?! Nc6!;
21.Bf1 Nd4;
22.Rc1 Rfd8; 23.Kf2 Kh8!?;
{Diagram?}
This looks overly cautious.
(Black wants to play ...f5; - - -
this is a grand strategy ...
but probably is not necessary.)
(Probably better was: >/= 23...e5; "/+" {Diagram?}
immediately.)
24.Ke3 e5; 25.b3? f5; 26.Nc3
Nxd3!; 27.Bxd3 f4+; ("-/+") {Diag?}
Black has an easily won game,
but White played on until all he
had left was his King, (and a few
pawns) ... before giving up.
J. Viidik - Paul Keres; Training Game/Match Estonia, 1935. ]
2...b5!?;
Black continues with his
Q-side expansion.
This was criticized by some, who said ...e6 was a better move. Suffice it to say that it is different, but not clearly better than the text.
[ If 2...e6; then
3.c4, "+/=" {Diagram?}
with a small but solid edge for
White in this position. ]
Karpov now chooses a very solid
formation for the first player.
3.Nf3,
Simple and straight-forward development - this could have been predicted by Miles.
[ MCO
gives: 3.Bd3 Bb7; 4.Nf3 Nf6!?;
{Diagram?}
transposing back into this
game. ( >/= 4...e6!? ) ]
3...Bb7; 4.Bd3 Nf6!?;
This is a little provocative. (To say the least!)
Some criticized this - & labeled it as very doubtful; (or worse); and said various other moves were better. But I think they are overly harsh, and really miss the point. Miles isn't just playing chess here, he is daring Karpov to ... 'come and get him.' (Psychology.)
{A British GM said Miles had toyed with this idea for many years, so it was not completely unprepared.}
[ Maybe a little safer was:
>/= 4...e6!?; 5.0-0,
"+/=" {Diag?}
and White retains a solid edge.
]
5.Qe2,
Karpov chooses a safe move. (Nothing wrong with that.)
But the sharper e5! would probably have guaranteed White a large and permanent edge.
[ It would have probably been
better for White to play:
>/= 5.e5, ('!')
5...Nd5; 6.a4!,
{Diagram?}
This is probably the best and
the most vigorous.
( ChessBase gives: 6.Ng5!?, "/\" ... with the idea of Nbd2, "+/=" next. )
6...bxa4!?;
{Diagram?}
This could be a little dangerous.
But Black's position is far from
easy to play.
( Or if 6...b4!?; then 7.Ng5!, with a clear advantage.
[ See MCO-14, pg. # 382,
column # 3, & note # (g.). ] )
7.c3!? Nb6!?;
8.0-0 e6; 9.Na3 h6!?; ('?!') 10.Re1 Be7;
11.Nc4 Nxc4;
12.Bxc4 d6!?; 13.Rxa4!? Nd7; 14.Ra1!,
"+/=" {D?}
White had a very clear advantage ...
and went on to win a very
nice game in less than 30 moves.
(This was from one of my own
games played just a year or two
after
this game was played. I
believe it was played in a California
team
tournament.)
*******
One opening manual recommends
that instead of Qe2, White play
the
following continuation:
5.Nbd2!? e6;
6.0-0 c5; 7.dxc5!?, {Diagram?}
This is very sharp, but makes it
easier, (I think); for Black to
equalize.
(In the long run.)
( White can try: 7.c3, "+/=" {Diagram?} as a sane alternative. )
7...Bxc5;
8.e5! Nd5; {Diagram?}
The end of the column.
9.Ne4 Be7;
10.Bg5!, {Diagram?}
This is very sharp. It is also a try
at exploiting the weak dark squares
in Black's position, most notably the
d6-square, of course.
(Qe2 is very similar to the game
here. 10.a4! also looks very good.
White could also play Re1 or even
c3 here, and be guaranteed
at least a small edge.)
( Maybe just 10.a4!?, "+/=" {Diagram?} )
10...0-0;
{Diagram?}
Naturally Black will want to
castle sooner or later.
( The move 10...f6!?; ('?!/?') is probably too weakening! )
11.Nd6 Bc6;
12.Bxe7 Qxe7; 13.a4!?, {Diagram?}
Probing the Q-side.
( Interesting is: 13.Qe1!?, "/\" or even Qe2. )
13...f6;
14.Ne4!?, "~" {Diagram?}
Apparently GM N. de Firmian
considers White to be much
better here. (At least - "+/=")
Tischbierek - Reefschager; Germany, 1994.
[ See MCO-14; page # 382, column # 3, and note # (i.). ]
14.Ne1!? and 14.axb5 should
also be carefully examined.
(In this last line.) ]
5...e6; 6.a4!,
To me, this is the most energetic.
[ White could also play:
6.e5, {Diagram?} or
6.Bg5!?,
{Diagram?}
or 6.0-0,
{Diagram?} or 6.c3!?,
{Diagram?} or 6.Nbd2,
{Diag?}
with a small advantage to White
("+/=") in any of these lines. ]
6...c5!?; (Maybe - '!') {Diagram?}
Very energetic play by Miles ... who is in danger of being run off the chess board.
[ Probably safer was:
6...b4; {Diagram?}
but White simply plays 7.0-0,
"+/=" {Diagram?}
with a small, but clear
advantage in this position. ]
7.dxc5!?,
I guess Karpov felt this was
positionally forced, but I don't
like the breaking down of White's
pawn structure that has occurred.
[ The FIRST British GM points out:
7.e5!? c4!;
"~" {Diagram?}
Black is OK here. - Tony Miles.
*******
White could play c3, but Tony
showed me an idea that may
have worked for Black:
= 7.c3!? c4!?;
8.Bc2 d5!?; 9.e5, "+/=" {Diagram?}
White is clearly just a little better here, in this position.
(9.Nbd2!?)
9...Nfd7!?;
10.0-0!? h6!?; 11.Nbd2!? Nc6; 12.Re1!? b4;
"~" {Diag?}
Black will play on the Queen-side,
and White will hope for chances
on the other side of the board.
*******
White could also play:
>/=
7.axb5!? axb5; 8.Rxa8 Bxa8; 9.dxc5 Bxc5;
10.0-0! b4;
11.e5, "+/=" (Maybe - "±") {Diagram?}
which looks to be a slightly
improved version of the game. ]
7...Bxc5;
Miles continues in a very sharp
manner. What many annotators
have overlooked is that the
strong British GM is basically offering a gambit to Karpov.
(Very brave, but kinda risky?!?)
[ Not very attractive for the second
player is the continuation of:
7...bxa4!?;
8.e5! Nd5; 9.0-0!? Nc6; 10.Rxa4,
"+/=" {Diagram?}
and White maintains a solid edge.
]
8.Nbd2!?, (Maybe - '?!')
{Diagram?}
White says: "pass," and just
develops.
---> This is a very passive and unimpressive reaction by Karpov.
[ Maybe just simply:
= 8.0-0, "+/="
{Diagram?}
keeping more options open for
the first player here.
(-
ChessBase.)
***
It seems to me that Karpov
should call Miles's bluff and
just
grab the pawn:
>/= 8.axb5! axb5;
9.Rxa8 Bxa8; 10.e5, {Diagram?}
White must play this first.
(Before grabbing the pawn.)
( </= 10.Bxb5?! Nxe4; "~")
10...Nd5;
{Diagram?}
This looks to be forced or
the best.
( </= 10...Ng4?!; 11.0-0, "+/=" or '±' )
11.Bxb5 0-0;
{Diagram?}
At least Black gets to castle
in this line!
12.0-0,
"+/=" (Maybe - '±') {Diagram?}
when I feel Black's compensation,
(for his pawn gambit); is
extremely
nebulous ... at best! (If there is
any meaningful play
here for
Black, I fail to see it.)
Basically, I feel that this amounts
to a REFUTATION (!!!)
of Black's
entire opening. ]
********************************
8...b4;
An interesting note is that
this position has occurred
a dozen times, according
to
ChessBase's on-line database.
[ 8...bxa4!?; 9.Rxa4, "+/=" ]
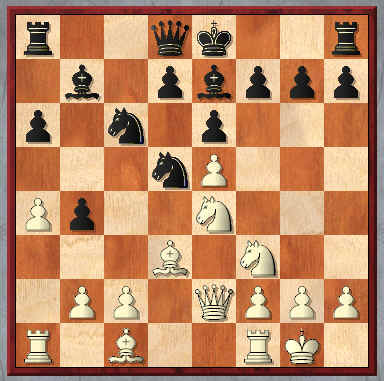
9.e5, "+/=" {See the diagram just
below.}
I think White has to play this
to maintain any edge at all.
**********
|
|
The position immediately following 9.e5
**********
Although while not excessively impressive, White still has a small and persistent advantage in this position.
[ After the moves:
9.0-0!? d5!; "~" {Diagram?}
Black looks to be fine.
]
9...Nd5;
This looks like the required
square for the Knight.
(On g4, this steed would look
to be a little stranded.)
[ </= 9...Ng4!?; 10.0-0, "+/=" ]
10.Ne4 Be7;
This looks to be forced.
[ Of course not: 10...Ba7??; 11.Nd6+ Kf8; 12.Nxb7, "+/-" ]
11.0-0!?,
White simply castles ... surely this
cannot be {that} bad?
Yet several authors have virulently condemned this move and blamed it for White's loss.
(I don't really buy into this argument ... White's one big opportunity has already come and gone.)
'?!' - ChessBase
The move, Bg5! may still {yet} guarantee White an advantage. (Maybe - !?)
[ Maybe the move
11.c4!?, {Diagram?}
is playable here.
***
With the continuation:
>/= 11.Bg5! f6!?; {Diagram?}
I think this is forced.
(ChessBase gives it a dubious
mark.)
( MUCH worse is: </= 11...0-0?; 12.Nd6, "+/=" ('±') {Diagram?}
and White has a very clear
(and large!) advantage. )
12.exf6 Nxf6;
{Diagram?}
This is probably forced.
( After the moves: </= 12...gxf6?; 13.Ne5!! 0-0;
14.Qh5!, "+/=" {Diagram?}
White has a strong advantage.
( </= ...fxe5?; Nd6! "+/-") )
13.Bd2 0-0; 14.0-0, "+/="
{Diagram?}
White gains a very small
advantage ...
but it is nothing
to write home about! ]
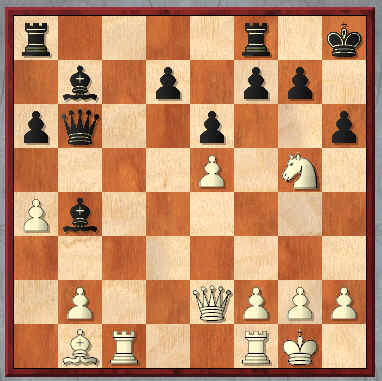
11...Nc6!?;
{See the diagram just below.}
Normal development cannot be
terrible, ... ... ...
(he has to develop his
pieces sooner or later); ...
but the
Queen to c7 first might have
been a sensible precaution.
**********
|
|
The position immediately following 11...Nc6
**********
Now If Bg5, then ...f6! (Black has few problems.)
[
I think that both >/= 11...Qc7!?; (!)
{Diagram?}
hitting the White e-pawn
...
***
and the idea of:
11...h6!?; {Diagram?}
preventing Bg5!, might have
been wiser than the move
actually played (...Nc6)
in
this game. ]
12.Bd2, {Diagram?}
This super-safe move is nice,
but fails to inspire.
[ Better was: >/= 12.c4!,
"+/=" {Diagram?}
and White retains a small plus.
***
If 12.Bg5!?,
then 12...f6!, "=" {Diagram?}
and Black is OK. ]
12...Qc7;
This is probably the best move
in this particular position.
[ Probably not as good was:
</= 12...0-0!?; 13.c4!,
"+/=" {Diag?}
when White may yet regain
the advantage. ]
Now White tries the pawn advance
c4; but he has already frittered
away most (or all!) of his edge.
13.c4,
White pushes the pawn ... I guess
he might as well. (The pawn on
b4 has become annoying.)
[ </= 13.Ng3?! h5!?; "~" ]
13...bxc3; 14.Nxc3 Nxc3; 15.Bxc3 Nb4; 16.Bxb4!?, {Diagram?}
White gives up the mitre-head.
Short-term this looks attractive, but I cannot believe that this will give Karpov a tangible advantage in the long run!
I would have probably tried Bb1 ('!') here - in this position.
[ Maybe
16.Be4; "~" {Diagram?}
with a fair position.
***
Or
>/= 16.Bb1!?,
"+/=" {Diagram?}
with a slight
advantage? ]
16...Bxb4; 17.Rac1 Qb6; 18.Be4,
White seems to be trying hard,
but sometimes that is not enough at the GM-level of chess.
[ 18.Ng5!? Be7!; 19.Qh5 Bxg5; 20.Qxg5 0-0; "~" - ChessBase. ]
18...0-0;
Black finally gets to castle!
[ </= 18...Bxe4?!; 19.Qxe4 Rb8; 20.Rfd1, "+/= ]
19.Ng5!?,
White's Knight sally here looks
a lot like ... "too little, too late."
[ After the continuation of:
</= 19.Bxh7+!? Kxh7[], ('!')
{Diag?}
Black must take.
( </= 19...Kh8?; 20.Bb1, '±' )
20.Ng5+ Kg6!!; 21.Qg4 f5; 22.Qg3
Rg8!, "=/+" {Diagram?}
White's attack runs out of gas.
***
Maybe White should try to play: 19.Rfd1!?,
{Diagram?}
as a last-ditch attempt at trying
to eeek out an advantage. ]
19...h6[]; 20.Bh7+!?,
Hmmm. {Diagram?}
I am not sure what this little sortie
accomplishes.
'!?' - ChessBase.
[ Maybe another try was:
>/= 20.Bxb7 Qxb7;
21.Ne4,
"~" (Maybe - "+/=") {Diagram?}
and Black still has a few structural
deficiencies to deal with. ]
20...Kh8; 21.Bb1,
{See the diagram
just below.}
White seems to have a lot of
threats here.
**********
|
|
The position immediately following 21.Bb1, in the actual game.
**********
If Black is not careful, the threat of Qd3 will prove decisive.
[ 21.Bc2!? ]
21...Be7!?; ('!')
Black continues to hang on. (This move was practically forced.)
This game reminds me of a movie where the hero finally pulls himself up ... after dangling off the edge of a cliff for a long time.
[ Obviously Black should not play:
</= 21...f5?!; ('?') 22.exf6 Rxf6;
23.Qd3
Rf5[]; {Diagram?}
I think this is forced.
( 23...g6; 24.Qxd7 hxg5; 25.Rc7, "+/-" )
24.g4,
'±' (Maybe "+/-") {Diagram?}
and White is clearly better ...
if not winning outright.
***
Black actually had many moves
that he could play in this position.
(... Pawn to d5 or d6, Bishop to c6,
Pawn to a5, etc.)
***
Also interesting was:
21...g6!?; {Diagram?}
which does not look that
bad; but White could probably just
{simply} play Ne4,
and retain
at least a (very small) edge.
(Maybe - "+/=")
]
22.Ne4,
White definitely seems to be
running out of ideas here.
[ Another line is:
= 22.Qd3!? g6; {Diagram?}
<< "=/+"
- ChessBase. >> (Black looks OK here.)
23.Qxd7?,
{Diagram?}
A definite mistake.
( White has to play: 23.Ne4, "~" )
23...Bxg5;
"-/+" {Diagram?}
and Black is winning. ]
22...Rac8;
At long last, Black has virtually
completed his development.
[ </= 22...a5?!; 23.Rfd1, "+/=" ]
23.Qd3?!, (Maybe - '?')
{Diagram?}
At long last ... Karpov commits
an inaccuracy. (I think Tony has
almost lulled Karpov to sleep ... with his 'rope-a-dope' defense.)
'?' - ChessBase.
[
The following continuation seems
to be forced for White:
>/= 23.Nd6 Bxd6;
24.Qd3 g6; 25.Qxd6, "~" {Diagram?}
and White may yet draw.
]
Now Black wins a key pawn.
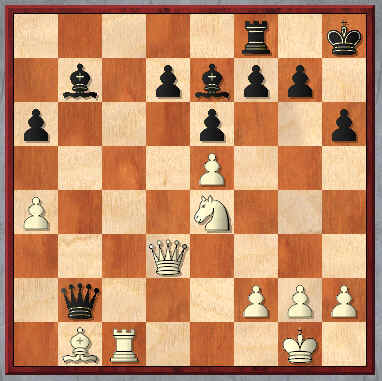
23...Rxc1; 24.Rxc1 Qxb2!; {See the
diagram just below.}
A daring pawn snatch ... but the
threat of QxR (check!) prevents White
from making good on any
of his threats along the b1-h7
diagonal.
[ </= 24...f5??; 25.exf6; "+/-" {Diagram?}
</= 24...a5?; 25.Nd6!, '±' {Diagram?} ]
**********
|
|
The position immediately following 24...Qxb2!
**********
Black is now getting the upper hand!
25.Re1?!, (Probably - '?')
{Diagram?}
The Rook has no future here
at all. (No targets of attack.)
This indirect defense of the e-pawn fails miserably. {In fact he walks into a pin ... and a nasty 'discovered' attack.} (The computer's assessment of the position changes most dramatically after this move.)
This could be the losing move ... and is overlooked by all the other annotators, as far as I could determine.
***************
[ It seems to me, that White simply
had to play the move:
>/= 25.Rd1, ('!') {Box?}
{Diagram?} in this position.
(If now ...g6!?; then White could
play Nd6, with a much
better
position than in the game.)
***
After the moves:
</= 25.Rc7?! g6!;
"=/+" {Diagram?}
Black is clearly better.
(Next is ...Rc8. - CB.)
( I much prefer the move: >/=
25...Bc6!; "/+" {Diag?}
with clearly the better game
for Black in this position.
{A.J.G.} )
***
Possibly even the move:
= 25.Rf1!?, {Diagram?}
was better than Re1? ]
25...Qxe5; 26.Qxd7,
Perhaps Karpov had counted on
this fork to save his game?
[ Or 26.Rc1? f5; "-/+" Not 26.h3?? f5; "-/+" {Pin.} ]
26...Bb4!; 27.Re3,
This is forced.
[ 27.Qxb7? Bxe1; "-/+" ]
27...Qd5; ('!?')
Now this forces the exchange
of Queens and the win simply
becomes a matter of technique.
[
But maybe the move:
>/= 27...Qb2!; (Maybe - '!!')
{Diagram?}
is even better than the text???
(I think I saw this move
somewhere in a magazine or
something,
but I cannot remember
where.) ]
28.Qxd5, {Diagram?}
Karpov could not have been
pleased with his game at this point.
[ </= 28.Qc7?? Qd1+; & mates. ]
Black continues to play very
precisely. White wriggles and
squirms, but it is all to no
avail.
28...Bxd5; 29.Nc3!? Rc8; 30.Ne2 g5; 31.h4!? Kg7; 32.hxg5 hxg5;
33.Bd3 a5; 34.Rg3 Kf6; 35.Rg4!? Bd6;
Now Black has some threats
based on back-row mates.
[ Also good was: 35...Bb3!? ]
Now on move 37, White loses
a tempo, and places his King
on a worse square. (Better was
f4 immediately.)
36.Kf1 Be5; 37.Ke1?! Rh8; 38.f4 gxf4; 39.Nxf4 Bc6; 40.Ne2 Rh1+;
41.Kd2!?,
41...Rh2; 42.g3 Bf3; 43.Rg8 Rg2; 44.Ke1 Bxe2; 45.Bxe2 Rxg3!?;
Taking with the Bishop may have
also been very possible here.
[ Maybe the move: 45...Bxg3+;
{Diagram?} was OK for Black?
(Better than the game?)
]
46.Ra8!? Bc7!?;
White RESIGNS.
(He is two pawns down, and his
game is completely lost.)
A great fighting game by Miles. I think anytime anyone could beat Karpov during the period of 1975-1983, it was a real accomplishment. Of course, Karpov missed many opportunities in this contest.
**********
BIBLIOGRAPHY:
I accessed old magazines, books, and also the Informant for 1980.
But my main resource for annotating this game was the ChessBase version
of this game that was on my hard drive.
(And many, many, many hours ... spent in the CB program, analyzing this
game!!!)
******************************
Copyright
(c) A.J. Goldsby I.
Copyright (c) A.J. Goldsby, 1993 - 2002.
Copyright (c) A.J.G; 2003.
******************************
This page first posted in May, 2003. This page was last updated on 01/09/06 .
***
Click
HERE
to go to, (or return to); my (Geo-Cities)
page
on the Best Chess games of all time.
Click
HERE
to go to, (or return to);
my Geo-Cities page
on the Best Chess Players who ever lived.
Click
HERE
to go to (or return to) my HOME PAGE ...
of my Geo-Cities web site.
(Click HERE
to return to my Geo-Cities web page on Miles.)
***
Click HERE to go to, (or return to); my Home Page for this site.
Click HERE to go to, (or return to); my End-Game School on this site.
***
Click HERE
to go to, (or return to); my page on Mikhail Tal.
(Click here
to go to - or return to - my Geo-Cities
page on GM
Mikhail Tal.)
Click HERE to go to, (or return to); my page on Emanuel Lasker.
Click HERE to go to, (or return to); my page on Paul Morphy.
(Or click the 'Back" button on your web browser.)
***********
I hope you have enjoyed this game half as much as I have. If you would like to obtain a copy of this game for your own study and enjoyment, (for a modest fee, mainly to defray postage); ... ... ... please contact me.
Copyright (©) A.J. Goldsby I, © A.J. Goldsby; 2003, 2004, 2005 & 2006.
Copyright (c) A.J. Goldsby, 2006. All rights reserved.