
|
GARDEN PONDS |
|
|
POND BUILDING BASICS  Establish an overall plan for the area:
location of pond, walkways, creekbed, waterfalls, bar-be-cue, hammock(s), roses, rock
garden, etc. Realize that it can be done in stages - spread over many years if necessary -
but that it does need to be a coordinated and inter-related plan. Establish an overall plan for the area:
location of pond, walkways, creekbed, waterfalls, bar-be-cue, hammock(s), roses, rock
garden, etc. Realize that it can be done in stages - spread over many years if necessary -
but that it does need to be a coordinated and inter-related plan.
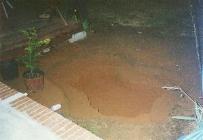
Dig the pond out: straight sides, flat bottom, approx.
20" deep, with absolutely level edges. Raise the lower edges to the same height as
the higher areas around the pond using a thick smooth mud mixture of clay. Trowel Measure for the liner by tying a string to a stick placed approx. 1-1/2 ft outside of the pond and draping the string over the edge, across the bottom, up the other edge, and out 1-1/2 ft. Measure the string. Measure the pond's longest dimension, and at right angles to that. Remember that it is very hard to accurately measure for a liner if the shape has a "peninsula" sticking into it, or an hourglass shape. Purchase quality pond liner (Permalon or fishsafe 45mil EPDM) of the appropriate size and carefully and accurately position it in the pond (see Installing a Pond Liner below). Write down the reading of your water meter and start to fill (let sit for a day to allow water to warm). Occasionally measure the depth of the water and write it, and the water meter readings, down for future use. Carefully get into the pond barefoot(!) (if you wear shoes, you may not notice the sharp rock that you just stepped on and shoved through the liner.) Fold the liner as needed on the sides (you can tape down the Permalon with the 5" tape to make "invisible folds.")
Now, add a quality water conditioner that eliminates chlorine and
adds the A waterfall or creekbed can be added to the pond at any time. The new liner overlaps the pond edge and is attached with the appropriate "double-sticky" tape. Unlike the pond, where you can easily get to any part of the liner should it be damaged and need repair, waterfalls and creekbeds are usually covered with rocks and might have to be completely torn out to find any mechanical leak. Therefore, it is best to protect the liner under all of these rocks from any possible future damage with a "bulletproof vest" of fiber-reinforced concrete. A 1/2" to 3/4" thick layer spread on top of the liner and allowed to set up hard with a rough top surface will protect the liner from you, sharp rocks, kids, herons, etc. Then you can build on top of it using pigmented fiber-reinforced concrete, approx. the color of the rocks used, to both hold the rocks in place and to fill in the empty spaces under the rocks to keep the water on top of them where it will be seen. Before the concrete sets up, dump a bucket of assorted size river pebbles on it and tamp them into the spaces between the rocks with a wooden stick (metal will scratch the rocks.) Later, after the concrete has set up, you can wash off the excess pebbles. River rocks look much more natural than fieldstones or quarried rocks. You can age the rocks by brushing on a mixture made of buttermilk and crumbled dry moss. The moss should grow fairly quickly on the rocks above the water line. You can also plant hunks of moss and plants in and around the rocks. If you use concrete, always use Fibermesh fibers to reinforce it to help prevent cracking. Also, always use a pH stabilizer (jungle Labs), especially with concrete, in any new fish pond to minimize pH fluctuations that can be deadly to your fish. The pump chosen needs to provide If you want a low maintenance, easy to care for, water garden: do
not get any koi! Goldfish, shubunkin, comets, black moors, etc., are wonderful pets! Koi
will eat If you want the thrill of a high-tech hobby, with its challenges, then a true koi pond may be the ideal backyard addition. It has to be carefully planned with knowledge and forethought! There are many rewards, but also many mistakes to avoid. * * * * * * * * * * * * * * * * * INSTALLING A POND LINER The start of a successful pond is in the planning. The first physical part of building it is in digging the hole, 16 to 18 inches deep, and making very sure that the top edge is level. We recommend the use of a length of clear tubing filled with colored water to assure a perfectly level edge - bringing the lower areas up to a level with the higher areas. It is critical that it is absolutely level.The hole should have steep sides, with no shelf, and a flat bottom.
It also has to be constructed out of materials that will not hurt the liner. If the
soil-is clay, smoothing it while wet will produce a pottery bowl that is ideal. Merely
chop any roots well back and cover with wet clay. If the soil contains sharp rocks, cover
it with either two inches of clay, sifted dirt, or other suitable underlayment
(non-biodegradable and thick and tough enough to blunt sharp rocks even after
many years.) (newspapers and most carpeting is not suitable!) A cost effective method for
very large ponds is sifted clay or dirt (no sharp rocks in it) on the bottom, and a good
underlayment on the sides. Once the hole is properly prepared, the liner is carefully positioned and is filled with water. It is an excellent idea to measure the water and make permanent notes as to how many gallons fills it how high. You can either check the water meter or determine the gallons per minute you are using and then watch the clock. If you note the depth and the number of gallons at frequent intervals, you can later determine how many gallons are in the pond at any level (for medication purposes, etc.) As the pond fills, carefully fold the liner on the sides for a neat appearance. You can also tape down the dry and clean folds with the 5 inch wide liner tape to make perfect and almost invisible folds. This also provides an extra safety factor since the fish cannot get trapped behind the folds. To decorate the edge, it is recommend that you use very clean fieldstones. The first layer should overhang the pond by a inch or two, and the second layer covers the spaces between the first layer's stones. Be sure to line up the back edges of the two layers. Then lift the liner's edge up and create a structural dam behind it - against, and about 2/3rds the height of, the two layers of rocks. This dam is to keep out surface water runoff, and should be made of a hard and durable material - such as concrete (or clay mud and gravel, which will dry into adobe brick.) The liner is then flipped over the dam, and the area outside of the pond is covered with porous groundcover such as pine bark, pine straw, or river stones. The groundcover starts at the top of the fieldstones and gently slopes off away from the pond.
Liner: it is recommended 12 ply Permalon for most pond applications because it is a permanent membrane (unlike vinyl), is absolutely fish-safe (unlike almost all vinyls and epdm's,) and is structurally strong, puncture resistant, and tear resistant (unlike vinyl, epdm, and butyl.) It is available in any size up to over an acre. Underlayment: a 250 mil thick non-biodegradable matted material that will very effectively prevent sharp rocks from attacking the liner. Thin materials cannot, and any material that degrades (newspaper, most carpeting, etc.,) Will not. De-toxifiers: most water is treated by man with chemicals such as chlorine and ammonia to destroy bacteria, etc. They also can combine to form chloramine - a toxic chemical that does not dissipate. They need to be neutralized and removed with a chemical additive. There are several products that are excellent at neutralizing just chlorine, or all three toxic chemicals.
SELECTING A WATERFALL PUMP SYSTEM "Oh yea, we'll need a pump, too." BUT?. Before you go, running out to buy "a pump.' you need to know what kind, size, etc. of pump will make you happy. First and foremost is the fact that the pump has to, do a specific job for you. It is supposed to, for example, make your waterfall look fantastic. In that case, since all waterfalls and rapids are different, you'll need to know how much water your waterfall requires to make you happy with the results. To determine how much water is required to make a specific waterfall look good to you, you have to actually run it. First you have someone pour water over It, and then, when it looks right to you, measure it. Use a garden hose, or two, pour a large pail, or whatever, and adjust the flow of water over your waterfall until you are pleased, and then measure it In gallons per minute or hour. For example: if the garden hose is adjusted to make it look good and 'fills a (measured) five gallon pail in 40 seconds, then it is flowing at 7.5 gallons per minute (5 gal. divided by the 40 seconds = 5/40 gal per second, times 60 seconds per minute 7.5 gallons per minute.) If the two gallon pail is poured over the falls and looks good when It takes 30 seconds to empty it.. 2 gal divided by 30 seconds is 2/30 gal per second, times 60 seconds per minute is 4 gallons per minute. If we use both a hose, which isn't quite 'enough water, plus a pail, then we compute, each and add the two together. You also need to know the vertical height from the surface of the water in the pond to the top of the waterfall - "how much higher are we lifting the water." Once you know the gallons per minute and the vertical height that you'll be lifting it, you can select a pump from the specifications. Remember that aluminum pump casings are not recommended for corrosive water like fish ponds - stainless casings are much better. You will also need to use big enough tubing/hose/pipe to carry that amount of water. The maximum recommended flows for hose, tubing and pvc pipes are as follows:
When in doubt, use a size that is too large, never too small. The National Electric Code specifies that the outlets should usually be over four feet from the pond and covered with weatherproof covers (weatherproof when in use - such as the Taymac Brand covers.) Verify the length of cord needed for your pump to be plugged in, without any extension cords, while placed farthest from the waterfall,(for cross circulation.) (Most Calpumps are available with any length cord.) Make sure that the electrical circuit used Is protected by a GFCI (Ground Fault Circuit Interrupter) - either a GFCI breaker in the breaker panel or a GFCI receptacle. They have a "PUSH TO TEST" button on them and protect you, your friends, and your pets from possible dangerous shocks. THE BASICS OF A CLEAR POND (Understanding the essential nature of a fish pond)First you dig a hole and put in an approved fishsafe liner of some sort to keep your water in, and the ground water out, and rill it with clean and fishsafe water.
So, you add some plants to consume all of the nutrients in the water, and you now have clear beautiful water in your pond. 'You now add one small fish. It lives on the bugs and other edibles in the pond. You add more fish. At some point, as you keep adding more and more fish, they will run out of food, and you will have to add more food to the pond. More food = more organic matter = more fertilizer = you need to add a balancing amount of plants to consume it. 'You keep adding more fish, (and, obviously, the proper amount of additional food for them, and the proper balancing amount of nutrient consuming plants,) until you reach the point where there are again too many and they have depleted the amount of oxygen in the water to a dangerous level for the fish. You now need to add oxygen. The usual way is with a water pump that supplies a waterfall or fountain to agitate the pond surface and mix more oxygen with the water. You continue to add more fish. And more food and plants. At some point you will have so much organic fish waste in the system that the pond will not be able to properly process it fast enough into fertilizer - and you'll have what is akin to an unchanged kitty litter box with ten cats using it. Your pond may not smell quite that bad to you, but the ammonia, etc., is still overwhelming to the system, and, might smell that bad to the fish - if they are still alive. At this point, the only thing that you can do is to. make the pond biologically bigger with a waste treatment plant - a "biological filter." What these really do is to provide a home 'for the bacteria that convert the fish wastes into fertilizer. You pump water out of the pond, into and through the biological filter system, and help make fertilizer faster. It does not in any way reduce the amount of algae, and may in fact increase it - by providing more fertilizer than the pond might without the circulation and agitation. So, if you want clear water, balance the organic matter (food') in the water with the proper type s and quantities of plants to consume it. The only other way to try to have a healthy and clear pond is to remove the fertilizer by doing water changes. This will dilute the concentrations and help lower the levels, but this is also an impractical waste of time, water, and doesn't really work well. (PS:- Ultraviolet sterilizers may only make matters worse by killing off algae and leaving the dead plants to decay in the pond - they do not remove the fertilizer from the system.)
|


 it absolutely
level using a water level (small diameter clear tubing with water in it) to get the edge
+/- 1/4" maximum deviation from true level.
it absolutely
level using a water level (small diameter clear tubing with water in it) to get the edge
+/- 1/4" maximum deviation from true level.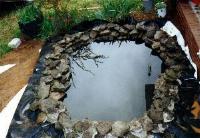 Have enough "thin" fieldstones to go around the pond twice, and
divide them into two equal piles: "larger" and "smaller." Place the
larger ones, touching each other, around the pond so that they extend out over the water.
Then place the smaller ones on top of them covering the "cracks" and lining them
up with the outside edge of the first layer. Bring the liner up behind them, and build a
hard wall/dam 2/3rds the height of the fieldstones with concrete or mud holding the liner
against the fieldstones. Cover the wall/dam with the liner and then cover them both with a
porous ground cover like pinestraw, river pebbles (not crushed stone!), pine bark, etc.,
that starts level with the fieldstones and tapers off away from the pond. You can now fill
the pond to above ground level and check the water meter for your final
reading. Install your pump, turn it on, and check the pond level for a few days to verify
that it does not leak.
Have enough "thin" fieldstones to go around the pond twice, and
divide them into two equal piles: "larger" and "smaller." Place the
larger ones, touching each other, around the pond so that they extend out over the water.
Then place the smaller ones on top of them covering the "cracks" and lining them
up with the outside edge of the first layer. Bring the liner up behind them, and build a
hard wall/dam 2/3rds the height of the fieldstones with concrete or mud holding the liner
against the fieldstones. Cover the wall/dam with the liner and then cover them both with a
porous ground cover like pinestraw, river pebbles (not crushed stone!), pine bark, etc.,
that starts level with the fieldstones and tapers off away from the pond. You can now fill
the pond to above ground level and check the water meter for your final
reading. Install your pump, turn it on, and check the pond level for a few days to verify
that it does not leak.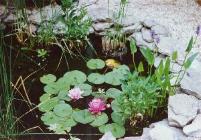 electrolytes that your fish will need. Add plants and fish.
 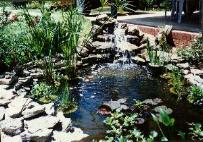 enough
water to make the waterfall look good to you (see Selecting a Waterfall Pump
System below). Fill a large container with a measured amount of water and pour it
- while timing. Calculate the needed water in gallons/minute or gallons/hour. Measure the
vertical lift: from the top of the water in the pond to the top of the waterfall = how
much higher are you lifting the water vertically. Select a pump (not aluminum) that will
do what you need. Use a larger hose/pipe than what you think you
need: I"= only 13 gpm max., 1-1/4"=23
gpm max., 1-1/2"=33gpm max., 2"=50gpm max, and 3"=125gpm maximum.
Too big is wonderful, too small can be a disaster. Plug the pump into a circuit that is
protected by a GFCI (Ground Fault Circuit Interrupter) type circuit breaker (the type that
has a "push to test" button on it.)
enough
water to make the waterfall look good to you (see Selecting a Waterfall Pump
System below). Fill a large container with a measured amount of water and pour it
- while timing. Calculate the needed water in gallons/minute or gallons/hour. Measure the
vertical lift: from the top of the water in the pond to the top of the waterfall = how
much higher are you lifting the water vertically. Select a pump (not aluminum) that will
do what you need. Use a larger hose/pipe than what you think you
need: I"= only 13 gpm max., 1-1/4"=23
gpm max., 1-1/2"=33gpm max., 2"=50gpm max, and 3"=125gpm maximum.
Too big is wonderful, too small can be a disaster. Plug the pump into a circuit that is
protected by a GFCI (Ground Fault Circuit Interrupter) type circuit breaker (the type that
has a "push to test" button on it.)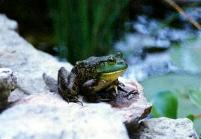 your plants and you will have fish that are too big in a pond of green water. A properly
done pond with water plants and not too many non-koi fish can be very maintenance free
with clean clear water and luscious flowers - a pond to enjoy and show-off, without having
to spend a lot of time working on it (see The Basics of a Clear Pond).
your plants and you will have fish that are too big in a pond of green water. A properly
done pond with water plants and not too many non-koi fish can be very maintenance free
with clean clear water and luscious flowers - a pond to enjoy and show-off, without having
to spend a lot of time working on it (see The Basics of a Clear Pond).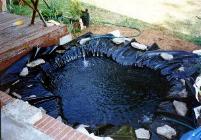 Note: do not use sand, it does not pack
into a hard unyielding surface.
Note: do not use sand, it does not pack
into a hard unyielding surface.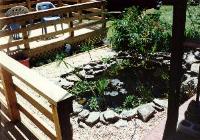 The result of this design is that you, will have a pond to be proud of... The
pond will appear to be flush with the ground, not like a pile of rocks above ground,
and the water is just below the top of the rocks. The water is actually well above
ground level and looks so much better than the installations, like those using hard
shell ponds, that look like a circle of rocks around a well, with the water "way down
there..." If the water level drops even a couple of inches, this design will still
look beautiful - and the overhang will hide the liner.
The result of this design is that you, will have a pond to be proud of... The
pond will appear to be flush with the ground, not like a pile of rocks above ground,
and the water is just below the top of the rocks. The water is actually well above
ground level and looks so much better than the installations, like those using hard
shell ponds, that look like a circle of rocks around a well, with the water "way down
there..." If the water level drops even a couple of inches, this design will still
look beautiful - and the overhang will hide the liner.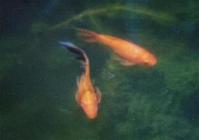 The water contains organic nutrients that we shall call fertilizer for
simplicity. Plants will grow in it. It is your decision as- to which ones - the ones that
you select and add, or the ones Mother Nature will try to add - algae.
The water contains organic nutrients that we shall call fertilizer for
simplicity. Plants will grow in it. It is your decision as- to which ones - the ones that
you select and add, or the ones Mother Nature will try to add - algae.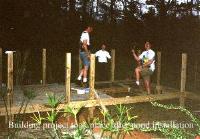 We had great fun working as a family to install the pond and then
the recreation area (deck). We spend many hours relaxing, grilling out and spending
time with family around our creation. Hope you will be able to experience the same
joy we have with our garden pond.
We had great fun working as a family to install the pond and then
the recreation area (deck). We spend many hours relaxing, grilling out and spending
time with family around our creation. Hope you will be able to experience the same
joy we have with our garden pond.