
|
|
||
|
28. A Human Skull - Modeling the Skull 4 |
||
 MODELER, BACK OF THE SKULL & TEETH Load 'SkullTutorial4.lwo'. Do a 'File->Save Object As...' and bump the number by one to 'SkullTutorial5.lwo'. I select seven points along the side of the skull, comprising the rounded area on the side of the skull, and I 'Extender', and 't' to move them to the right. I CTRL-t (Drag) the individual points in a curve.  I delete the polygon that 'Extender' creates when it extends flat objects. I extend the seven points one more time, CTRL-t to drag them to their positions in both the 'Right' and 'Top' viewports.  I select the six points across the back of the top of the skull and extend them, deleting the polygon it creates, pressing 'y' to rotate the group from the 'Right' view by clicking on the bottom-most point and rotatting it clockwise. I use 't' to move it a bit, and CTRL-t to move individual points. 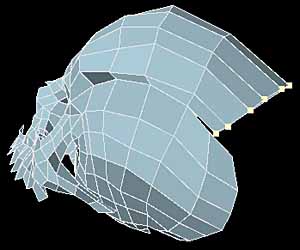 I do 14 more extensions, each time rotating the extension by pressing 'y' and in the 'Right' viewport, centering the rotate cursor over the innermost point of the line, rotating it to be perpendicular to the edge of the head. When it gets shorter at the bottom, I use CTRL-h to size it and drop it down.  Realize that the points which used to lie on the zero X axis might not be there any more so you will have to highlight every one of those points, do an 'i' while in CTRL-g 'Point' mode' to bring up the Point 'Info' requester, and setting X to zero. I use CTRL-t (Drag) to move the edge points to line up with the image of the head. I delete all polygons inside the head where 'Extender' created that straggler polygon for each of the 14 sets of Extensions that I did. I rotate the head in 'Perspective' view, selecting pairs of points two at a time, starting with the point on the segments I just created, then the point on the edge of the side of the head as it curves around (points which have already been welded indicated in red).  I press CTRL-w to weld each of those sets of points together. I turn the skull around, using 'Drag' to make it round, but skull-shaped. I set the color to white to see what it looks like. It now has the back of the skull. I grab two different angles of the skull and paste them together in two different layers of Photoshop to give me an idea of what it will look like when done. 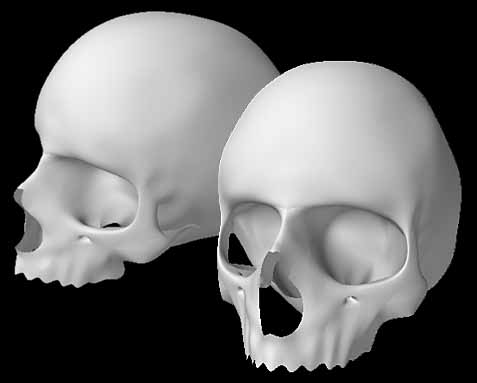 This is when 3D Sculpture gets really exciting, once your object starts taking form. MODELER, THICKENING THE NOSE Everything always has a thickness to it. Even a piece of paper has a thickness. If you don't give things thickness, they won't feel right. So, next I will thicken up the bone in the nose. I enter 'Point' mode with CTRL-g and select all of the points around the nose hole. 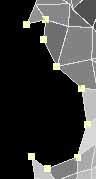 I select the  from the 'Extend' section of the 'Multiply' tab and press SHIFT-h to enter 'Size' mode. I turn on from the 'Extend' section of the 'Multiply' tab and press SHIFT-h to enter 'Size' mode. I turn on  mode by pressing SHIFT-y to keep the zero X axis points in their place, dragging it inward a tiny bit. mode by pressing SHIFT-y to keep the zero X axis points in their place, dragging it inward a tiny bit.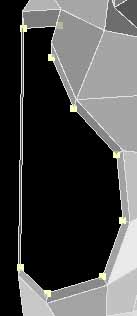 I delete the created polygon. I rotate the head so it is sideways in the 'Perspective' viewport, and press 't' to move the points towards the back of the head a tiny distance. I press CTRL-T to nudge the points, one-by-one until they are tangent to the previous nose edge, and very close to it. 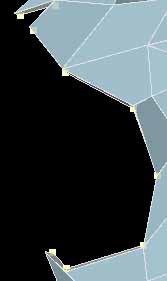 I click again, and drag it far into the skull. It might protrude through the current surface.I turn the face inside-out, delete the created polygon, flip the polygons if they need to be flipped, and use CTRL-t to drag each point until it is inside the head and gives the skull a thickness. 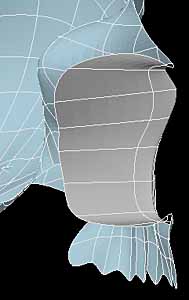 I select all polygons, press 'q' to bring up the 'Change Surface' requester and select the 'Skull' surface name to make them blue and smooth. MODELER, THICKENING THE GUMS I select each point along the gumline. 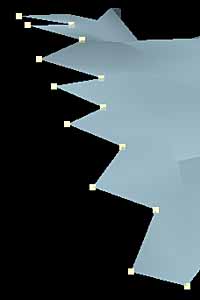 I select the from the 'Extend' section of the 'Multiply' tab and press 't' to enter 'Move' mode.I rotate the gums so they are edge-on to me, and drag downward to give the gums an edge. I highlight the extra created polygon to delete it.  I press the DELETE key to remove it. I enter 'Select Points' mode by pressing CTRL-g, and deselect all points of the troughs. I keep selected the the highest points. I press CTRL-h to enter the 'Select Polygon' mode, press TAB to enter SubSurface mode, press 't' to stretch them inward. The skin of gums goes between the teeth. 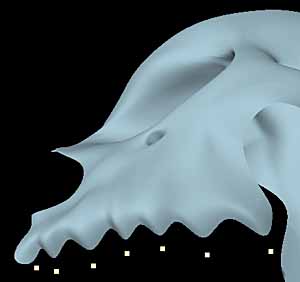 I enter 'Select Points' mode by pressing CTRL-g to deselect the high points and select the troughs of the edge you just created. Enter 'Polygon Select' mode with CTRL-h and press TAB to enter SubSurface mode, entering 'Point Select' mode with CTRL-g, dragging them upward to accentuate the curve at the top of the teeth. Notice that it is intricate which select mode you must be in at any time. To select points you must be in 'Point Select' mode, CTRL-g. But, to enter SubSurface mode you must be in 'Polygon Select' mode, CTRL-h. Thus, you must switch back and forth as necessary. Press CTRL-t to individually position the upper-gumline of each trough.  I do a 'File->Save Object As...' and call it 'SkullTutorial6.lwo' MODELER, TEETH The best thing to do when drawing teeth is: do them in a new layer. Click the top diagonal of the Layer 2 gadget and it turns yellow.  In the 'Back' viewport, I press CTRL-g for 'Point Select' mode, pressing '+' to select the 'Add Points' tool. I lay down points a little inside each tooth, as we'll be giving other points along the sides to give it depth. In the 'Right' viewport, I press 't' to move them and I move them towards the tooth so the lowermost points coincide with the end of the tooth.  I press 'y' for 'Rotate', point the circular cursor so the circle encircles the bottom point, rotating the tooth points to correlate with the tooth angle. Press CTRL-t to 'Drag' points to more precise locations.  Connect each of the three 4-sided polygons in the normal manner, flip if needed.  Sequentially select, clockwise, the points around the tooth. Click the button and CTRL-h to size the extension. expand the selection a little. Enter CTRL-t to drag the points to more precise positions. No need to delete any polygon as this is a closed circle of points.Press CTRL-h to enter 'Polygon Select' mode, make sure all polygons are deselected and press TAB. Adjust inner and outer points from front and side views until it feels right. If you were creating teeth that will need to be close-up shots, they would need more planes than I am giving them. A centerline of points would let you adjust the curvature better. Don't add too many polygons, though. Only one more line of points would give you more control.  This quality should do with the skull, though. And, depending on whether the bottom of the skull will ever be shown, this might be enough of a representation to get by. Otherwise, create the other side of the tooth, as well. To do the back of the tooth, I turn off SubSurface mode, turn it around, select the outer points - clockwise.  I do an 'Extender', CTRL-h to size it, bring it smaller, CTRL-t to position carefully, flip polys if necessary.  I highlight the four points, clockwise, of each of the three 4-sided polygons, pressing 'p' to create them, flip polygons if necessary. Enter 'Select Polygon' mode, make sure all polygons are deselected and press TAB to SubSurface. Press CTRL-t to 'Drag' intersections to proper shapes.  The second tooth... copy tooth 1, paste into Layer 3, turn on Layer 2 as background layer by clicking bottom diagonal of Layer 2 making it background layer. Rotating the 'Perspective' view so you can see the top of the tooth, choose 'Sketch' view type so you can see both teeth at once (with 'Smooth Shade', you won't be able to see multiple layers). Press 'y' to Rotate, rotate new tooth just a little using first tooth as guide. Press CTRL-h to size and drop size just a hair. In 'Right' viewport, press 'y' to Rotate and rotate to proper angle.  Cut it to clipboard with 'x', switch to Layer 2, paste it into layer 2 with 'v'. If you lose the selection on that tooth, select one polygon and press ']' to 'Select Connected'. Keep rotating it in the 'Perspective' viewport, using 'y' to rotate, 't' to move' until it feels like it could have grown that way. 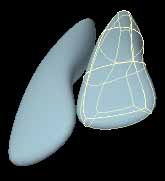 The third tooth needs to be more intricate, so you will most likely have to add more lines of points, one line down the center of the tooth. Do one tooth at a time, and after you've got the shape, select one polygon, pressing ']' to select all on that tooth. Use 't' to move it, 'y' to rotate it, CTRL-h to size it until it sits in the curve of the gumline that you created. Once it's about in the right position, set the head as the front layer, the teeth as the background layer and put it into 'Sketch' mode so you can see a representation of both layers. Use CTRL-t to 'Drag' the intersection lines so it feels like the bone of the gums smoothly cover the teeth.  Select every polygon that comprises the teeth, press 'q' to bring up the 'Surface ' requester and give it a Surface Name of 'Teeth' and a color other than light blue (I used pink). Click 'Add to Custom Colors'. While in the 'Surface Editor', lets create a surface for the teeth which we'll use once we're done. By experiment, I found this to be a good surface for teeth.  Once you've set those values, click on the  button and save the surface as 'TeethSurface'. button and save the surface as 'TeethSurface'.I repeat the SHIFT-v to mirror, 'n' for numeric requester, SPACEBAR to exit from mirror mode. Here is a close-up of what the teeth look like when positioned, sized, shaped, angled and surfaced.  I reposition the head and look at the detail. You have seen that the process of 3D Sculpture has to do with an increase of intricacy. The moment you decide that it's good enough for your purposes, that'll be the instant when it'll be complete. You'll want much more detail if you wish to fly up its nose than you will if it will sit on the other side of a room on a desk. There's still the palette on the roof of the mouth to be done, and the bones which go around the back of his wisdom teeth. There are still the lobes and hole where the skull attaches, and the area where the orbital bone connects to the skull... However, this should be good enough for even the most demanding of close-up work. Click for a Rotating 3D Version of the skull done using the Blaxxun3D Applet |
||
