
|
|
||
|
33. Cartoons - Leroy the Hawk - Part 2 |
||
|
I already drew the perimeter points of Leroy's body in the 'Right' window. Next I will have to draw the perimeter points in the 'Back' view. I lay down points one-by-one by pressing '+', clicking with the left mouse button in the 'Back' viewport, moving it with the right button in the 'Right' viewport.  When I place them, I think of placing on on each side of the feathers that will need to be there. I try placing one dot for each corresponding dots which have already been placed, forming rows.  I think that if I place two more rows of dots between the centerline and the perimeter of the 'Back' viewport, that will probably be enough. I connect all polygons by selecting four dots, clockwise, pressing 'p' for each four-sided polygon. Afterwards, I recline the shape at a sharp angle, like a roadway, arranging the dots by highlighting a row at a time, dragging each dot in the 'Perspective' viewport until they are all equidistant from each other with no jagged rows. I select all of those polygons and press TAB to subsurface them. If Leroy looks like a jigsaw puzzle with a couple of pieces gone, highlight those polygons and flip them.  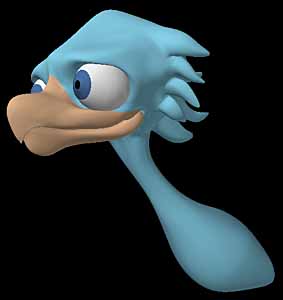 MODELER, LEROY'S TAIL So far, his tail is poorly sketched. Each of the tail feathers will have to have edges, and they'll have to have a center line, and at least two sets of polygons down the center of each feather so they will round properly. I will have to greatly magnify the tail and place more strategic points where the feathers will end, as there will have to be joint lines there like you'd draw if you were drawing the webbed area between your fingers. I drew the front picture well, but the side view I probably can't use. I want to add enough segments to the tail section in case I wish to curve the tail in intricate ways later. When there is a corresponding top/bottom point, I'll try and keep the top-bottom relationship in the 'Back' viewport so I can understand what is what. I'll probably do best if I draw each of the two tail feathers separately, instead of doing them both at once. That way I won't get in my own way. I press '+' to enter the 'Create Points' mode and start laying down points for the inside feather. Since I want all four feathers to move independently of each other, I must also move the center line a bit to the right, away from the zero X axis. It will be easier if I draw them round. I'll stretch them later. Since I might wish to draw each feather slightly concave or convex, I'll have a centerline. That will mean 8 dots around in a circle. I throw away all points that I might have previously placed that are in the tail feather section and start anew. I greatly magnify the tail section, and just below where the tail feathers stop I draw the outline of the feather.  I do a copy of those points, a paste, press 't' and drag the copy down. Don't make a mistake here, or you'll end up with two sets of points on top of each other. If you wish, copy them to the clipboard, change to a blank layer, paste them, move them, cut them off, and paste them. That's always the safer way of doing it. I do that a total of three times. Since I was imprecise with the side view of the tail, I just use it as a rough guess, changing my mind that I wish the tail to be straight, not point downward. I may even tilt it upward after I'm done, but this will be good for the moment.  In the perspective window, using 'Wireframe' mode so I can see the points, I position the circles so they are like a roadway, connecting the corresponding points, clockwise, pressing 'p'. It is important that you remember where you began, and you must keep track of which are the proper corresponding points.  I create three new points so I can attach all end points, which will round the end of the feather.   MODELER, CONNECTING LEROY'S TAIL FEATHERS I turn off SubSurface mode, hiding the entire body by selecting all of those polgons (not points) and pressing '-'. I hide the end of the tail. I greatly magnify the beginning of the tail feathers like if it were Hoover Dam. When magnifying, I find that there is a certain distance which I reach where the polgons I'm magnifying disappear. To make them not disappear, I press 'd' to bring up the 'Display Options' requester and pull the 'Perspective Amount' slider all the way to the left.  I highlight the end points sequentially, extending them, and press 't' to move them up a bit. I press SHIFT-h to size them a bit bigger.   I now will need to connect 6 polygons on the body (half the body) to 16 polygons on the tail. That means I will have to make triangles. First, I clone the points along the top edge of the tail (which I just extended as a bevel) and 'Extend' them again. I will need to unweld these two points, as I want to have it be just one circle, not two, now. I choose 'Unweld' by pressing CTRL-u and nothing seems to have happened.   I move other points around it so they are definitely on the right side of the zero X axis. I highlight the two points and press 'i' to bring up the Point Info requester, putting zero as the X value. This will be our interface between the split in the feathers, and where it will join with the other two feathers when I mirror it. 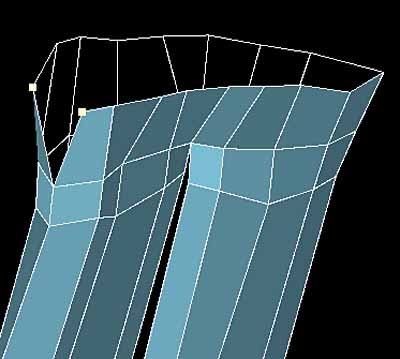   I create an equal distance beween the rows of points between the body and tail. I form them so they look good as they come together, creating the last row of polygons with sequentially picked points, and 'p'. In 'Wireframe Shade' view type I adjust angles on the tail feathers with 'y' rotations and 't' movement. I mirror the new pieces and weld them together. You notice that I'm now keeping the symmetry, so I turn on 'Symmetry' mode when I need it and turn it off at other times.  Click for a Rotating 'Leroy the Hawk' done using the Blaxxun3D Applet |
||
