
|
|
||
|
41.2 Layout (LightWave.exe) - 2 |
||
 When animating using bones, there are two ways to animate objects. One way is called FK (Forward Kinematics) and the other, IK (Inverse Kinematics). Both sound difficult, because of the fancy names, but they're really not too hard to understand. Layout, FK (FORWARD KINEMATICS) FK just means that you move a bone and that moves the object's part, such as a thigh. It's sort of like 'pushing' the part to that position. Layout, IK (INVERSE KINEMATICS) IK means that you form a link between the thigh, calf and toes, then you pull the toes to the position. IK would be like if you had a puppet and you pulled on his toe. His toe would move to where you pulled it and his calf and thigh would follow. IK is generally used to keep feet solidly planted on the ground or palms solidly planted on a table while moving the rest of the leg or arm around it. Thus, IK is handy to use when an object is walking. One problem with IK is that you have to set limits for each bone so a thigh doesn't turn backwards or the calf, sideways. A second problem with IK is that the movements sometimes aren't realistic. Layout, HOW DOES IK WORK? Lets say that the dinosaur were a puppet. If its bicep bone were connected to the forearm bone, and the forearm bone were connected to a hand bone...    There are a few rules that you must adhere to (most of the time) when you use IK. 1. On IK chains, pre-bend the arms or legs controlled by the chains to give LightWave a strong indicator in which direction they should bend. Layout, WHY USE IK? Besides the obvious reason that it frees you up from having to set the arm and leg bones one-by-one as you animate, as I mentioned before, another big advantage of using IK in at least part of the arms and legs is it lets the feet be firmly planted upon the ground while the body moves around, or lets the palms of the hands rest upon a table while the rest of the body sways. As opposed to 'Forward Kinematics where each bone is forced into its final position by pushing it there, 'Inverse Kinematics' or IK, pulls the end of a chain to a goal by having the computer compute the movement of the interconnecting bones between the wrist and the shoulder point. When using Skelegons, and you know that some of the skelegons will be controlled by IK (bicep/forearm bone pairs, neck bones, and thigh/calf bone pairs are oftentimes best controlled with IK), certain special things should be created which will help you later when you do the IK. IK, being more complex than FK, has particular needs which must be planned for in 'Modeler', before you enter the 'Layout' program. In 'Modeler', skelegons are automatically connected head-to-tail when you click the next skelegon. And, when those skelegons are converted to bones in 'Layout', later, they'll only be child/parent relationships (where one bone is a child of another) unless they were originally connected head-to-tail in 'Modeler'. However, bones must be intricately linked in 'Layout' with the proper parent/child relationships for IK to work properly. Layout, THINGS TO SET UP IN 'MODELER' BEFORE USING IK I'll start with a simple arm, and show with experiments how IK works. The way that bones are parented is very important when using IK. When a skelegon is created in Modeler, and then later converted to bones in the Layout program, the instant you do a 'Convert Skelegons into Bones', skelegon chains are automatically parented head-to-toe. The highest parent bone of a skelegon chain will be parented to the object. The short end of the skelegon will be the parent side, and the long end will be the child side. The first skelegon in the chain will be parented to the object, itself. First, one has to determine which bones will be controlled using IK. Basically, the bicep/forearm bones and the thigh/calf bones will be controlled by IK. Once we've determined which bones will be controlled by IK, lets look at what IK's particular needs are. Lets start with Deinon's arm. 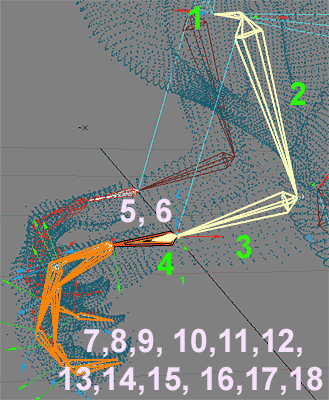 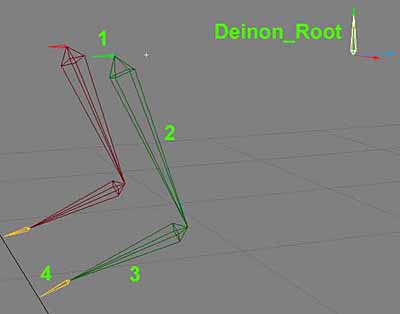 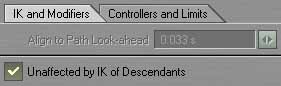 Bone #4 will be a child of Bone #3, and is part of the IK chain, but it's NOT going to control any axis movements. It will, however, be 'IK Enabled'. It will only be used as a 'Puller' bone. It's not physically attached to bones #4, or 5, which it is nestled inside of, but it is actually a child of the IK chain, whereas bones #5 and above are parented to 'Deinon_Root'. I know this is all very confusing. Just remember that every time you create an IK chain you'll have to create a puller skelegon. If you don't create a puller bone at the end of the chain, but point the last bone to the goal, instead, the last bone in the chain won't be part of the IK computation (in this case, the forearm bone). IMPORTANT - The only purpose for the Puller bone is to point the IK chain to an associated goal object. In this case, the goal object will be a 'Null Object which will be attached to bone #5 of the hand. The puller bone is actually attached to the forearm, which is completely separate from the hand bones (other than the fact that it LOOKS like it's attached to it because it's in-line with it as if it's attached to it). Bones #5 and #6 will be parented, not to bone number #3 or #4, as you might expect, but to 'Deinon_Root' just as the shoulder bone is. The three bones are 'Nestled' inside each other, as I've shown before. Deinon_LeftWrist_Rot' will have a Null Object called 'LeftWrist_Goal' attached to it. This will allow the puller bone #4 of the IK chain to be pointed to that goal. A null object must be used because LightWave doesn't let a bone be a goal. therefore, you have to create a 'Null Object', call that null object a goal, then use the object as a goal for the puller bone in the IK chain. Bones #7, #8 and #9 are the first three segments of the three fingers. They will be children of bone #6 ('Deinon_LeftWrist_Rot') which is a child of bone #5 ('Deinon_LeftWrist_Trans') which is a child of 'Deinon_Root' #10, #11, and #12; #13, #14 and #15 and #16, #17 and #18 are the second, third and fourth set of segments of the three fingers. Layout, TERMINATING IK CHAINS LightWave can't read minds, so if I've created a bone that's a higher-parent to what I want to be the top of an IK chain, I have to show LightWave where the IK chain should begin. As I've already mentioned, the 'Deinon_LeftShoulder' bone isn't being used, but is a parent to the bicep, thus I have to tell it not to include that bone in the arm chain. In the same way, above 'Deinon_LeftShin' is 'Deinon_LeftThigh', which is not to be included in the IK chain. Most of the time, bones such as these are put here because its much easier to later just use the bone in an IK chain, for example, than start all over back at Modeler or create a bone manually, in Layout program. Later, if I wish to move the 'Deinon_LeftThigh' bone, I'll use FK to do it. In Deinon, I'll have five IK chains: two arms, two legs and the tail. I've set skelegons which will be used to attach IK goals to on the bottom of his arms, legs and tail. In all, that makes five IK pullers. In this image, the white circles point to where the tiny arm and leg skelegon pullers go. They will each be the last child in their corresponding IK chains. 
I save the scene, then save an incremented version, so if I make a mistake, I won't lose anything. Now, although bones may look like they're right next to each other, that in no way means that they have any sort of parent/child relationship. For example, if we look at the 'Deinon_LeftHeel' bone, this is the bone to which I'll attach a 'Null Object' called 'LeftHeel_Goal. 
If at any time I forget what a bone's name is, I can always highlight the bone, and press 'p' to bring up the properties for that bone. In this case, where it says 'Current Bone', it tells me that bone's name is  . .I press 'm' to bring up the 'Motion Options' panel and choose Its parent is the Deinon object. I haven't chosen 'Deinon_Root' to be the parent, as I don't wish the feet to move when I move 'Deinon_Root'. The feet will only move when I either move the whole body, or just this heel bone. The layout of Deinon's leg is very similar to the layout of his arm. If I hide everything but those four bones... 
In this case, his thighbone, bone #1, shouldn't be controlled by IK, just as bone #1 of the arm isn't controlled by IK. I select bone #1 and pick  from the from the  drop-down menu from the 'Items' tab 'IK' section. drop-down menu from the 'Items' tab 'IK' section.'Unaffected by IK of Descendants' is a toggling checkmark. Toggle the checkmark 'ON' for a bone and IK calculations of the child bone will stop and go no further. If you make a mistake and accidently checkmark 'Unaffected' for a bone, just select it again and the checkmark will go away. I do this for both thighs. Bone #2 and 3 will be controlled by IK and bone #4 is the puller bone which will point to the left heel's goal object. To create a 'Null Object' goal... from the 'Items' tab, 'Tools' section  menu of the Layout program, selct 'Add Null' menu of the Layout program, selct 'Add Null'
Type the goal's name. 
As you just created the null, it's currently selected. Press 'o' to bring up the 'General Options' panel and make sure that 'Parent in Place' is NOT checkmarked. This will force the goal to snap to the heel bone when you select the heel bone as the goal's parent. Press 'm' to bring up the 'Motion Options' panel. Select  as the heel goal's 'Parent Item'. as the heel goal's 'Parent Item'.I can't stress enough that you have to keep saving your work when you're in the Layout program. There is one undo, but it oftentimes doesn't work. With bones, in particular, one wrong move can ruin everything. For example, if you do a 'Record Pivot Rotation' BEFORE you do a 'Parent in Place', the bone will suddenly twist around and you'll have a VERY hard time getting it back to the way it was. Also, you're struggling your hardest just to understand what I'm saying and why I'm saying it so you're mind is already consumed. It's SO easy to make a mistake at this point as Layout is particularly picky about the order you do things. IMPORTANT - When in the Layout program, SAVE, SAVE, SAVE... Press 'o' to bring up the 'General Options' panel and make sure that 'Parent in Place' is TURNED ON. Parent in Place' must be turned on this time because we don't want the relative position of the heel to change relative to the rest of the body. If you have ever did a 'Record Pivot Rotation' on the bone before, you might get horribly twisted bones. Always wait to do all 'Record Pivot Rotations' until all Parent/Children are correct. Next, the 'Deinon_RightHeel' bone needs the object as its parent so I select that bone, press 'm' for the 'Motion Options' panel and set the Deinon object as the 'Parent Item' for the right heel. So, now, the foot is completely separated from both the 'Deinon_Root' bone and 'Deinon_LeftAnkle'. Instead, the foot is parented to the object, itself. So far, I've told the Layout program where the IK chain would end, I've set up a puller at the end of each IK chain which will be set to point to one of five goals. I've created one goal for the right heel and attached it to the right heel bone. Now I have to point 'Deinon_RightAnkle_Puller' at the goal. I select 'Deinon_RightAnkle_Puller' by either picking it from the 'Schematic view', by selecting it with the 'Scene Editor' (F1), or by selecting the bone from the 'Perspective View'. I press 'm' to bring up the 'Motion Options' requester and select 'RightHeel_Goal' from the 'Goal Object' drop-down menu. 
In the same manner I create a goal for the left heel, parent the left heel to the Deinon object, parent the goal to the left heel making sure that 'Parent in Place' is turned off, parent the 'Deinon_LeftHeel_Puller' with 'Parent in Place' turned ON to the Deinon object (whatever it's currently called). The hands are similar, but instead of parenting them to the Deinon object, I parent them to 'Deinon_Root'. 'Deinon_LeftWrist_Trans', the bone I'll use to move the hand is equivalent to 'Deinon_RightHeel' in the foot. It's highlit in this image... 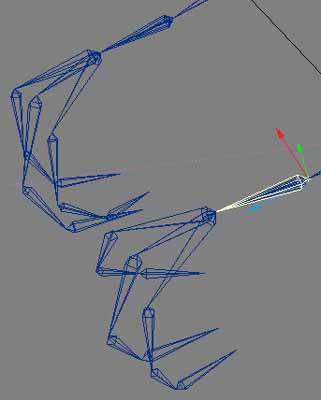 I make sure that 'Deinon_LeftWrist_Rot', the bone I'll use to rotate the hand, is a child of 'Deinon_LeftWrist_Trans'. I make sure that the first three segments of the fingers ( 'Deinon_RightFinger_01_1', 'Deinon_RightFinger_02_1', 'Deinon_RightFinger_03_1') are children of 'Deinon_LeftWrist_Rot' I do the same for Deinon_LeftWrist_Rot, Deinon_LeftWrist_Trans and Deinon_LeftWrist_Puller. I create a goal object, with 'Parent in Place' turned OFF I attach the new left wrist goal to 'Deinon_LeftWrist_Trans' by selecting 'LeftWrist_Goal', pressing 'm' for the 'Motion Options'. Since there are two possible bones I could attach the goal to, I select 'Deinon_LeftWrist_Rot' as the 'Goal Parent'. 
To see if you correctly set up IK bones, first press 'd' to bring up the 'Display Options' panel, and make sure  is checkmarked. is checkmarked.You should see a cyan line between the top of the topmost enabled IK bone passing to the bottom of the lowest enabled IK bone. 
Layout, CREATING NULL GOAL OBJECTS: REVIEW That was a lot to learn, so lets review... Bones can't be used as goals in LightWave, so you need to add what are called 'Null Objects' which will be used as goals for the IK chains to attempt moving to. After creating the null object, you make them children of the wrist bone if it's an arm, the heel bone if its a leg. WITH 'PARENT IN PLACE' TURNED OFF. This allows the goal to snap to the bone. To create a new goal, select from the 'Items' tab's drop-down menu choose Objects->Add NullI name the Null Object an appropriate name such as...  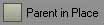 Press 'm' to bring up the 'Motion Options' window for 'LeftWrist_Goal. From the 'Motion Options' 'Parent Item' drop-down menu I select 'Deinon_LeftWrist_Trans' as the parent for the 'LeftWrist_Goal' Null Object. Because 'Parent in Place' is turned off, the LeftWrist_Goal' snaps to the position of 'Deinon_LeftWrist_Trans'. I create a second null object, call it 'RightWrist_Goal' and select 'Deinon_RightWrist_Trans to be its parent. I create a third null object, call it 'LeftAnkle_Goal' and select 'Deinon_LeftHeel to be its parent. I create a fourth null object, call it 'RightAnkle_Goal' and select 'Deinon_RightHeel to be its parent. But, I now see that the tail is missing a bone. I put a puller bone on the end of the tail, but I FAILED TO CREATE A BONE TO ATTACH THE GOAL TO. Luckily, bones were originally a thing you created in Layout. In the Schematic View, I point the mouse over the 'Deinon_Tail_Puller' box, right-click with my mouse and choose 'Clone'. I select one clone and it switches to 'Size'. A second box will appear, just below the move to the 'Deinon_Tail_Puller' box with a new name of 'Deinon_Tail_Puller (2)'. The original will now be called 'Deinon_Tail_Puller (1)'. I select the 'Deinon_Tail_Puller (2)' box, make sure that Y and Z axis on the 'Move' tool are active, then in the Right Viewport I move the new bone so that its head touches the old bone's tail.  I select 'Deinon_Tail_Puller (1)', press 'm' to bring up 'Motion Options', select 'Tail_Goal' as the IK chain's 'Goal Object. Layout, HIDING IK GOALS AND PULLERS Finally, I hide all goals and pullers as they are only used by IK, and I won't need to personally get at them. They'd only cause confusion. The way to hide many items is to press 'F1' to bring up the 'Scene Editor'. On the far right of the window is a symbol of an eye.  If an item has the ability to have a view type, such as 'Wireframe' or 'Solid', a graphic character will show inside each box. Bones only have a circle, as they only can be viewed in 'Wireframe' view type. If it's an object, not a bone, it gives you a menu. Select 'Hidden'.  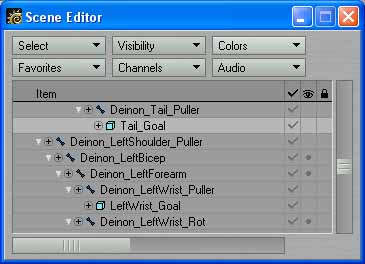
You still can't see IK work because you haven't yet turned on IK for the bones, but you're getting much closer. Be patient, because I'll soon be activating the IK chains. Layout, COLOR CODING THE SCHEMATIC VIEW I press the 'zero' key to turn it into only one viewport, '7' to display the 'Schematic' view type, and arrange the new goals in their proper places near the puller bones. While I'm there, I color code each of the boxes by right-clicking them and choosing 'Set Color'.  I choose red for all bones on the Deinon's right side and green for the ones on his left. I pick orange for puller bones and goals.  (The bones of his tongue?) If you can understand my schematic representation, then it'll greatly help when you're trying to select particular bones while animating. One advantage of coloring the bones red on the right side and green on the left becomes evident immediately. Which bones are associated with which side of the model has suddenly become far easier to discern.  Layout, RECORD PIVOT ROTATIONS & REST POSITIONS Now that all bones have been properly parented I can record all pivot rotations and rest positions for all bones. IMPORTANT - ALWAYS save your scene and bump the number before attempting to 'Record Pivot Rotations' or 'Record Rest Position'. It's far too easy to forget to turn on 'Auto Key'. If you ever forget to do this, you can't undo a 'Record Rest Position'. Your object might be twisted like a pretzel, and you have no recourse but to start over from whatever step you had last saved it. Let me show you how quickly things can go haywire if you forget to turn on the 'Auto Key' feature, or forget to create even one key after you've done a 'Record Pivot Rotation'. Realize that it will do the first one properly, because so far it's remembered the pivot rotation. However, on the second bone, it will suddenly forget the pivot rotation it just did on the first bone and will only remember the one for the second bone. In this particular case, I can do all of the tail bones without it looking too bad. However, by the time I reach the second bone from the top, his 'Deinon_LeftShin bone, Deinon suddenly gets turned inside-out. 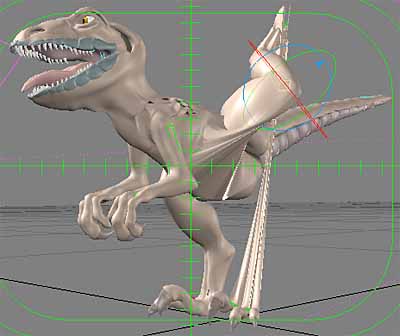 And, when I press 'u', it says it can't undo the last operation... nice. Moral of the story? Whenever you are about to attempt a 'Record Pivot Rotation', always save your scene first. ( Insert Mother's voice speaking... "Save, save, save" ). Luckily, I can revert back to before Deinon went through the transporter, but I couldn't if I hadn't saved it first. So, for each bone, starting at the tip of his tail and moving up, I first turn on the 'Auto Key' button, then press 'o' to ensure that 'Auto Key Create' is set to 'Modified Channels', as I outlined before. Then select 'Record Pivot Rotation' from the 'Pivot' drop-down menu of the 'Tools' section of the 'Items' tab. I then press 'r' for each bone after I've recorded the pivot rotation to record the rest position (meaning that for the polygons affected by that bone, all polygons are at their normal position when the bone is in this position). That's why you'll see a greatly stretched figure suddenly look correct the instant you press 'r'. That doesn't mean it will work right if the leg bones are all twisted into a pretzel, however. Layout, ACTIVATING IK CHAINS Next, I have to activate IK so LightWave will know which item should pull which chain towards which goal. I can start using the Schematic view that I built. I need to select the 'Deinon_RightWrist_Puller' so in the lower-right Schematic window I point to his right hand with my mouse, press 'g' to center his right hand in the view and press '>' to enlarge the hand until I can read the bone names. To better center the hand, I press 'ALT' while moving my mouse left and right. Once I find the wrist puller, I highlight it. 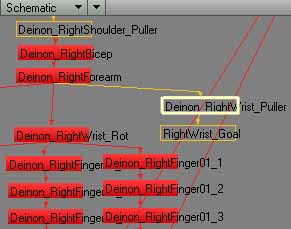 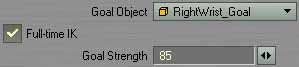 I do the same for 'Deinon_LeftWrist_Puller', 'Deinon_RightAnkle_Puller', 'Deinon_LeftAnkle_Puller' and 'Deinon_Tail_Puller'. If I've properly set the IK chains, cyan-colored lines should appear between the goal item and the item which was set as 'Unaffected by IK Chain'. In the case of the arms, that's between the wrist/hand junction and the shoulder point.  After you've activated IK chains, they should look like the arms, or legs, look - not the way that Deinon's tail looks. I can always turn off IK on his tail, though, using FK to move it. One thing about this image that you can't see... If you ever are grabbing screenshots ('Print Scrn' copies an image of the screen to the clipboard, 'ALT-Print Scrn' copies an image of the currently selected window to the clipboard), and the lights or camera lines start getting in the way of your shot, hide them using the 'Scene Editor' just as you've been hiding bones or objects. Layout, TURNING OFF MANUAL CONTROLS You might think that IK should now work on those bones, but there's one last thing to do. I must turn off the manual controls in each axes that I wish IK to control. There is a rule-of-thumb, with IK, that you let IK control only one or two axes. I start with his bicep bone by selecting 'Deinon_LeftBicep', then I press 'm' to bring up the 'Motion Options' requester. I select the  tab. tab.However, I'm already going to break the "Only two Controllers" rule. In the case of the bicep bone I choose 'Inverse Kinematics' for all THREE controllers. 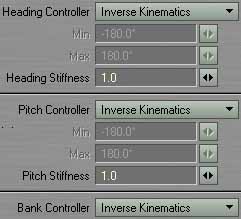 With a bicep, you'll get more realistic movement if you let IK control all three axes. I, next, choose the right forearm and set just the Heading controller to 'Inverse Kinematics'.  On his legs, I set 'Heading' and 'Pitch' of 'Deinon_LeftShin' to 'Inverse Kinematics'. I set just 'Heading' of his calf bone to 'Inverse Kinematics'. On his tail, I set the largest bone that's near the root to 'Heading' and 'Pitch' being controlled by 'Inverse Kinematics', but possibly just Heading on all three will work better. The other two end tail bones, I set to only 'Heading' being controlled by IK. Layout, DISABLING UNUSED CONTROLS I know that's a long sequence of things that you need to do before you see any coins drop from your slot machine, but it's worth it. The next step in creating a working IK/FK object is to disable any unused axis controls for Heading, Pitch and Bank. Just select each bone and goal object one at a time, then select three tools for each item...  , ,  and and  As you select the tool, for example, three controls will appear at the bottom left...  , ,  and and  When the buttons have a dark background with light letters, that means that tool is turned ON for that axis (like ).If you click the controls, they'll toggle to be light background and dark letters. This means that tool is turned OFF for that axis (like  ). ).In the same way, the tool has controls for Heading ( ), Pitch ( ), Pitch ( ) and Bank ( ) and Bank ( ). ).The tool is like the tool, having a control for , and What follows can be used as a guideline to help you decide which axis should be turned off for which bone for which tool. A symbol which is half-light and half-dark such as  means that you can decide whether to turn off that axis or not. I'd suggest turning off any where I gave you the choice until you understand how the controls affects bones, better. means that you can decide whether to turn off that axis or not. I'd suggest turning off any where I gave you the choice until you understand how the controls affects bones, better. |
||
| Key: | |
|
X Axis OFF: Y Axis OFF: Z Axis OFF: |
  |
|
X Axis ON: Y Axis ON: Z Axis ON: |
|
|
Heading Axis OFF: Pitch Axis OFF: Bank Axis OFF: |
   |
|
Heading Axis ON: Pitch Axis ON: Bank Axis ON: |
|
|
X Axis, Your Choice: Y Axis, Your Choice: Z Axis, Your Choice: |
  |
|
Heading Axis, Your Choice: Pitch Axis, Your Choice: Bank Axis, Your Choice: |
   |
|
Hide: |
 |
| BONE NAME |
|
|
|
HIDE |
| Deinon Object |
|
|
|
|
| Deinon_ArmAnchor |
|
|
|
|
| Deinon_Backbone |
|
|
|
|
| Deinon_BottomJaw |
|
|
|
|
| Deinon_Head |
|
|
|
|
| Deinon_JawAnchor |
|
|
|
|
| Deinon_LeftAnkle |
|
|
|
|
| Deinon_LeftAnkle_Puller |
|
|
|
|
| Deinon_LeftBicep |
|
|
|
|
| Deinon_LeftFinger01_1 |
|
|
|
|
| Deinon_LeftFinger01_2 |
|
|
|
|
| Deinon_LeftFinger01_3 |
|
|
|
|
| Deinon_LeftFinger01_4 |
|
|
|
|
| Deinon_LeftFinger02_1 |
|
|
|
|
| Deinon_LeftFinger02_2 |
|
|
|
|
| Deinon_LeftFinger02_3 |
|
|
|
|
| Deinon_LeftFinger02_4 |
|
|
|
|
| Deinon_LeftFinger03_1 |
|
|
|
|
| Deinon_LeftFinger03_2 |
|
|
|
|
| Deinon_LeftFinger03_3 |
|
|
|
|
| Deinon_LeftFinger03_4 |
|
|
|
|
| Deinon_LeftForearm |
|
|
|
|
| Deinon_LeftHeel |
|
|
|
|
| Deinon_LeftKnee_Puller |
|
|
|
|
| Deinon_LeftShin |
|
|
|
|
| Deinon_LeftShoulder |
|
|
|
|
| Deinon_LeftThigh |
|
|
|
|
| Deinon_LeftToe01_1 |
|
|
|
|
| Deinon_LeftToe01_2 |
|
|
|
|
| Deinon_LeftToe01_3 |
|
|
|
|
| Deinon_LeftToe02_1 |
|
|
|
|
| Deinon_LeftToe02_2 |
|
|
|
|
| Deinon_LeftToe02_3 |
|
|
|
|
| Deinon_LeftToe03_1 |
|
|
|
|
| Deinon_LeftToe03_2 |
|
|
|
|
| Deinon_LeftToe03_3 |
|
|
|
|
| Deinon_LeftWrist_Puller |
|
|
|
|
| Deinon_LeftWrist_Rot |
|
|
|
|
| Deinon_LeftWrist_Trans |
|
|
|
|
| Deinon_NeckPivot |
|
|
|
|
| Deinon_RightAnkle |
|
|
|
|
| Deinon_RightAnkle_Puller |
|
|
|
|
| Deinon_RightBicep |
|
|
|
|
| Deinon_RightFinger01_1 |
|
|
|
|
| Deinon_RightFinger01_2 |
|
|
|
|
| Deinon_RightFinger01_3 |
|
|
|
|
| Deinon_RightFinger01_4 |
|
|
|
|
| Deinon_RightFinger02_1 |
|
|
|
|
| Deinon_RightFinger02_2 |
|
|
|
|
| Deinon_RightFinger02_3 |
|
|
|
|
| Deinon_RightFinger02_4 |
|
|
|
|
| Deinon_RightFinger03_1 |
|
|
|
|
| Deinon_RightFinger03_2 |
|
|
|
|
| Deinon_RightFinger03_3 |
|
|
|
|
| Deinon_RightFinger03_4 |
|
|
|
|
| Deinon_RightForearm |
|
|
|
|
| Deinon_RightHeel |
|
|
|
|
| Deinon_RightKnee_Puller |
|
|
|
|
| Deinon_RightShin |
|
|
|
|
| Deinon_RightShoulder |
|
|
|
|
| Deinon_RightThigh |
|
|
|
|
| Deinon_RightToe01_1 |
|
|
|
|
| Deinon_RightToe01_2 |
|
|
|
|
| Deinon_RightToe01_3 |
|
|
|
|
| Deinon_RightToe02_1 |
|
|
|
|
| Deinon_RightToe02_2 |
|
|
|
|
| Deinon_RightToe02_3 |
|
|
|
|
| Deinon_RightToe03_1 |
|
|
|
|
| Deinon_RightToe03_2 |
|
|
|
|
| Deinon_RightToe03_3 |
|
|
|
|
| Deinon_RightWrist_Puller |
|
|
|
|
| Deinon_RightWrist_Rot |
|
|
|
|
| Deinon_RightWrist_Trans |
|
|
|
|
| Deinon_Root |
|
|
|
|
| Deinon_TailBone |
|
|
|
|
| Deinon_Tail_Puller |
|
|
|
|
| Deinon_Tail01 |
|
|
|
|
| Deinon_Tail02 |
|
|
|
|
| Deinon_Tail03 |
|
|
|
|
| Deinon_TailAnchor |
|
|
|
|
| Deinon_Tongue01 |
|
|
|
|
| Deinon_Tongue02 |
|
|
|
|
| Deinon_Tongue03 |
|
|
|
|
| Deinon_TopJaw |
|
|
|
|
| GOAL OBJECTS |
|
|
|
HIDE |
| LeftHeel_Goal |
|
|
|
|
| RightHeel_Goal |
|
|
|
|
| LeftWrist_Goal |
|
|
|
|
| RightWrist_Goal |
|
|
|
|
| Tail_Goal |
|
|
|
|
