
|
|
||
|
30. A Human Skull - Modeling the Jaw 2 |
||
 MODELER, JOINING THE TOP AND BOTTOM EDGES Load 'SkullTutorial7.lwo'. Do a 'File->Save Object As...' and bump the number by one to 'SkullTutorial8.lwo'. Load the Backdrop preset images. Make sure SubSurface mode is turned off and 'Polygon Select' mode is turned on (CTRL-h). In the perspective window, arrange so you can see the gap between the inner and outer jaw surfaces. Create polygons between the corresponding locations on each jaw by clockwise selection and pressing 'p'. 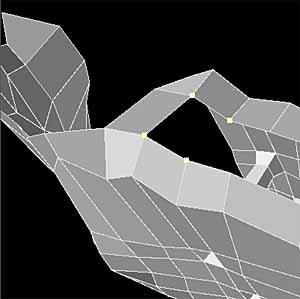 You'll either have to hide the polygons on the bottom and sides of the jaw, or be very careful which points you select as it is easy to select a point deep within the jaw as it is to select the points along the edge. If you don't hide the polygons (I didn't), turning the object so the points you wish to select have plain space behind them. Press TAB to see the progress. This is the view from the top of the point which comes up through the skull's eyesocket looking down towards the chin.  I had originally turned on 'Double-Sided' to see the inside of the other side of the jaw. Now I must press CTRL-F3 to bring up the 'Surface Editor', select the Surface Name 'Jaw' and turn it off. I must flip all inside jaw polygons that are backward. Select all jaw polygons, press 'q' to bring up the 'Change Surface' requester, and choose 'Jaw' to add all new polygons to the 'Jaw' Surface Name. I'll now build the inside of the front of the jaw. I highlight the polygons at the front-end of the jaw up to where it is double-width. 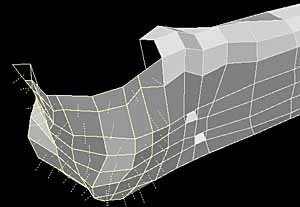 I copy them to the clipboard with 'c', choose a spare Layer, paste with 'v'. I select the top diagonal for the new Layer I just pasted into and the bottom diagonal of the Layer control for the layer containing the jaw which will appear as black lines. I check to make sure that I'm in the 'Wireframe' view type. tI press 't' to move them and in the 'Top' viewport, move them towards the back of the jaw. I use a tool we haven't used yet, 'Stretch' to scale it in only the X and Z axis. I press only the 'h' key (not SHIFT-h as we've been doing to size things) to select the tool. In the 'Top viewport I drag until it's about half as wide, and do the same thing with the height (depth). I press 't' to move it and I alternate between 'h' to 'Stretch' it and 't' to move it until it is the right width and depth. 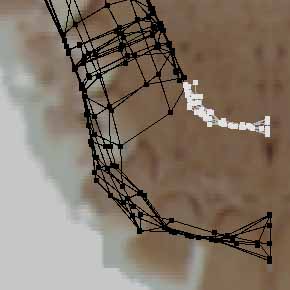 I select all polygons in the inner jaw piece I just pasted, pressing 'f' to flip them. I cut it to the clipboard with 'x', return to the layer with the jaw in it (Layer 3), and paste with 'v'. I select the row of points on the inside of the front of the jaw that are closest to the zero X axis.  I press 'i' to bring up the 'Point Info' requester. I enter zero for the X value and press 'OK'. I turn 'Symmetry' mode on to keep those points on the Zero X axis, hilight one polygon of that new piece, ']' to select connected polygons. I press 't' for the 'Move' tool. In the 'Perspective' viewport I move it up-and-down/sideways until all lines match.  I zoom in with the '.' key. I highlight pairs of points, welding (CTRL-w) the seam.  I select the points along the two top edges so they will be the only ones which will move, pressing CTRL-t to enter 'Drag' mode. I rotate the jaw so I'm looking straight down onto it and adjust the two sets of points so they point towards each other and are properly corresponding.  I highlight the polygons in groups of four, pressing 'p' to create the polygons. I flip them if necessary.  I highlight all points that should be on the zero X axis.  I press 'i' and enter zero for the X axis value. I want to see how it's coming, so I press SHIFT-v for Mirror' mode, 'n' for the numeric requester, and close the numeric requester.  Not bad for not having detailed it at all, yet. I press 'u' to undo the mirror and 's' to save it. I am now going to match up the 'Right' viewport image with the outline of the SubSurfaced jaw. I turn on SubSurface mode, and press 'd' to bring up the 'Display Options' requester. I choose 'Backdrop' tab and set the 'Brightness' and 'Contrast' controls to extremely dark.  I make sure I am in 'Wireframe' view type in the 'Right' viewport and press CTRL-t to enter the 'Drag' tool. MODELER, MATCHING THE SILOUETTE I zoom in with the '.' key, and adjust the white dots until the while indicator lines match up with the contours. 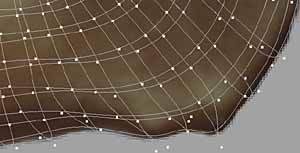 I start working on smaller details now. I change the Surface Color of the 'Jaw' to turquoise so the glare is gone. Since the foramen holes on the jaw actually point down, they don't go straight into the jaw, I reform them from both inside and outside the jaw. I also round off the corners at the front of the jaw so it feels more natural.  MODELER, THE BOTTOM TEETH Basically, you can steal the top teeth, modifying them. The bottom teeth are very similar to the teeth just above them, but smaller in the front and about the same size in the back. The unexpected thing is that you will have to copy the teeth on the other side of the head (the skull's right side) whereas this jaw is the left side of the skull's head. I highight at least a few polygons of each upper-tooth on the skull's right side. I enter 'Polygon Select' mode with CTRL-h, press ']' to 'Select Connected', press 'c' to copy them to the clipboard, choose a vacant layer, paste them with 'v'. First I will have to rotate them upside-down by approximately 180 degrees in the 'Right' viewport so I press 'y' (Rotate), point it at the center of the teeth, and move the mouse sideways until the teeth have flipped upside down.  They need to be flipped 180 degrees in the 'Top' view as well. I press 'y', point to the center of the teeth in the 'Top' view and flip them. I press 't' to 'Move' them where they should be, and alternate between 'y' to rotate to better angles and 't' to nudge it.  I go to the 'Back' viewport and judge the left/right position better as well as the 'up/down' position. I'll be manipulating each tooth separately anyway, but this should get them close enough to see what it will look like.  I CTRL-v (Mirror) both the teeth and the chin to see what it will look like. I am almost ready to abandon the reference images. The bottom teeth need to be dropped down, the whole skull is too narrow in the X direction, the jaw will need to be moved up, and this will mean the images will become useless to me. I rotate it to three different angles, and construct a composite of them using Photoshop layers.  I save it by pressing 's'. Next, the back of the jaw has a platform on which it hinges. I select the four points on the outside, at the top of the back projection and I turn it sideways. I press 't' to move the points, pulling them away from the head in the direction of the red arrow. I select the four on the other side and pull them a tiny bit, flattening the top and round the back of the platform's edge where it wears against the upper bone.  Now, I create the platform on which this platform pivots. I can't explain the intricacy of this pivot, nor have I ever seen anybody actually create a 3D version of it. But I will do a simplified version of it, as well as the ear hole. The red boxlike shape is what the shape of the current end looks like when not subsurfaced. It has no bottom at the moment, and is basically just a box with no bottom and no back side on the last polygon.  I have drawn a red line, and a tentative red dotted line, to indicate where it has to attach to the head. It has to curve coming off the head in a slope, forming a platform, then it has to round into a socket which fits around the rounded top of the jaw's round-backed platform. The ear hole is right behind the jaw joint and has a round ball of bone on the bottom of the skull. As usual, with very difficult parts of an object, take it a piece at a time. First, lets delete the four polygons in the head area ('k' key which stands for 'Kill Polygons'), leaving the points behind, and think how I'll form that slope. (I also kill the polygons on both sides of those four polygons). I'll hide most of the rest of the skull as I work on it so I can get at either side. I choose 'Wireframe' as the view type. I add three sets of curved points which will intersect with the head curve and have already integrated with one point of the head. The orange lines are where I bent the hidden back polygons upward in order to start the curve which connects to the skull. The red lines are exactly equivalent to the last image.  I create 4-sided polygons with these points as all these last tutorials have done and flip any that are backwards. I switch from 'Wireframe' view type to 'Wireframe Shade' so I can see the planes and am surprised to find that the new polygons are the jaw's color, so LightWave got confused somewhere. It'll help me see the new polygons, though, so I'll add those polygons to the 'Skull' Surface Name after I'm done (which will automatically remove them from the 'Jaw' Surface Name's definition). I highlight these three points to extend the platform toward me for those two polygons.  I click 'Extender', then the 't' key to move them toward me, swiveling the Perspective view to a top view so I can pull them. I delete the junk polygon it creates. I highlight two points I'll need to weld. I'll also need to weld the two points just below those two.  It looks like I might be able to bond all of those tapering polygons into one point. It doesn't matter if it puckers there. I highlight all of those points.  I press CTRL-w to weld them all together. To create the socket, I make a shape that looks like a little wing just under and to the left of where I just bonded those points together. 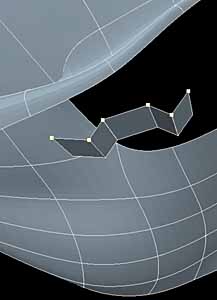 I highlight the six points and do an 'Extender' on them, pulling the polygons upward. I do the same on the opposing side of the wing. I delete the two junk polygons that it creates and flip any backward polys. I highlight points along the edge, 'Extend' them sideways like airplane wings. I do the same with all of the points on both ends, extending them to the right and left. I enter SubSurface mode and start to sculpt it into the proper shape. When I'm done, it's a very intricate shape. I will copy it to another layer so you can see it, both not subsurfaced, and subsurfaced.  Now, I just have to figure how to bond this shape to the upper shape. I highlight these three points, selecting the middle one last so they will bond to it when I weld them. 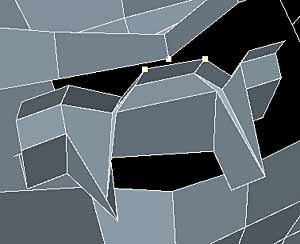 I press CTRL-w to weld them. I do the same to the three on the left side, selecting the middle one last.  And, I do the same with the three on the right side. I resort to a very inelegant method for getting rid of the problem of what to do with the loose ends at the right hand side, I create many triangles, bonding them all to that same tie point. Ouch. Talk about a copout.  But, in a case like this it seems to work well enough. Nobody will be looking here anyway, but it gives it more realism with little expenditure.  Now, I must do the hard part, tie up the rest of the junk that's left unattached. I hide most of the skull again, so I can get in from the back. I should be able to better understand what needs to be done from there. I would hate to lose all that, so I do a save with an 's', then a 'File->Object Save As...' and bump the number to 'SkullTutorial9.lwo' to keep working on it. If you wondered where I got all that from, it was all from the image.  Can I curl around a circle to create the ear inside that open spot? Lets try that next, something simple though. I'm going to start it on a blank Layer so I go to Layer 4 and use the image to build the opening. I create a simple version of the ear hole and push the hole down and around in the 'Perspective' viewport.  I select the five points inside the earhole and do 'Extender' and 't' to pull it deep into the head.  And, through the use of many many triangles, I patch this ear into the rest of the model. In that manner I finish the ear in a very inelegant and down-and-dirty way. I'm tired, and that's how it goes when you're tired. In the real world you will have to give up things, and settle more times than you will find a pure mathematical formula for the part. In this particular case, it isn't an important feature and this fakes it well enough anyway. It gives it a bit more realism. The jaw pivot was the more important part here.  Sometime in the future when I have more time, I'll work on that area. With 3D Sculpture, you're never really ever truly finished. Click for a Rotating 3D Version of the skull done using the Blaxxun3D Applet |
||
