
|
|
||
|
37.1 Cartoons - Leroy the Hawk, Animation 1 |
||
 MODELER, SKELEGONS FOR LEROY So far, you've learned about skelegons, you've learned how to assemble skelegons, you've learned the basics of creating weight maps - yet you still haven't actually animated a figure. If you got through all of those tutorials, you now hold nearly every skill you'll need in order to effect a walking or flying bird. So, lets get started. Load the last version of 'Leroy_XX.lwo', do a 'File->Save Object As...' and bump the number by one (In my case I bump it to 'Leroy_13.lwo). I have to determine how the skelegon structure will be placed. I choose  from the 'Elements' section of the 'Create' tab. from the 'Elements' section of the 'Create' tab.MODELER, UPPER-BEAK SKELEGON First, I will place a skelegon for the upper beak. I click in the middle of the head, drawing a skelegon toward the beak. I press 'n' to bring up the 'Draw Skelegon's requester. I name it 'UpperBeak' and turn on 'Add Weight Map' and call it 'UpperBeak'. I press the space bar to complete the skelegon. At the moment there will only be the one skelegon I'll be working on. I would like it to start out perfectly straight relative to the Z axis with no rotation in any direction. You'd think it would place the skelegon with no rotation angle, but it is a bit tipped to the side when you look at it in the 'Back' viewport, and the beginning and end points don't line up. I press 'y' and TRY to rotate it so it is flat. Rotating a skelegon sideways is easy, rotating it end-on is nearly impossible. Remember, though, that the beginning and end points of a skelegon are just regular points, so I can enter 'Select Points' mode with CTRL-g, I can select both points, and I can press 'i' to bring up the 'Point Info' requester. I enter zero as the value for the X value and they snap to the centerline. To make the skelegon be perfectly flat relative to the Z axis, I deselect one point, again press 'i' to bring up the 'Point Info' requester, copy the Z axis value to the clipboard (946.5726 mm). I then turn on both points, press 'i' to bring up the 'Point Info' requester, and enter 946.5726 mm for both points.  I rotate the 'Bank Rotation Handle' to point perfectly upward.  I position the skelegon in the 'Right' viewport by pressing 't', moving it up and down until it's in the position I wish. I ensure it didn't move from the X axis by returning to 'Select Points' mode with CTRL-g, and press 'i' to check the X axis for the two points.  MODELER, BOTTOM BEAK SKELEGON I make sure the skelegon is selected, then I press 'c' to copy it to the clipboard and 'v' to paste it. I press 't' to move the cloned skelegon and in the 'Right' viewport I move it down just enough so I can see the two points. I enter 'Select Points' mode with CTRL-g. I select the nose-end point of the new skelegon and press then press 'i' to bring up the 'Point Info' requester. I am going to fiddle with the Y value manually. That way I won't disturb the rotation of the skelegon, and I will angle the nose-end of the skelegon downward. It's initial starting Y value is 935.0726 mm. When I put in a value less than 935, the point drops downwards in the 'Back' viewport. To see approximately how far down it will have to go, I deselect that point, selecting a point in the bottom jaw about at the position I'll want the tip of the skelegon to be placed, then press 'i' again to bring up the 'Point Info' for that point.   I guess, and place -540 mm for the Z value to move the end of the skelegon from the edge of the bottom beak a little, which looks right. I do the same thing for the back of the skelegon, selecting a point about where I want the back of the skelegon to go. This time, only the Y value is important. That way the skelegon which will join the two will be perfectly vertical between the two points. 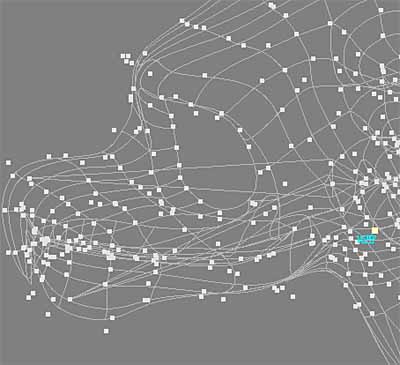  MODELER, BEAK ANCHOR SKELEGON Next, I'll create a third skelegon which will join the back points of these two jaw skelegons. This will act as a hinge anchor for them. I choose from the 'Elements' section of the 'Create' tab and draw a skelegon in the 'Right' viewport that's a little away from the other two skelegons so I can see the end points.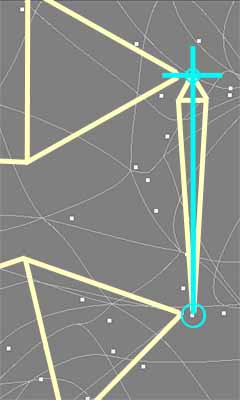 This could never happen in the real world. I've done it so you could see the relationships better. I press 'n' to bring up the 'Draw Skelegon' requester, change the name to 'BeakAnchor', click 'Fill Weight Map' and do the same with the Weight Map name. 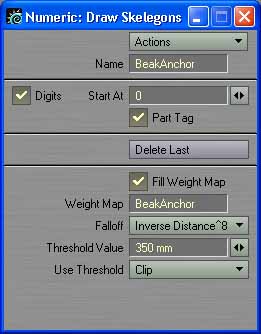 I press CTRL-w to weld the two skelegons together. You'd think that the skelegons should be perfect, correct? Let me show you something that sometimes throws people. Look at the bottom jaw skelegon in the 'Back' viewport. 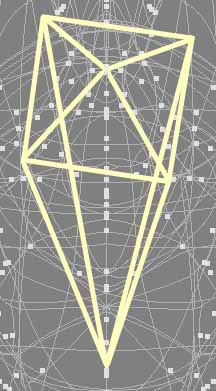 So, when skelegons are drawn, then are oftentimes visibly rotated from norm. The drawing of the skelegon tends to twist. And, so far, I've found no easy way of getting the drawing of the skelegon to be straight. Lets try doing it the 'proper' way, then. Maybe it was because I was moving it numerically? I delete the bottom skelegon, and draw it using 'Draw Skelegons' rather than cloning it. I select the skelegon and press DELETE, I choose from the 'Elements' section of the 'Create' tab and draw a skelegon in the 'Right' viewport. I press 'n', give it the name 'BottomBeak', click 'Fill Weight Map', change the weight map name to 'BottomBeak'.And, immediately, the newly drawn skelegon is twisted exactly the same amount as the one I had done numerically.  This can bother people. However, let me tell you a secret... IMPORTANT - Don't worry about the apparent visible twist of skelegons when you're drawing them. The important thing is the 'Bank Rotation Handle, not the visible look of the skelegon. The 'Bank Rotation Handle' is what determines the zero twist angle of a skelegon, not the way it looks in the viewport in Modeler. It is now the end of this test, I will now stop yanking your chain, if this had been an actual emergency you would have been informed of which radio station to tune in to... I choose 'Edit Skelegons' from the 'Other' section of the 'Detail' tab. I rotate the 'Bank Rotation Handle' from pointing to the right in the 'Back' viewport until it points upward. This will orient the pitch properly for the beak (as detailed in Chapter 13 on Skelegons and Chapter 14 on Bones)   MODELER, WEIGHT MAP NAMES I select each of the three Weight Map names, one-by-one from the Weight Drop-down menu at the bottom left of the window.   from the 'General' section of the 'Map' tab. from the 'General' section of the 'Map' tab.I do this three times, changing the weight map names to TopBeak, BottomBeak and 'BeakAnchor'.  I choose  from the 'Other' section of the 'Detail' tab. from the 'Other' section of the 'Detail' tab.I change both the skelegon names and associated weight map names to match the 'Weight Map' names I just created.  MODELER, HEAD SKELEGON I'll want Leroy to turn his head up/down/left/right so I'll create a bone for that. I choose from the 'Elements' section of the 'Create' tab.I draw a skelegon in the 'Right' viewport clicking the first time to the right just where the neck would meet, and click the second time close to the top of the two 'BeakAnchor' skelegon points.  When I close the requester, 'Head01' appears in the Weight Map menu. Using I change the Weight Map name to 'Head'.I enter 'Select Points' mode with CTRL-g, selecting the point on the 'Head' skelegon, then the rightmost point of the juncture of the 'UpperBeak' and 'BeakAnchor' skelegons and CTRL-w (weld) them together. I change the skelegon and associated weight map names to 'Head'.I select the 'Head' skelegon, choose  from the 'Other' section of the 'Detail' tab and point the 'Bank Rotation Handle' upward in the 'Back' viewport. from the 'Other' section of the 'Detail' tab and point the 'Bank Rotation Handle' upward in the 'Back' viewport. I'm sure that you noticed by now that if you have a skelegon selected, and you choose , it continues the skelegon chain from that skelegon.If you don't want that, deselect all skelegons before you click .MODELER, NECKPIVOT SKELEGON Since the neck curves, I'm going to create a worthless bone to get around that curve in the neck. I'll call it 'Neck Pivot'. I press 'n' for the numeric requester, call it 'NeckPivot', click 'Fill Weight Map', call it 'NeckPivot' and it creates 'NeckPivot01'.  MODELER, WINGANCHOR, BACK AND TAIL SKELEGONS I don't exit from the mode, but draw another skelegon. If I were to do an 'n' to try and change it to 'WingAnchor', the first skelegon I created would be changed to WingAnchor01'. This second one would be called 'WingAnchor02', but the first one would be wrong. IMPORTANT - Doing 'n' and modifying the skelegon/weight map names affects the whole chain that you're currently doing. I'll change the names later. I still don't exit from the mode, but draw a third skelegon that I'll later call 'Back' and a fourth that I will call 'Tail'. Using , I change 'NeckPivot01' to 'NeckPivot', 'NeckPivot02' to 'WingAnchor', 'NeckPivot03' to 'Back and 'NeckPivot04' to 'Tail'Using , I change the skelegon and associated weight map names to correspond.MODELER, LABELING SKELEGON & WEIGHT MAPS Before I go to far, I decide to tack on 'Leroy_' before each skelegon and weight map name. That underline is called an 'Underscore' and is found by shifting and pressing the '-' key. Changing the names so each name begins with 'Leroy_' will make it easier to tell what skelegon goes with which object once I'm in the Layout program.   MODELER, USING SPLIT SKELEGON TO CREATE LEGANCHOR AND TAILANCHOR When I think of how I'll attach the wings and legs to these skelegons, I suddenly realize I haven't created an anchor point for the legs. I press CTRL-h to enter 'Select Polygons' mode, selecting the 'Back' skelegon. I select  from the 'Subdivide' section of the 'Construct' tab. from the 'Subdivide' section of the 'Construct' tab.This splits the one skelegon into two equal skelegons.   from the 'Other' section of the 'Detail' tab. from the 'Other' section of the 'Detail' tab.I change the 'Leroy_Back' to 'Leroy_LegAnchor'. I select the lower of the two and again click I change 'Leroy_Back' to 'Leroy_TailAnchor'. Notice that when you split a skelegon, both skelegons still retain the exact same old skelegon name so make sure you remember to change those names. Now, I'll need two weight maps for each of these two skelegons. I can rename the 'Weight Map' called 'Leroy_Back' for the top one, but I'll have to create another weight map for the 'Leroy_TailAnchor' skelegon. Since there are no actual weight maps yet, I can just select 'Leroy_TailAnchor' from the drop-down menu (after changing the old 'Leroy_Back' weight map to it). Now, I click  from the 'General' section of the 'Map' tab. from the 'General' section of the 'Map' tab.I change the new 'Leroy_TailAnchor 1' name to 'Leroy_LegAnchor'. 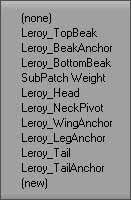 to fix the names, there. to fix the names, there. I enter 'Select Polygons' mode with CTRL-h and select 'Leroy_NeckPivot' skelegon. I select and readjust the skelegon circle in the center of the newly split skelegons so it's positioned in the center of where the legs will join.I turn each of the four spine 'Bank Rotation Handles' upward so their pitch will rotate properly for each of these skelegons. With these four skelegons, their pitch will rotate in a circle if you were looking into the 'Right' viewport if you arrange the bank rotation handles in this manner and do a 'Record Pivot Rotations' on them when you enter Layout.  MODELER, LEROY'S ARM SKELEGONS I again choose from the 'Elements' section of the 'Create' tab.I click the first time in the 'Back' viewport starting where the arm pivot skelegon meets the leg pivot skelegon. I finish off the first skelegon by clicking where Leroy's elbow will be. I press 'n', call the skelegon 'Arm', click the 'Fill Weight Map' checkmark, calling the Weight Map 'Arm'.  I click at the 'wrist' and the last time at the tip of the 'thumb', then I go to the 'Top' viewport, adjust the positioning of all skelegon circles, finishing in the 'Perspective' viewport where I position the 'Bank Rotation Handles' to point in the directions I wish the pitch to go for each skelegon.  Thus, the shoulder pitch will move the arm up and down like a wing flapping, the elbow pitch will move the 'forearm' forward and back (relative to the way you're seeing it now), the thumb pitch will also make the thumb go up and down (like the wing-flapping). VERY IMPORTANT - The direction the Bank Rotation Handle points will indicate the PLANE THAT THE PITCH ROTATES IN. I have seen so many chatrooms filled with people trying to understand bank handle rotation angles. They all know that they 'somehow' control 'something', but the LightWave manual is so horrible in this respect that few people end up figuring it out. So, understand it, get it in your brain, and never let it go. MODELER, LEROY'S FINGER FEATHER SKELEGONS I again create a new skelegon chain, calling it 'Fingers', create weight maps for each finger, and treat them as if they were human fingers. I turn all bank rotation handles to point upward. This is where you see just how unruly bank rotation handles can be when you try rotating them to a particular angle. 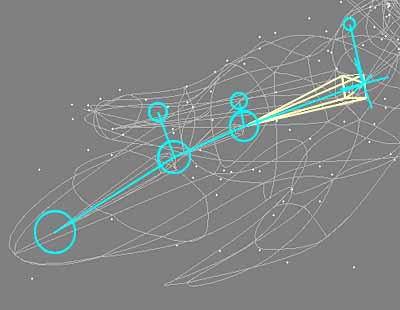 I press CTRL-h to enter 'Select Polygons' mode, selecting each skelegon one at a time, then pressing 'Rename Skelegon' from the 'Other' section of the 'Detail' tab. I name the skelegons, 'Leroy_LeftBicep', 'Leroy_LeftForearm', 'Leroy_LeftThumb', 'Leroy_LeftBigFinger01', 'Leroy_LeftBigFinger02' and 'Leroy_LeftBigFinger03'. I could have used 'Skelegon Tree' to do that, but I can ensure that I'm naming the correct skelegon this way. I now can select 'Skelegon Tree' to rename the weight maps so the names match. Next, I select each weight map name from the 'Weight Map' drop-down menu and rename each map name as I've done in the past. 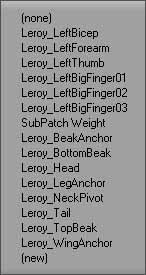 If you do get strange skelegons, import the object into Layout program, then highlight the strange skelegon by picking that bone name to see where it's hiding. You might have to move skelegons out of the way in Modeler once you see where it's hiding to be able to select, and delete it. MODELER, LEROY'S RIGHT ARM I select all skelegons in the arm chain, mirroring it. I name the new skelegons with the word 'Right' instead of 'Left'. I do a 'Skelegon Tree' and change all associated weight map names to equal the skelegon names. 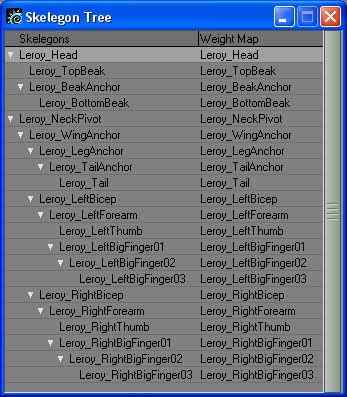 I do that by selecting 'Leroy_LeftBicep' from the 'Weight Map' drop-down menu, clicking on 'Copy Map' from the 'General' section of the 'Map' tab. I rename 'Leroy_LeftBicep 1' to 'Leroy_RightBicep'. I do this with each 'Left' map, creating a corresponding 'Right' for each. 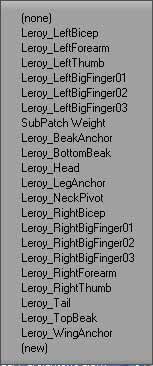 MODELER, LEROY'S LEGS I won't make separate bones for each segment of each toe, I'll just create one skelegon for each toe. So, in the same manner I did the left wing, I do his left leg. I create skelegons and weight maps called 'Leroy_LeftHip', 'Leroy_LeftThigh', 'Leroy_LeftShin', 'Leroy_LeftBackToe', 'Leroy_LeftToe01', 'Leroy_LeftToe02' and 'Leroy_LeftToe03' (with Toe01 being the toe closest to the center of the body and Toe03 being the one furthest from the center of the body). I mirror those skelegons, creating 'Leroy_RightHip', 'Leroy_RightThigh', 'Leroy_RightShin', 'Leroy_RightBackToe', 'Leroy_RightToe01', 'Leroy_RightToe02' and 'Leroy_RightToe03'.   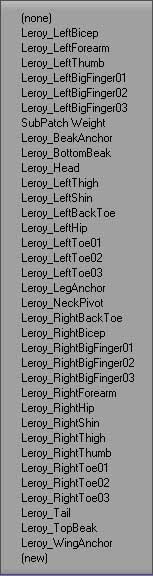 I bump the number for both the Leroy object and scene | ||
