This project started when I wanted to copy Harrison's "All Things Must Pass"
to CD from the LP, which is a three record set. CD-R's are well suited to this, as they
will hold 80 min or so of music. Making a recording from a LP can be as simple as using
MusicMatch Jukebox to record one song at a
time, setting up a songlist, and burning it to disk with the same program. However, it is
more practical to record an entire album side as one track, then split it up later. Also, you
may wish to remove any pops and scratches that the LP has acquired with use. All
this is possible, and not difficult, however it is time consuming. The quality of
the resulting CD will be very good, but in most cased will not match that of digitally
remastered releases. If you have more time than money, and are up for a little do-it-yourself,
here are the basic steps:
All you really need for tools, are a recording, editing, and burning program.
Some programs will do all three chores, or you can use several programs. I have found
Polderbits to be an excellent recorder and sound
editor that is simple to use. For cleaning up scratches and pops,
Depopper is the best and easiest
program I have found. Both have full function free trials, and are inexpensive. Any CD burning
software will do. Currently, I am using Nero Burning ROM. For the purpose of this tutorial, these are the
programs I will use. The steps will be similar no matter which software you use.
There are many other recording and editing programs available. For a discussion
of them, click Here
Connections:
The first step in making a CD from a LP is to record the LP to your hard drive.
To do this, you must connect the output of your turntable to the input of the
computer's sound card.
The signal
from your turntable needs to be preamplified, so it can't be plugged directly into your
computer. Ideally, you will run a patch cord from the 'line out' or 'tape out' on
your stereo, to the stereo 'line in' on your computer's sound card. In a pinch, the
headphone output can be used, but it may be harder to get a good recording level.
The exact type of patch cord you need will depend on the configuration of your stereo's output, and
your sound card's input. Typically, your sound card will use a 1/8" stereo mini-plug.
The plugs needed for the output from your stereo will vary. When you have the turntable
connected to the computer, you can proceed to the recording section.
Click
Recording:
Before you actually start recording, It is a good idea to clean the dust off your LP. Also, turn off
any unnecessary programs that might be running in the background on your computer. Even
something as benign as a screensaver kicking in can cause a hiccup in your recording.
Ok....so fire up your recording program. I will be using
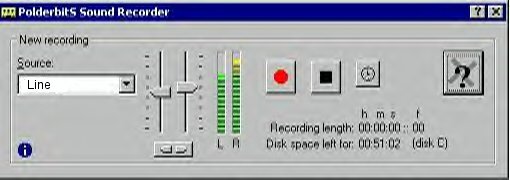
Polderbits. The first thing you must do is select the input source and set the volume levels.
The input source will be 'Line'. If you start playing the LP, you should see some activity
on the level meters.
The idea here is to get as strong a signal as possible without 'clipping'. Some programs
(like Polderbits)
include level meters and volume controls. Other programs require you to open your sound
card's mixer console to set levels. Monitor the LP to get a representative sample of the
loudest passages, and set your volume so that the level meters stay mostly in the green,
and always out of the red.
Once you have your levels where you want them, you are ready to record.
Now at this point, you could record each song seperately. This involves starting
and stopping your recorder and turntable between each song, and naming and saving the file.
I find it easier to record the entire LP then split it up later using Polderbit's sound editor.
Why bother to split the tracks at all? Well if you were to record one whole side
of an album, then burn that directly to a CD, There
would be no easy way of locating the individual songs......Track 1, Track 2, etc. The CD would
just have one long Track1.
Are we ready to record? Press the red 'Record' button and start playing the LP. When the LP is
finished, press the black 'Stop' button. This will cause the recording to end, and the
sound editor to open.
[
Editing:
If you have chosen to split your recording into tracks, now is the time to do it.
The method will depend on which program you are using. Some, like
Dart CD Recorder
and Audio Companion have an auto-split
feature that looks for silences between songs. You set the parameters of how long
a silence,
and what threshold to search for.
Polderbits has an auto-split feature, but also allows manual adjustments
to the splits.
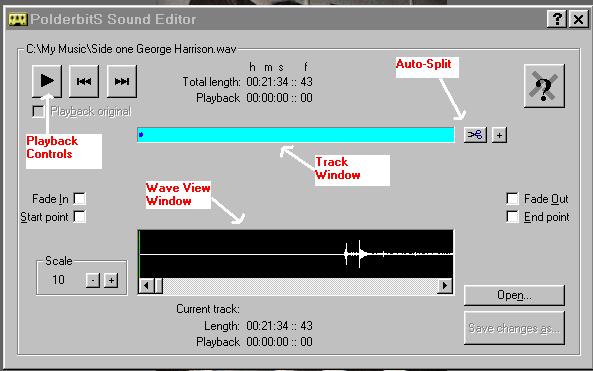
To auto-split your tracks with the Polderbits Editor, simply press the 'scissors'
button. Below, you can see the tracks in the upper window, and a graphic of the sound
waves in the lower window. Use the playback controls in the upper left to preview
the splits. By dragging the green and red index lines in the wave window, the start and
end points
can be adjusted, and fade in and out can be set if desired. Also, just to the left of
the green index line, you may notice a small spike in
the wave. This is a pop. This can be edited out.

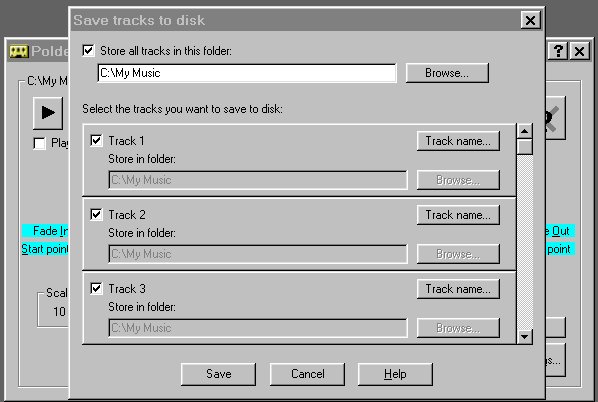
When all the tracks are split as you want them, you can 'Save Changes As...' This
will bring
up the dialog window shown below. In this window, you can name the tracks, designate
where you want them saved, and uncheck any you don't wish to save. Save and exit.
At this point, you could burn to disk, but if there are any scratches and pops
in your recording, you might wish to clean them up.
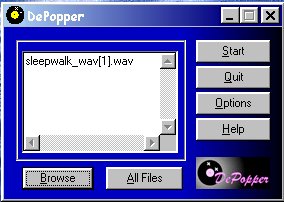
Depopper is the program I
prefer to use for this task, To use Depopper, simply browse to find your song files,
choose your options (big pops, little pops etc.) push start and go grab a
cup of joe. When the program is done, you will have two files...your original,
and a clean one marked 'new'. Play the new files. Make sure there are no
hiccups, and they are of acceptable quality. Now you are ready to burn to disk.
UPDATE: While Depopper is still the weapon of choice for simple depopping, I have found the noise filters in CoolEditPro to be superior. The difference is especially clear on poor, badly scratched recordings. CoolEdit is not as easy to use,but has more options and can give a better result. It is also considerably more expensive. Click HERE to download a comparison of some sample clips processed with each program. (360kb)
Write to CD-R:
So now you have recorded the songs, split them into tracks, and cleaned them up.
You can now use your favorite program to write them to a CD-R. At this point, you also have
two options.
- Audio CD: If you plan to play this CD on most home and car stereos, boomboxes,
and computers, chose this option. Be sure to use
CD-R not CD-RW media.
- Data CD You may prefer to convert your music to MP3 format. This will typically
reduce the file size by about 10:1. These files can be played on your computer,
and some stereo equipment designed for this format. Either CD-R or CD-RW
media should work.
It doesn't really
matter which program you use to burn the CD. Just compile a song list in the order
you want,
and get ready to enjoy those old tunes for years to come.
[What are Mp3 & .Wav?
What is a .wav file?
When sound is recorded, it is represented electronicly as waves.
In order to store this sound on your computer, these waves must be converted
to a digital format. This is done by 'sampling' the waves many times
per second. The data from this wave sampling is stored in your computer as
a .wav file.
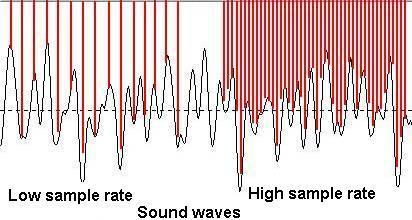
In the graphic to the left, the red lines represent samples being
taken of a wave. It can be seen that more frequent sampling will give
a more accurate representation of the wave. In fact CD quality sampling is
done 44,100 times per second. Each one of those 'samples' is 2 bytes in
size (16 bits). For stereo music, the left and right channels must both
be sampled. If you do the math, (44100 x 2 x 2 x 60) you will find that
one minute of music, sampled at CD quality will make a file
about 10 MB in size! With the average song being 3 min. long,
.wav files have a voracious appetite for hard drive space. Files this large
are also difficult to transfer over the internet. If the rate of sampling is
lowered, the file size can be reduced at the expense of lower quality
sound. (In the graphic, you can see that the lower sample rate misses
some of the variations in the wave.) MP3 was developed as a form of
compression which will reduce the size of .wav files, with
minimal loss of quality.
What is MP3?
MP3, or MPEG layer 3, has become a popular format for reducing the
size of audio files. Most of the music available for download off the internet
is found in this format. The reduction in file size is accomplished
partly by compression, elimination of inaudible data, and the encoding of
duplicate data.
Mp3 encoding programs analyze the music, and throw out any data that is
above or below the range of the human ear. They also look for quiet sounds
that are drowned out during loud passages, and discard them.
Also, if there is duplicate data in both left and right channels, data from one
channel can be discarded and reconstructed on playback. The result is an audio file that sounds the same,
but is not identical to the original. MP3 can be encoded at different
bitrates, measured in kilobits per second (kbps). Music encoded at
either 128 or 160 kbps will generally be of good quality.
Since MP3 is a lossy format, I prefer to burn my CD's from the original
.wav file before converting to MP3.
[