Click HERE for LP to CD Tutorial.
Table of Contents
- What are the basic steps in creating a music CD?
- How do I create a CD from songs I have downloaded?
- How do I create a music CD from multiple sources?
- How do I connect a tape or LP player to my computer?
- What are MP3 & .wav anyhow?
-
What are the basic steps in making a music CD?
There are several basic steps in compiling an audio CD. In the most general sense, one must:- Make the songs available to your CD burner. This would involve either placing a source disk in your computer's CD-ROM drive, or copying the songs to your hard drive.
- Next, the songs should be converted to an appropriate format. Mp3 format will not play in most home or car stereo systems, and should be converted to .wav format.
- Follow the instructions in your burn program to create an audio CD.
- Burn it!
-
How do I create a CD from songs I have downloaded?
Uncompressed music files can get quite large, and are not practical to transfer via the web, or store on a hard drive. For this reason, most songs that you have downloaded will be in mp3 format. While mp3 is playable on your computer, it will not work in most home and car stereo systems. Because of this, it is necessary to convert your mp3's to .wav format. Many burn programs will do this 'on the fly' (during the burn) but it is preferable to do the converting first, assuming you have sufficient space on your hard drive. The conversion process takes a bit of time, and if done during the burn, will increase your burn time, and complicate the process. With so much else to go wrong, it is best to keep the burn as simple as possible. Also, mp3 can be a quirky format, and pre-conversion will give you the opportunity to preview the songs. (More on mp3 & .wav)There are many programs that will convert between formats. MusicMatch Jukebox is a (free) multi- format media player. It will also convert between formats, record from several sources, and write to CD-R. Mp3 workshop and RazorLame are two free programs that specialize in conversions, and are much smaller downloads than Musicmatch.
At this point, you may wish to put the converted songs into a new folder. This will make them easier to find when compiling your CD, and easier to delete afterward. Some conversion programs like MP3Workshop, will let you specify a destination folder for the converted files.
Now you are ready to create your CD. Follow the instructions specific to your burner's program to create an audioCD. This will probably involve locating your song folder by browsing a directory tree. Then you select the songs in the order you want your tracks, and burn the CD. IMPORTANT! Be sure to use CD-R media only. CD-RW disks will not work in most playback units.
[Back to the top]
-
How do I create a music CD from multiple sources?
Perhaps you would like to create a composite CD using some mp3 files, and a few songs you have on other CDs. If there is only one other CD involved, you could insert it in your computer's CD-ROM drive, and access it when you are assembling your track list for the burn. You will need to leave the CD in so it is accessable during the burn.But what if you want to include songs from more than one other CD? Or tape? Or LP? In this case, you will need to copy the songs to your hard drive. There are two basic ways to do this.
-
Recording: This will record songs in real time, just like a tape recorder
only instead of being stored on tape, they will be in a file on your computer.
MusicMatch Jukebox has a 'record'
feature. PolderbitS Sound Recorder
(low cost, fully functional trial)
is a better chioce for recording from an LP or tape. You can record one entire
side then use the sound editor to break the recording into individual tracks.
If your recording has tape hiss, or record scratches and pops, there are ways
of minimizing these.
DePopper is a great program for this.
How do I connect a tape or LP player to my computer?
-
Ripping: This is method of extracting songs quickly from a CD. It is much
faster than recording, but can only be used for CDs. Check out CDex
or
Mp3 workshop (free) When you rip
tracks, you may have the option of choosing a format. Keep them in their original
format for best quality. If you wish to convert to mp3, do it later.
Now that you have copied, recorded or ripped your songs to your hard drive, follow the instructions specific to your burner's program to create an audioCD. This will probably involve locating your song folder by browsing a directory tree. Then you select the songs in the order you want your tracks, and burn the CD. IMPORTANT! Be sure to use CD-R media only. CD-RW disks will not work in most playback units.
[Back to the top] -
How do I connect a tape or LP player to my computer?
To connect an external tape or LP player to your computer, you will need to run a patch
cord from the 'output' of your source to the 'input' of your computer's
soundcard
- Patch cord: The exact configuration of this cord will vary with each
individual case. This should be a shielded audio type cable that will run from
your tape deck or phonograph to your computer.
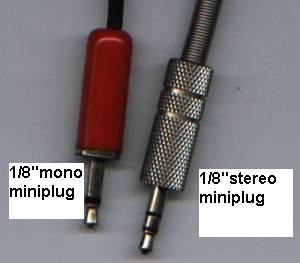
- Input: This is where you hook your patch cord into your sound card.
You may need to check your computer's documentation if it is not marked, but
on the back of your computer, you should be able to locate the jacks for your
sound card. Your speakers will be plugged into the output jack. Most likely,
there will also be a 'mic' and 'line' input. The 'mic' input is usually mono,
so use the 'line' input. It is probably a 1/8" stereo mini-plug
, the same
kind you see on 'Walkman' headphones. So you need this kind of
plug on one end of your patch cord. If you plan to do much recording from
instruments, or stereo systems, you may wish to construct a
line-in box for ease in
hooking up patch cords.
-
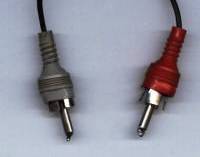
Output: There is likely to be more variation in the type of plug you need
for this end of the patch cord. You need to locate an output on your phono or
tape deck. If this is part of a stereo system, look on the back for a 'line out'.
This would likely be two
RCA type phono plugs marked 'L' and 'R'. In a pinch, or if
there is no 'line out' (on a boombox for instance) the 'headphone' jack will work.
Some experimentation with volume will be necessary to prevent clipping. (distortion
due to excess volume)
Once you have connected your tape/phono to the computer, use a recording program such as PolderbitS Sound Recorderor MusicMatch Jukebox as described previously. If volume adjustments need to be made, open the volume controls of your sound card from the icon at the bottom ofyour screen. More detailed instructions can be found here: LP to CD-R Recording Page
[Back to the top]Links:
CD Wave Editor Record and auto-split features. $15.00 (31 day full demo)
Audacity (Freeware.) Record and manually edit/split files. Includes some filters and effects.
RIPvinyl $10.95 Record and auto-split (crippled demo)
MusicMatch Jukebox (free converter, recorder, player, and more....)
PolderbitS Sound Recorder (low cost recorder, sound editor, full function free trial)
Mp3 workshop (converter, ripper, normalization, free)
dBpowerAMP (ripper, converter, recorder plugin, free)
CDex (ripper, converter, recorder, normalization, free)
Hitsquad (download music shareware & freeware)
AudioCompanion (recorder, auto-split, ripper, converter)
DePopper (noise remover)
Nero Burning ROM (full featured burn, record, editor)
Exact audio Copy(convert/rip/record,'free-cardware')
[Back to the top]