

 THE
COMPASS: This is the first image on the bar. It shows you, by lit or
unlit green lights at compass points, which directions are available for
you to move through and which are not. By clicking on a lit green light
you can move from one area to the next much faster than having to type
walk north (or wherever) over and over.
THE
COMPASS: This is the first image on the bar. It shows you, by lit or
unlit green lights at compass points, which directions are available for
you to move through and which are not. By clicking on a lit green light
you can move from one area to the next much faster than having to type
walk north (or wherever) over and over.
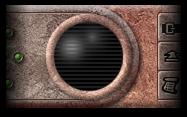 THE
WINDOW: This image is just to the right of the compass. It show you
a generalization of the weather when you are outside, and whether there
is an sufficient light source to see by when you are inside or underground.
Clicking on this window will pull up a detailed description of the weather.
THE
WINDOW: This image is just to the right of the compass. It show you
a generalization of the weather when you are outside, and whether there
is an sufficient light source to see by when you are inside or underground.
Clicking on this window will pull up a detailed description of the weather.
 THE
MACRO-BAR: This group of square buttons has a specific command or command
string assigned to each one. Clicking a button will cause the command to
go through without having to take the time to type it. These buttons can
also be assigned new commands or command strings, though the process is
rather complicated. Wait until you have advanced a little in the game and
are familiar with exactly what commands you use the most before attempting
to reprogram the macro-bar. When you are ready, leave the game and, from
the "welcome area" (the place
THE
MACRO-BAR: This group of square buttons has a specific command or command
string assigned to each one. Clicking a button will cause the command to
go through without having to take the time to type it. These buttons can
also be assigned new commands or command strings, though the process is
rather complicated. Wait until you have advanced a little in the game and
are familiar with exactly what commands you use the most before attempting
to reprogram the macro-bar. When you are ready, leave the game and, from
the "welcome area" (the place
 you enter upon signing in but before you actually enter the gameworld)
type @menu. From the menu that pops up choose and enter P
for preferences. From this next menu enter X to toggle the Macro-Bar.
When you return to the game you will find that the macro-bar has changed.
It no longer display pictures to indicate it's assigned command, it now
holds consecutive roman numerals from I to XV. To assign one of these "blank"
buttons a command just click it. The game will ask you to enter the command
string so simply type what you want the button to represent as if you were
actually doing it. For example, to assign wield quarterstave to
button number I, just click the button and then, when prompted, type wield
quarterstave and enter. Now, whenever you click button number I you
will wield whatever quarterstave you are holding.
you enter upon signing in but before you actually enter the gameworld)
type @menu. From the menu that pops up choose and enter P
for preferences. From this next menu enter X to toggle the Macro-Bar.
When you return to the game you will find that the macro-bar has changed.
It no longer display pictures to indicate it's assigned command, it now
holds consecutive roman numerals from I to XV. To assign one of these "blank"
buttons a command just click it. The game will ask you to enter the command
string so simply type what you want the button to represent as if you were
actually doing it. For example, to assign wield quarterstave to
button number I, just click the button and then, when prompted, type wield
quarterstave and enter. Now, whenever you click button number I you
will wield whatever quarterstave you are holding.
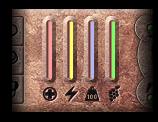 THE
STATUS BAR: Each of these colored lines represents a different attribute.
THE
STATUS BAR: Each of these colored lines represents a different attribute.
The RED
indicates your health. Too many bites and scratches and line goes down.
If it reaches the bottom...well, you get the idea. Bleeding wounds will
remind you that they are there by popping up in the text screen every few
minutes. They represent an on-going drain on your health until you can
find a healer to stop the bleeding. Bruises, on the other hand, do not
get any worse on their own.
The YELLOW
line indicates your energy or fatigue. If allowed to go too low you will
begin to have difficulty hitting anything in combat and are in danger of
passing out, an easy meal for whatever you were fighting. When you get
this tired it's time to Walk to (the Riverside) baths and
lay around for awhile in the tepidarium ("hot bath").
The BLUE
line indicates your portage or how much you are carrying. Too much weight
will cause you suffer penalties in battle, slow your movement down and
increase the rate at which you are fatigued. Your portage level is managed
by simply taking care in how much stuff you carry or wear.
The GREEN
line indicates your hunger. When it begins to go down you should eat something.
Delaying in eating for too long will cause your hunger line to drop to
the point that it too begins to effect combat, movement and fatigue. Fortunately
it doesn't take much food at all to fill up, hence the hunger line is the
easiest to maintain.
In addition, any of the
lines can be clicked in with your mouse to give you a text description
of the status of all four of the lines.
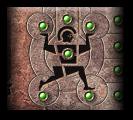
 THE
STATUS INDICATORS: This figure, and the buttons on it and to the right
of it can pretty much be ignored. They are indicators that respond to a
mouse click, but some of the things they indicate are not part of the game
yet. The figure, however, will give you an indication of what wounds you
have suffered upon the area of it's body that you click. But this information
can be as readily accessed by clicking one of the colored lines of the
status bar or by typing condition.
THE
STATUS INDICATORS: This figure, and the buttons on it and to the right
of it can pretty much be ignored. They are indicators that respond to a
mouse click, but some of the things they indicate are not part of the game
yet. The figure, however, will give you an indication of what wounds you
have suffered upon the area of it's body that you click. But this information
can be as readily accessed by clicking one of the colored lines of the
status bar or by typing condition.
