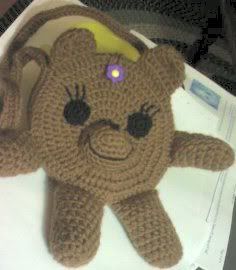
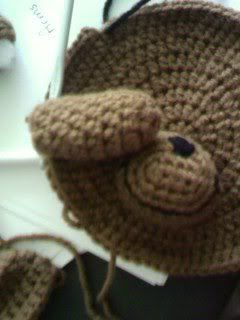
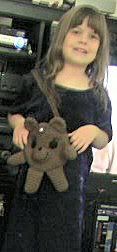
Bear-y Huggable Bear Purse
I originally designed the Pink Bunny Purse for our 3 year old little great-neice for Christmas this year, but i confess when my 2 girls saw it, they wanted it. So i thought that i would make up a few others for our other neices and our own girls. (lol!) They are 7 and 14!! I am sure any age would love this, I plan to make more that are similar just for fun! I sure hope u like it too!! I had so much fun making it, I couldnt put it down until i had it finished.
Hugss to all...

You will need:
about 4 oz of Brown Worsted Weight Yarn
a little bit of Black Worsted Weight Yarn
H Hook
Sewing needle for weaving in ends and attaching pieces
small amount of batting
one Pink Flower Button (or your choice)
Instructions:
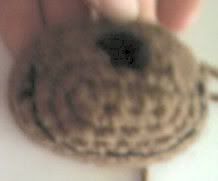
Front and Back (make two):
Row 1. Ch 2, 10 hdc in 2nd ch from hook,
join to top of first hdc, do not turn.
Row 2. Ch 2, hdc in same st as joining, 2
hdc in each stitch, continue around, join
to top of first chain.
Row 3. Ch 2, hdc in same st as joining,
hdc in next, 2 hdc in next, continue
around, join to top of chain.
Row 4. Ch 2, hdc in same st as joining,
hdc in next 2, 2 hdc in next, continue
around, join to top of chain.
Row 5. Ch 2, hdc in same st as joining,
hdc in next 3, 2 hdc in next, continue
around, join to top of chain.
Row 6. Ch 2, hdc in same st as joining,
hdc in next 4, 2 hdc in next, continue
around, join to top of chain.
Row 7. Ch 2, hdc in same st as joining,
hdc in next 5, 2 hdc in next, continue
around, join to top of chain.
Row 8. Ch 2, hdc in same st as joining,
hdc in next 6, 2 hdc in next, continue
around, join to top of chain. Finish off and weave in ends.
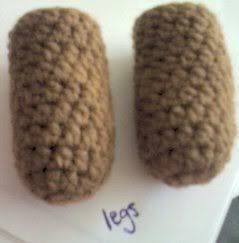
Legs (make 2):
Row 1. Chain 2, 8 hdc in second chain from
hook. do not join, continue rounds. mark
last stitch in this row to make it easier to remember
where u finished the round.
Row 2. 2 hdc in first st, hdc in next,
around (16)
Row 3 - 10. Hdc in each, finish off, weave in ends. (16)

Arms (make 2):
Row 1. Chain 2, 6 hdc in second chain from
hook. do not join, continue rounds. Mark
last stitch to make it easier to remember
where u finished the round.
Row 2 -8. 2 hdc in each st around, finish off, weave in ends. (12)
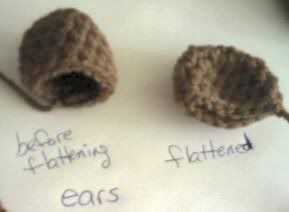
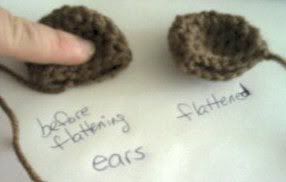
Ears (make 2):
Row 1. Chain 2, 8 hdc in second chain from
hook. Do not join, continue rounds. Mark
last stitch in this row to make it easier to remember
where u finished the round.
Row 2. 2 hdc in first st, hdc in next,
around. (16)
Row 3 - 5. Hdc in each, finish off, weave in ends. Flatten in half and set aside.(16)
Eyes (make 2 with black yarn):
Row 1. Chain 2, 6 sc in last chain from
hook. Do not join rounds, continue
around.
Row 2. 2 sc in each stitch. Leave long
length of yarn for securely attaching to
face and embroider eyelashes above each eye.
Muzzle:
Row 1. Chain 5, sc in second ch from
hook. Sc in next 2, 3 sc in last. Working
on opposite side of the chain in remaining
loop, sc in next 2, 2 sc in last. Do not
join, continue in rounds.
Row 2. 2 sc in first stitch, sc in next 2
stitches, 2 sc in next 3 stitches, sc in
next 2, 2 sc in each of the last 2
stitches.
Row 3. 2 sc in first stitch, sc in next 4
stitches, (2 sc in next stitch, sc in next
stitch) twice, sc in next 4 stitches, (2
sc in next, sc in next stitch) twice.
Row 4. Sc in next 7 stitches, 2 sc in next
stitch, sc in next stitch, 2 sc in next
stitch, sc in next 8 stitches, 2 in next
stitch, sc in next stitch, 2 sc in last
stitch.
Row 5 and 6. Sc evenly around, pull thru
and leave a very long length for sewing to
face, just below the very center of main
circle.
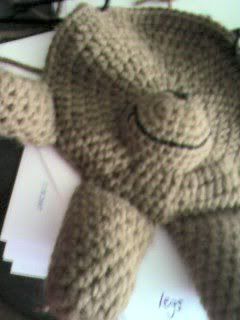
With Black yarn, embroider nose and a great big, happy smile on muzzle. Sew securely to face. Stuff muzzle lightly to give 3-dimensional effect.
Attach eyes securely, one on each side,
one row above muzzle and embroider pretty eyelashes above each eye.
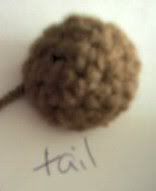
Tail:
Row 1. Chain 2, 6 sc in last chain from
hook. Do not join rounds, continue
around.
Row 2. 2 sc in each stitch.
Row 3 and 4. Sc around evenly. Finish off, leave length of yarn, stuff lightly and securely attach to back of purse at the bottom in the middle.
ASSEMBLY:
Front of Face:
Leaving 22 stitches open across the top
unworked, join yarn in 12th
stitch to the left of the center with the
face looking at you. Join with a slip
stitch, sc in same stitch as joining. Sc
in the next 7 stitches, working down the
left side. Flatten open end of arm and
lay it down on face with the hand on nose,
sc thru all layers (including side of
face) at end to attach to the side of the
body to attach the arm. Sc in next 4 stitches,
and under muzzle on left side, lay
first leg with open end on outside of face
and foot on muzzle. Flatten leg opening
and sc thru all layers to attach with sc
and continue. Sc in next stitch,
attach second leg in the same fashion.
Work up right side of face with sc and
attach second arm in the same fashion.
Continue up face, stop in 12th space from
the top/center of face. Continue by
chaining 100 chains for strap, being very
careful not to twist chain. Attach with a
slip stitch to first sc on left side
of face, chain 1, sc in same stitch and sc
down left side and around face, continuing
sc around the strap chain, join to first
sc, finish off, leave long length for
attaching front to back.
Back of Face:
Leaving 22 stitches open across the top
unworked, join yarn in 12th
stitch to the left of the center with the
face looking at you. Join with a slip
stitch, sc in same stitch as joining. Sc
down the left side. Continue sc around,
under muzzle on left side, continue up
face on right side, stop in 12th space
from the top/center of face. Continue by
chaining 100 chains for strap, being very
careful not to twist chain. Attach with a
slip stitch to first sc stitch on left side
of face, chain 1, sc in same stitch and sc
down left side and around face, continuing
sc around the strap chain, join to first
sc, finish off, weave in ends.
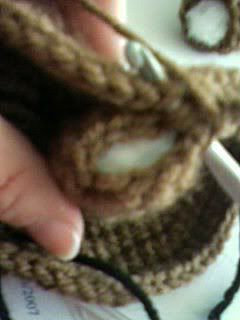
With right sides facing each other, sew
front sc row to back sc row all the way
around the strap and body. Finish off,
weave in all ends securely.
In the middle of the back piece, at the
top, attach yarn, chain 12 to make button loop, slip stitch to base of chain, finish off, weave end in.
Sew flower button to second row in the
front of the face right in the middle.
Sew flattened ears securely on the top of front
piece, starting in the first stitch that attaches the strap on either side, working toward the middle. Weave in and cut off all ends.
note: If you need click on the link for the Pink Bunny Purse below, you will see additional pics showing assembly. HAVE A GREAT DAY!! hugsss, janie :)
Pink Bunny Purse to Crochet
Other Toys to Crochet
Other FREE Crochet Patterns
FREE Plastic Canvas Patterns

Email: prpl_smok@yahoo.com

