
To complete this tutorial you will need:
Jasc Paint Shop Pro 7. Get it here.
Super Blade Pro, get a trial version here.
My zipped file. Get it here.
Put the SBP preset in your environments and textures
folder.
Put the .sel files in your selections folder.
Put the .psp file where you can find it easily.
I have included a section on how to
create the tussie with vectors instead of using my
sel files. If you would like to give it a try go here. Then you will need to use
your back
button to return here and finish the tutorial. If at any
time you have any questions
feel free to contact me at the link below. Have fun
either way you choose.
Remember to Save often!!
1. Open a transparent image 300 x 400.
Add a new layer and name Tussie.
Selections>Load From Disk CMtussie.
Flood fill the selection with white.
While still selected, apply the CMgold5 SBP preset I
included in the zip file.
Deselect.
 
2. Add a new layer and name Tussie Top,
Selections>Load From Disk
CMtussietop. Flood fill with white and
apply the SBP preset.
In the Layer Palette, drag this layer
below the Tussie layer. Deselect.
 
3. We can now decorate the Tussie. Open
the lacecircle file I included in the
zip file.
With the lacecircle as the active image, open the Layer
Palette and drag
layer 1 to the tussie image. In the Layer Palette
rename that layer lace.
Drag the lace layer to the top if necessary. You can
minimize the lacecircle
to get it out of the way. With your Mover tool
move the lace to the desired position.
On the lace layer, Selections>Load From Disk,
CMtussie. Then Selections>Invert
Press the delete key to remove the excess lace. Deselect.
With the Selection tool set to
rectangle, select the lace, then click in the middle
to select. Apply the SBP preset.
 
4. We need to remove the excess gold
lace that is around the top edge of the tussie.
Making sure that the lace layer is active, click on the Lasso
Tool. Use Point to Point,
Feather set to 0, Antialias checked. To make it
easier to see the edge, turn down the
opacity on the lace layer to 25. Zoom in and click along
the edge all the way across
then up and over the top. When you get back to where you
started, right click to
select the area. Press delete one time. Now turn the
opacity back to 100.
The edge is now clear of the lace.
 
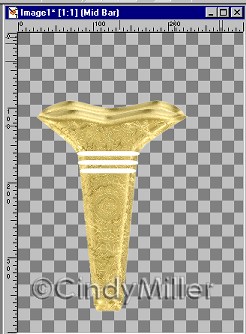
5. Next we will add some bars to the
Tussie. Add a new layer and name
TopBar. Click on Preset Shapes and
choose button number 062. If you
are using a different version of PSP choose a similar
button.
Set Stroke to null and Fill to
white. Draw out a bar.
Add another layer and name Mid Bar. Do the same thing
again
Add another layer and name Bot Bar. Draw out another bar.
This is how it looks so far.
6. Go back to Top Bar layer and with
the Selection Tool select the bar. Then
click on it so it is selected. Apply the CMgold5 SBP
preset.
While still selected Effects>3D
Effects>Drop Shadow and use these settings.
Do this for each bar. It is now ready for you to add
flowers.
 
7. I have found some bouquets work
better if the top isn't merged with the rest
of the layers. You can decide for yourself. I hope you
have enjoyed making
this Tussie. I have found many different ways to decorate
it. The one below on the left
was done with a pattern fill that I made from a bouquet,
made a quick tile, then used the
colorize setting to remove most of the color. Then used
the blend mode to get the
effect I wanted. Then I removed the middle bar and added
some jewels.
The one on the right was one using a simple ding for the
base. I'm sure you can
come up with some beautiful ways to decorate this to make
it uniquely your own.
 
Tutorial Index
Home
Contact Me
©Copyright 2002-2010 Cindy Miller, All
rights reserved.
The graphics you make from my tutorials
are yours for your personal use only.
All graphics, text, and files are not to be copied, sent
through email, linked to,
profited from, or archived in any manner without my
written permission.
By using my tutorials you are agreeing to my terms.
|

