The Vector Tussie
Remember to Save often!!
1. Open a 300 x 400 transparent image.
Click on Preset Shapes and choose
rounded
rectangle. Antialias and vector checked, line
width 1. Set Stroke to null, Fill to white.
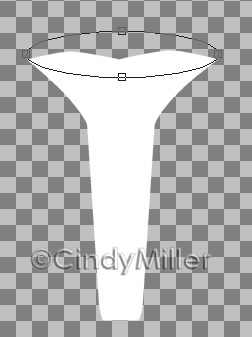
Draw out a rectangle approximately 50 x 215.

2. Now we need to pull the top out a
little and make the bottom of the rectangle narrower.
While holding down on the control key, put the cursor on
the upper right corner and
pull the top out a little. Put the cursor on the bottom
right corner and push the
bottom in a little.

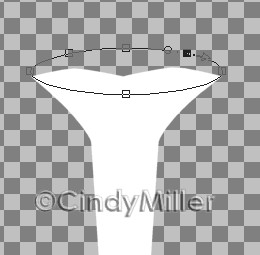
3. Click on the Object Selector
and then with the pointer on the image, right
click and choose Node Edit. Take a hold
of the upper right node and pull up and out
as shown, then repeat for the upper left node.
 
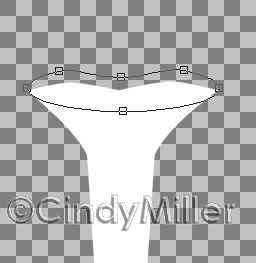
4. We need to add a node to each
slanted side and pull out a little so they are more
rounded. While holding down on the Control key, move the
cursor over the line
until you see it change to Add.
Left click to add a node. Pull out and down a little
Now place a node on the left side and pull it out and
down a little.
 
5. Now we need to add 3 nodes across
the top. One in the middle and one centered
between that one and the outer one on each side. Remember
to hold down on the
Control key and move the cursor over the line until you
see Add. Then right click
to add the node. Take a hold of the node that is between
the middle one and the
corner one. We are going to pull it up a little to form a
curve in the top edge. Do
the same thing on the other side.
 
6. Once you have it how you want, right
click and choose Stop Node Edit. Before
you
change it to a Raster layer, you need to make a sel file
of it for use later in the tutorial .
To do this, Selections>From Vector Object.
You should see ants marching around the object now.
Then Selections>Save to Disk and name
it tussie. When you go back to
the tutorial use this sel instead of the one I provided.
Now change this to a Raster Layer and
name tussie. Just a little more to do.
7. Now we need to make the top back.
Change the Fill to another light color. I chose
a pale blue. This will make it easier to see. Click on Preset
Shapes and choose the
Ellipse. Antialias and vector checked, line width
of 1. Draw out an oval that meets the
outside edges of the base top. It will be approximately
196 x 47 depending on your base.

7. We need to add 2 nodes to the top
edge of the oval. Right click on the object
and chose Node Edit.
While holding down the control key,
move the cursor across the line until you see the Add.
Right click and add a node between the top middle and the
side node. Do this
for both sides.
Then take a hold of the middle node and
pull it straight down a little.
8. When you have it how you want, we
need to make a sel file for this one too.
Selections>From Vector Object then Selections>Save
to Disk and name
tussietop. Now you need to change this to white since you
used another color. Right
click on the image and choose Properties.
Left click on the Fill color and choose white.
You are changing this to white so you can apply the SBP
preset.
Now you can convert this to a Raster layer, name
tussietop and pull it below the
tussie layer in the Layer Palette.
You can select the two images and apply the SBP preset I
furnished now. Then go back
to the tutorial and start at 3. Or go back to the
tutorial and start at the top.
Remember to substitute your sel files for mine
when asked.
Tutorial Index
Home
Contact Me
©Copyright 2002-2010 Cindy Miller, All
rights reserved.
The graphics you make from my tutorials
are yours for your personal use only.
All graphics, text, and files are not to be copied, sent
through email, linked to,
profited from, or archived in any manner without my
written permission.
By using my tutorials you are agreeing to my terms.
|

