
This tutorial was written using
Jasc Paint Shop Pro 7. It can be done
in version 8 with slight modifications. Get a
trial version here.
My zipped file. Get it here.
Unzip my ice cream canvas to a folder.
If using version 8 you will need a rustic
wood tile for the wood fill pattern.
Remember to save often!!
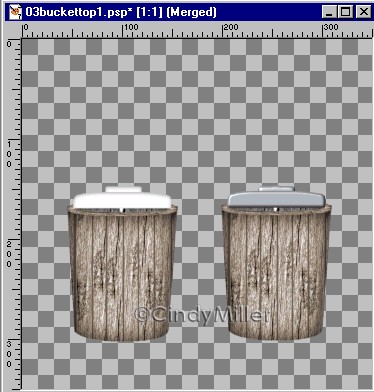
1. Open my CM Ice Cream freezer canvas.
2. Click on the Bucketback layer.
Set Background to Pattern and choose
Driftwood, Angle 90, Scale 50.
Selections>Load from Alpha Channel>CM01bucketback.
Fill selection. Invert the selection and apply
a Drop Shadow of,
V & H=0
Opacity=100
Blur=37
Shadow=Black
Deselect.
3. Skip the next two layers and click on
the Bucketfront layer.
Selections>Load from Alpha Channel>CM02bucketfront.
Set Stroke to color #635D5D and Fill to
Pattern>Driftwood, Angle 90, Scale 50.
Click on Preset Shapes and choose
Rectangle, Antialias checked, Line Width
1. Vector not checked.
Now we need to draw out some boards for
the bucket. I turned off the Bucketback
layer and used the width of my grid
squares to make the boards. I drew three
middle ones at various levels and then
changed the Pattern Angle to 270 and drew
the rest so they wouldn't all look the
same. When you have them drawn out Invert
the selection and press Delete once. Leave the
selection inverted and apply the same
Drop Shadow as before. Deselect. You can
turn the Bucketback layer back on now.

4. Click on the Bucketrim layer.
Selections>Load from Alpha Channel>CM03bucketrim.
With background still set to Pattern>Driftwood
change the Angle to 0 leave Scale at 50. Fill and invert
the selection. Apply a Drop Shadow of,
V=1 H=0
Opacity=75
Blur=6.2
Shadow=Black
Deselect.
5. Next apply Color>Colorize, settings
of Hue=20 and Saturation=35 to the
bucketfront layer and the bucketrim layer.
Leave the bucketback as is.

6. In the Layer Palette drop down two layers and click on the
Centerpost layer. Selections>Load from
Alpha Channel>CM 04centerpost. Set Foreground
to color #808080 and fill the selection.
Apply Inner Bevel round preset. Deselect.
To make a white plastic cranktop follow 7
and 8, to make a metal colored cranktop
follow 7b and 8b.
7. Plastic Cranktop>
Click on the Crankbasetop layer.
Selections>Load from Alpha Channel>CM05crankbasetop
and fill with white. Leave selected and
invert then apply this Drop Shadow
V=1 H=0
Opacity=36
Blur=4.9
Shadow=Black
Deselect.
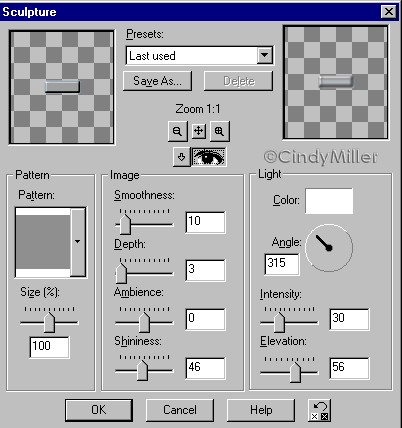
7b. Metal Cranktop>
Click on the Crankbasetop layer.
Selections>Load from Alpha Channel>CM05crankbasetop
and fill with white. Selections>Select
None. Effects>Texture>Sculpture
choose the gold preset then change the
pattern to the number 2 or gray pattern.
See image below for settings.
8. Plastic Cranktop>
Click on the Crankbase layer.
Selections>Load from Alpha Channel>CM06crankbase
and fill with white. Invert and apply the
same drop shadow as for the crankbasetop,
V=1 H=0
Opacity=36
Blur=4.9
Shadow=Black
Deselect.
8b. Metal Cranktop>
Click on the Crankbase layer.
Selections>Load from Alpha Channel>CM06crankbase
and fill with white. Selections>Select
None. Then
Effects>Texture>Sculpture choose
the same settings as for the Crankbasetop.
9. Click on the Sidescrew layer.
Selections>Load from Alpha Channel>CM07sidescrew
and fill with color #808080. Apply the
Inner Bevel round preset. Deselect.
10. Click on the Handle layer.
Selections>Load from Alpha Channel>CM08handle
and fill with #808080. Apply the Inner
Bevel round preset. Deselect.
11. Click on the Sideposts layer. Selections>Load from
Alpha Channel>CM09sideposts. Flood fill with #808080
and apply the Inner Bevel round preset.
Deselect
12. Click on the Handleknob layer.
Selections>Load from Alpha Channel>CM10handleknob.
With the Background set to Pattern,
select the Driftwood Angle 0 and Scale 50.
Fill the selection. With it still
selected, Selections>Float and apply
this Cutout.
H & V=1
Opacity=50
Blur=5.
Shadow=Black
Apply again changing the H & V to -1.
Now apply the Colorize setting from
before. Hue=20 and Saturation=35.
Deselect.
13. Click on the Bucketwires layer.
Selections>Load from Alpha Channel>CM011bucketwires.
Fill with color #808080 and apply the
Inner Bevel round preset. Then apply a
Drop Shadow of,
V=1 H=0
Opacity=49
Blur=5
Shadow=Black
Deselect.
On the same layer Selections>Load from
Alpha Channel>CM02bucketfront.
Selections>Modify>Expand 1. Invert
the selection and press delete once.
Deselect.
14. Click on the Canister layer.
Selections>Load from Alpha Channel>CM12canister
and flood fill with color #E2E2E2.
Deselect.
15. If desired, click on the label layer
and unclick the glasses to show the label.
If you want you can age it a
little by changing the Layer Blend mode
to Lighten or Dissolve and reduce the
opacity a little. Experiment with other settings
until you have it the way you like.
Once you are finished merge layers.
I hope you enjoyed this tutorial.
If you would like to
make the dish of ice cream like the one
in the above image, click on this dish!

|
Tutorial Index
Home
Contact Me
©Copyright 2003-2010
Cindy Miller, All rights reserved
The
graphics you make from my tutorials are yours for
your personal use only.
All graphics, text, and files are not to be
copied, sent through email, linked to,
profited from, or archived in any manner without
my written permission.
By using my tutorials you are agreeing to my
terms.
Unless otherwise
stated, nothing on this page is available for
download.
|

