

 |
is Required To Make A FAUX “GREAT KILT” !!! |
 |
 |
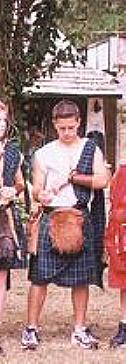
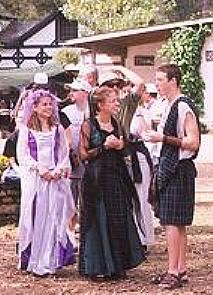
GREAT KILTS are WAY Cheaper than “real” Kilts!
(which usually START |
 |
 |
The directions I’m about to provide are not terrifically “detailed!”
You’ll likely need to be fairly familiar with
After all, a “GREAT KILT” is merely a
So! Do NOT be “afraid” |

FIRST: You’ll need the following measurements,
of each individual you are making a Faux Great Kilt for.
You’ll need to purchase:
|
 |
Unless you want to fuss with cutting and pasting parts of fabric that is 60" wide
(thus requiring LESS fabric than I’m about to tell you to buy),
whether the fabric you select is 45" or 60" wide, simply buy
THIS length of fabric for each Kilt:
4 X the waist measurement, PLUS 1/2 the waist measurement
(if buying 45"-wide fabric, get a pinch MORE than that – just incase!)
For example: My nephew Erik’s waist measurement is 28"
- 4 X 28 = 112"
- 28 divided by 2 = 14" (1/2 his waist measurement)
- 112" plus 14" = 126"
- 126" divided by 12 (for “feet” of fabric) = 10.5 feet
- 10.5 feet divided by 3 (for “yards” of fabric) =
3.5, or 3 and 1/2 yards of 60" wide fabric- plus a “pinch more” if buying 45"-wide fabric =
3 and 3/4 yards of 45" wide fabric!
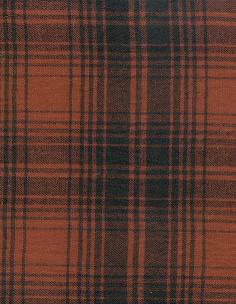 |
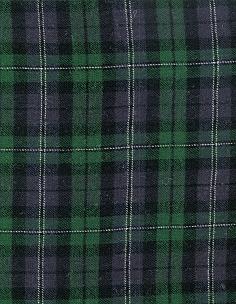
DARK and/or “MUTED” PLAID FABRIC for your Kilt.
Bright plaid fabrics are usually
The Great Kilt is a “HUNTING” Kilt. |
 |
Now! MEASURE & CUT your Fabric!
USE THE “SELVEDGE EDGE” FOR THE BOTTOM OF THE KILT!
That way, you will NOT have to HEM the Kilt … and, it will “hang” better.
shown are the “cutting” lines.
Measure |
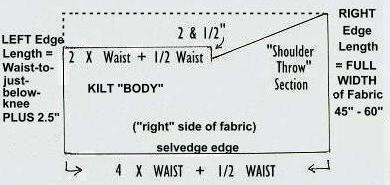 |
[If you’re going to cut-and-paste from 60" wide fabric … or you need to correct your cut! … paste pieces into the KILT BODY LEFT END, rather than into the “Shoulder Throw” RIGHT end.]
SEWING DIRECTIONS
“FINISH” Unfinished (“raw”) Fabric Edges with a ZIG-ZAG stitch
This keeps the cut-edges of the Kilt fabric from unraveling
during sewing or when the Kilt is washed.
The “SELVEDGE EDGE” does NOT need to be “FINISHED.”
Here comes the most TEDIOUS part
o’ the WHOLE Kilt-making gig!:
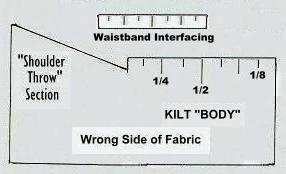 |
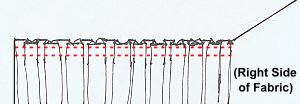
the Waistband Interfacing: Fold EACH in HALF, and mark the half-point. Fold EACH HALF in half, and mark the 1/4 points. Fold EACH 1/4 in half, and mark the 1/8 points. |
Pin the WAISTBAND INTERFACING
to the KILT WAIST SECTION:
Lay the Waistband Interfacing on the WRONG side of the Kilt fabric; at the TOP of the Kilt Waist Section; with the Kilt Body Fabric extending about 1/4" BEYOND each END of the Waistband Interfacing … AND, so that at least 1/4" of the Kilt Body Fabric extends beyond the “TOP” of the Waistband Interfacing (which, actually, will end up being the BOTTOM of the Waistband Interfacing, after it’s turned over).
Using SMALL SAFETY PINS: MATCH-UP the
1/2, 1/4, and 1/8 points of the Kilt Waist Section
with the Waistband Interfacing, and SAFETY PIN them together.
(Personally, I like to pin & then SEW |
 |
About The PLEATS:
and attached fabric so that RIGHT SIDEs of the Kilt fabric are TOGETHER (The Waistband Interfacing is on “top” of the folded Kilt fabric.) |
 |
Turn RIGHT-SIDE-OUT, so that the WAISTBAND INTERFACING
is now “INSIDE” the Kilt Fabric
lay relatively straight across the Waistband Interfacing.
SEW along the WAIST top, about 1 and 1/2" |
 |
Now, FINISH ALL OTHER Unfinished Edges:
Turn all other ZIG-ZAGGED edges back onto themselves
(wrong-sides of fabric together),
PIN where needed, and SEW along the INSIDE edge.
This creates a thin “hem” along the remaining top and sides of the Kilt and Shoulder Throw.
Remember, you do NOT need to turn and “hem” the SELVEDGE edge!
It’s a good idea to “reinforce” the corner where the shoulder throw leaves the Kilt Body
by sewing back-and-forth around that point.
It’s also a good idea to SEW AGAIN, just at the OUTSIDE edge.
This makes the Kilt fabric lay flatter.
CREATE WAIST CLOSURES
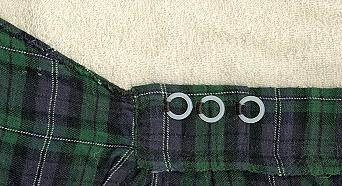 |
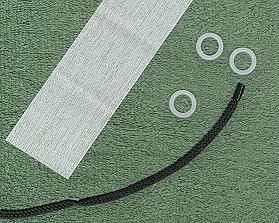
CUT CLOSURE TIES
Cut three 6-to-8" lengths of the STRONG dark ribbon or cord.
“Finish” the cut cord ends so they don’t unravel.
(I use black ELECTRICIAN’s TAPE to “finish” the ends of cord!)
Attach the CENTER of each to the first OR second set of plastic rings.
 |
 |
 |
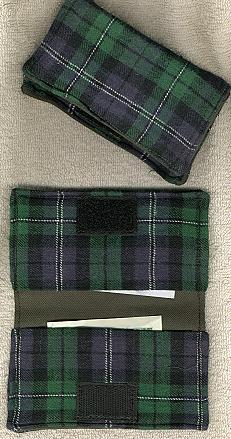
 You can also use left over KILT FABRIC to make coin pouches and/or wallets. |
 |
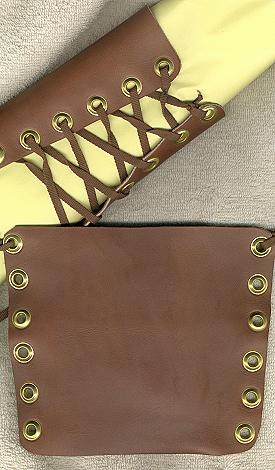 |
(the thingys that go on the forearms!) are cool to get, or make.
I always make a |
 |
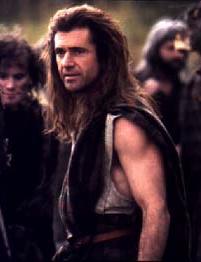
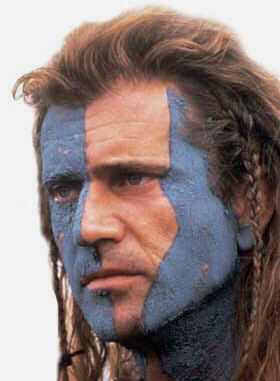
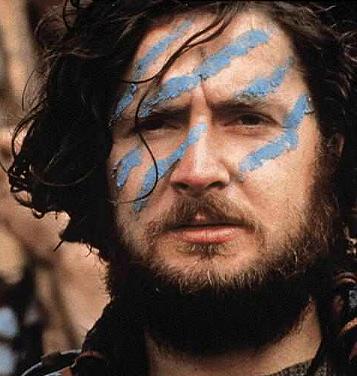
the Kilt Dude (“Braveheart”) costume, CONSIDER MAKEUP!
Specifically: Consider doing a
“Woad” is the blue, organic substance |
 |
 |
 |
 c-d-miller@neb.rr.com
