

 Click on the image for a larger picture
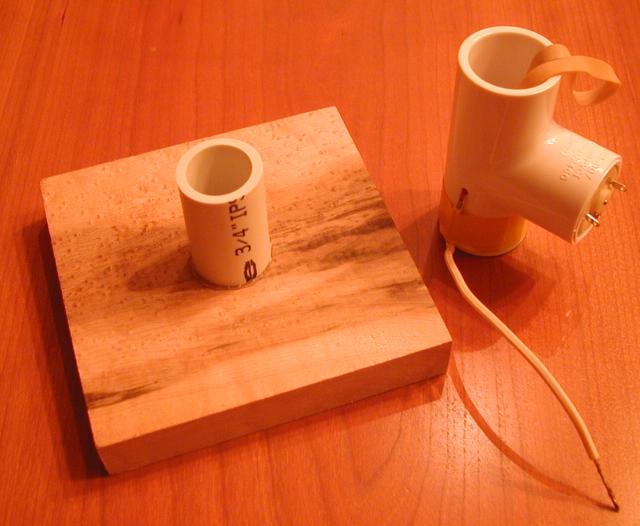
The first thing to do is to cut a 2 to 3 inch long piece of
3/4 inch PVC pipe, and glue that to the wooden base. This
piece will hold the generator up, and allow us to remove it
to more easily replace the rubber band, or make adjustments.
The PVC "T" connector will hold the small motor. The motor fits
too loosely by itself, so we wrap paper or tape around it
to make a snug fit. The shaft of the motor can be left bare,
but the generator will work a little better if it is made fatter
by wrapping tape around it, or (better) putting a plastic rod
with a hole in the center onto the shaft to act as a pulley for
the rubber band.
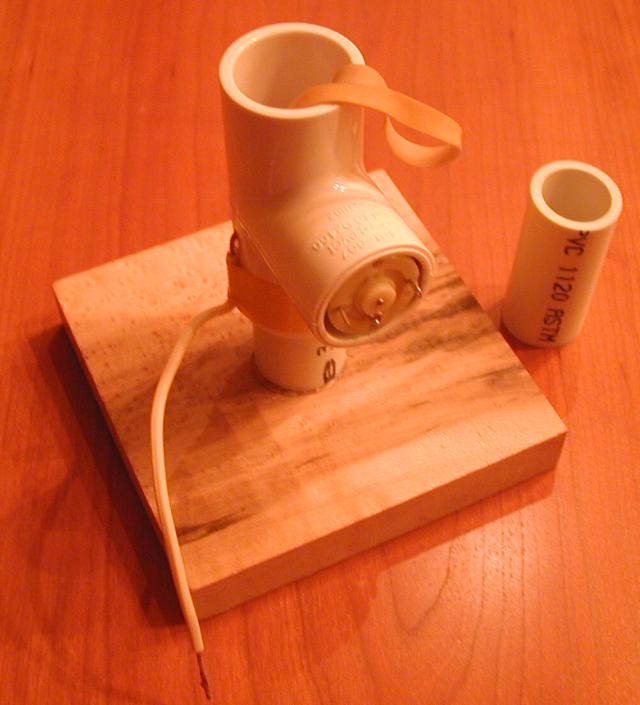
Next, we drill a small hole in the side of the PVC "T" connector,
just under the makeshift pulley on the motor. This hole will
be used to hold the lower "brush", which is simply a bit of
stranded wire frayed at the end, that is almost
touching the rubber band on the pulley.
As the photo shows, the stranded wire is held in place with some
electrical tape, or some other tape or glue.
The rubber band is now placed on the pulley, and allowed to hang
out the top of the "T" connector.
Click on the image for a larger picture
The first thing to do is to cut a 2 to 3 inch long piece of
3/4 inch PVC pipe, and glue that to the wooden base. This
piece will hold the generator up, and allow us to remove it
to more easily replace the rubber band, or make adjustments.
The PVC "T" connector will hold the small motor. The motor fits
too loosely by itself, so we wrap paper or tape around it
to make a snug fit. The shaft of the motor can be left bare,
but the generator will work a little better if it is made fatter
by wrapping tape around it, or (better) putting a plastic rod
with a hole in the center onto the shaft to act as a pulley for
the rubber band.
Next, we drill a small hole in the side of the PVC "T" connector,
just under the makeshift pulley on the motor. This hole will
be used to hold the lower "brush", which is simply a bit of
stranded wire frayed at the end, that is almost
touching the rubber band on the pulley.
As the photo shows, the stranded wire is held in place with some
electrical tape, or some other tape or glue.
The rubber band is now placed on the pulley, and allowed to hang
out the top of the "T" connector.
 Click on the image for a larger picture
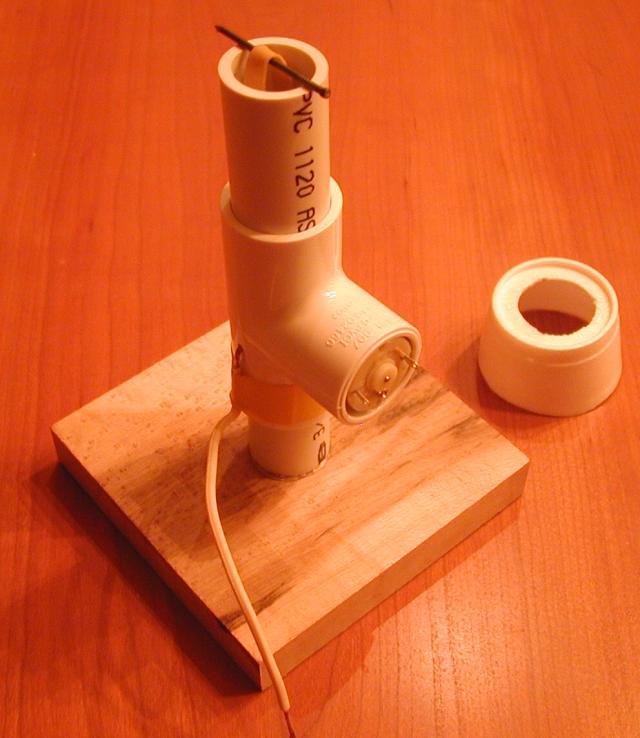
Next, cut another 3 or 4 inch piece of 3/4 inch PVC plumbing pipe.
This will go into the top of the "T" connector, with the rubber band
going up through it. Use the small nail to hold the rubber band
in place, as in the photo below. The length of the PVC pipe should
be just enough to fit the rubber band. The rubber band should not
be stretched too tightly, since the resulting friction would prevent
the motor from turning properly, and increase wear on the parts.
Click on the image for a larger picture
Next, cut another 3 or 4 inch piece of 3/4 inch PVC plumbing pipe.
This will go into the top of the "T" connector, with the rubber band
going up through it. Use the small nail to hold the rubber band
in place, as in the photo below. The length of the PVC pipe should
be just enough to fit the rubber band. The rubber band should not
be stretched too tightly, since the resulting friction would prevent
the motor from turning properly, and increase wear on the parts.
 Click on the image for a larger picture
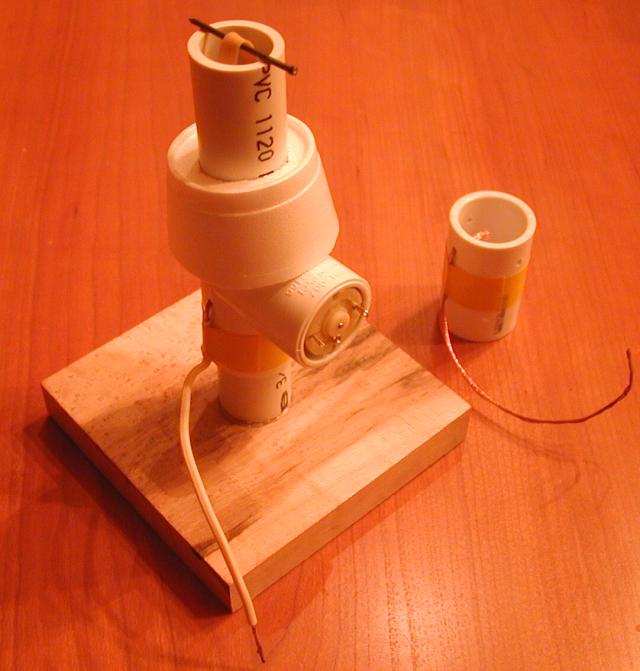
Cut the styrofoam cup about an inch from the bottom, and carefully
cut a 3/4 inch diameter hole in the center of the bottom of the cup.
This hole should fit snugly onto the 3/4 inch PVC pipe.
Click on the image for a larger picture
Cut the styrofoam cup about an inch from the bottom, and carefully
cut a 3/4 inch diameter hole in the center of the bottom of the cup.
This hole should fit snugly onto the 3/4 inch PVC pipe.
 Click on the image for a larger picture
Now drill three holes near the top of the PVC union coupling.
Two of these holes need to be diametrically opposite one another,
since they will hold the small nail which will act as an axle
for the rubber band. The third hole is between the other two,
and it will hold the top "brush", which, like the bottom brush,
will almost touch the rubber band.
The top brush is taped to the PVC union coupler, and the coupler
is placed on the 3/4 inch pipe, above the styrofoam cup collar.
The rubber band is threaded through the coupler, and held in
place with the small nail, as before.
Bare the top brush (so it has no insulation) and twist it to
keep the individual wires from coming apart. You can solder the
free end if you like, but it is not necessary.
The free end of the top brush will be curled up inside the empty
soda can when we are done, and thus electrically connect the soda
can to the top brush.
Click on the image for a larger picture
Now drill three holes near the top of the PVC union coupling.
Two of these holes need to be diametrically opposite one another,
since they will hold the small nail which will act as an axle
for the rubber band. The third hole is between the other two,
and it will hold the top "brush", which, like the bottom brush,
will almost touch the rubber band.
The top brush is taped to the PVC union coupler, and the coupler
is placed on the 3/4 inch pipe, above the styrofoam cup collar.
The rubber band is threaded through the coupler, and held in
place with the small nail, as before.
Bare the top brush (so it has no insulation) and twist it to
keep the individual wires from coming apart. You can solder the
free end if you like, but it is not necessary.
The free end of the top brush will be curled up inside the empty
soda can when we are done, and thus electrically connect the soda
can to the top brush.
 Click on the image for a larger picture
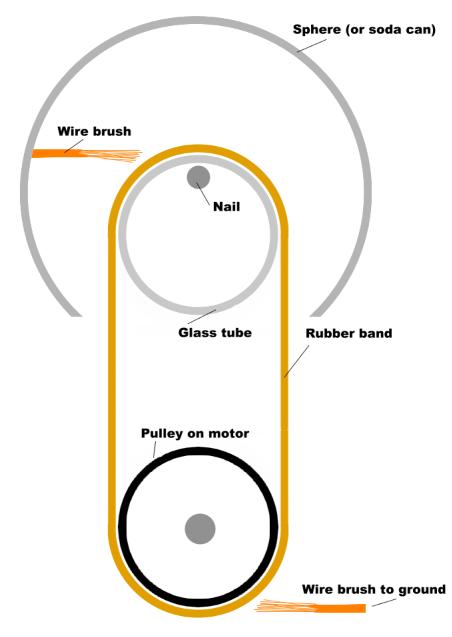
We need a small glass tube to act as both a low-friction top pulley,
and as a "triboelectric" complement to the rubber band, to generate
static electricity by rubbing. Glass is one of the best materials
to rub against rubber to create electricity.
We get the tube by taking apart a small electrical fuse. The metal
ends of the fuse come off easily if heated with a soldering iron or
a match. The solder inside them drips out when they come off, so
be careful. The glass, the metal cap, and the molten solder are
all quite hot, and will blister the skin if you touch them before
they cool.
Click on the image for a larger picture
We need a small glass tube to act as both a low-friction top pulley,
and as a "triboelectric" complement to the rubber band, to generate
static electricity by rubbing. Glass is one of the best materials
to rub against rubber to create electricity.
We get the tube by taking apart a small electrical fuse. The metal
ends of the fuse come off easily if heated with a soldering iron or
a match. The solder inside them drips out when they come off, so
be careful. The glass, the metal cap, and the molten solder are
all quite hot, and will blister the skin if you touch them before
they cool.
 Click on the image for a larger picture
The resulting glass tube has nice straight, even edges, which are
"fire polished" for you, so there is no sharp glass, and no uneven
edges to catch on the PVC and break the glass.
The next step is a little tricky. The small nail is placed through
one of the two holes in the PVC union coupler, and the small glass tube
is placed on the nail. Then the rubber band is placed on the
glass tube, and the nail is then placed in the second hole. The rubber
band is on the glass tube, which is free to rotate around the nail.
Click on the image for a larger picture
The resulting glass tube has nice straight, even edges, which are
"fire polished" for you, so there is no sharp glass, and no uneven
edges to catch on the PVC and break the glass.
The next step is a little tricky. The small nail is placed through
one of the two holes in the PVC union coupler, and the small glass tube
is placed on the nail. Then the rubber band is placed on the
glass tube, and the nail is then placed in the second hole. The rubber
band is on the glass tube, which is free to rotate around the nail.
 Click on the image for a larger picture
Now we glue the styrofoam collar in place on the PVC pipe.
I like to use a hot glue gun for this, since the glue can be
laid on thickly to stabilize the collar, and it sets quickly
and does not dissolve the styrofoam.
Click on the image for a larger picture
Now we glue the styrofoam collar in place on the PVC pipe.
I like to use a hot glue gun for this, since the glue can be
laid on thickly to stabilize the collar, and it sets quickly
and does not dissolve the styrofoam.
 Click on the image for a larger picture
At this point we are ready for the empty soda can.
Aluminum pop-top cans are good for high voltage because
they have nice rounded edges, which minimizes "corona discharge".
With a sharp knife, carefully cut out the top of the soda can.
Leave the nice crimped edge, and cut close to the side of the
can so as to leave very little in the way of sharp edges. You
can smooth the cut edge by "stirring" the can with a metal tool
like a screwdriver, pressing outward as you stir, to flatten the
sharp edge.
Tuck the free end of the top brush wire into the can, and invert
the can over the top of the device, until it rests snugly on the
styrofoam collar.
Click on the image for a larger picture
At this point we are ready for the empty soda can.
Aluminum pop-top cans are good for high voltage because
they have nice rounded edges, which minimizes "corona discharge".
With a sharp knife, carefully cut out the top of the soda can.
Leave the nice crimped edge, and cut close to the side of the
can so as to leave very little in the way of sharp edges. You
can smooth the cut edge by "stirring" the can with a metal tool
like a screwdriver, pressing outward as you stir, to flatten the
sharp edge.
Tuck the free end of the top brush wire into the can, and invert
the can over the top of the device, until it rests snugly on the
styrofoam collar.
 Click on the image for a larger picture
The last step is to attach the batteries. I like to solder a
battery clip to the motor terminals, and then clip this onto
either a nine-volt battery, or a battery holder for two AA
size batteries. The nine-volt battery works, but it runs the
motor too fast, making a lot of noise, and risking breakage of
the glass tube. It does, however, make a slightly higher voltage,
until the device breaks.
Click on the image for a larger picture
The last step is to attach the batteries. I like to solder a
battery clip to the motor terminals, and then clip this onto
either a nine-volt battery, or a battery holder for two AA
size batteries. The nine-volt battery works, but it runs the
motor too fast, making a lot of noise, and risking breakage of
the glass tube. It does, however, make a slightly higher voltage,
until the device breaks.
 Click on the image for a larger picture
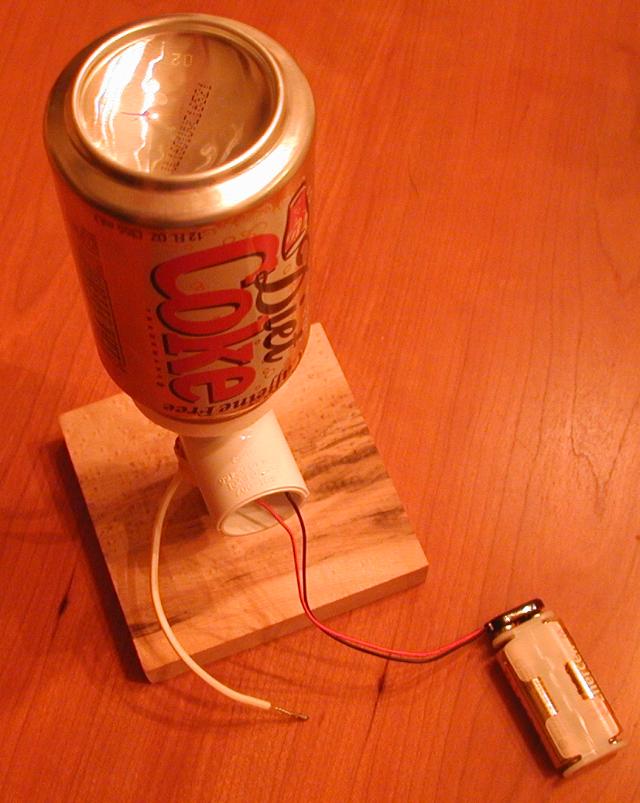
To use the Van de Graaff generator, simply clip the battery to the
battery clip. If the brushes are very close to the ends of the rubber
band, but not touching, you should be able to feel a spark from the
soda can if you bring your finger close enough. It helps to hold onto
the free end of the bottom brush with the other hand while doing this.
Click on the image for a larger picture
To use the Van de Graaff generator, simply clip the battery to the
battery clip. If the brushes are very close to the ends of the rubber
band, but not touching, you should be able to feel a spark from the
soda can if you bring your finger close enough. It helps to hold onto
the free end of the bottom brush with the other hand while doing this.
 Click on the image for a larger picture
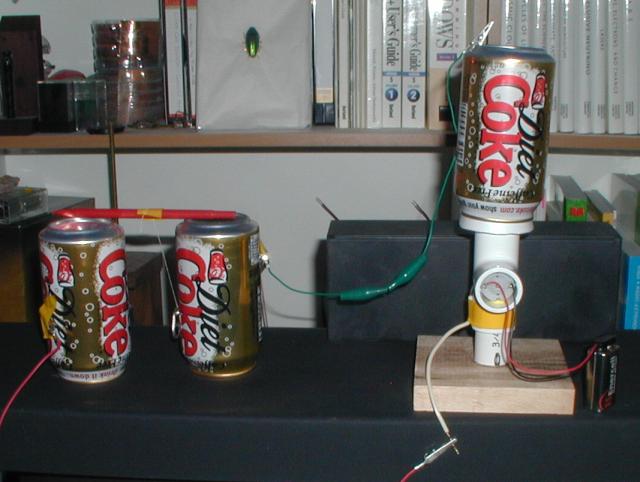
To use our generator to power the Franklin's Bells we built in the
previous section
of the book, clip the bottom brush wire to one "bell", and attach a
wire to the top of the generator, connecting it to the other "bell".
The pop-top clapper of the Franklin's Bells should start jumping between
the soda cans. It may need a little push to get started.
Click on the image for a larger picture
To use our generator to power the Franklin's Bells we built in the
previous section
of the book, clip the bottom brush wire to one "bell", and attach a
wire to the top of the generator, connecting it to the other "bell".
The pop-top clapper of the Franklin's Bells should start jumping between
the soda cans. It may need a little push to get started.
 Click on the image for a larger picture
Most negative
(items at this end steal electrons)
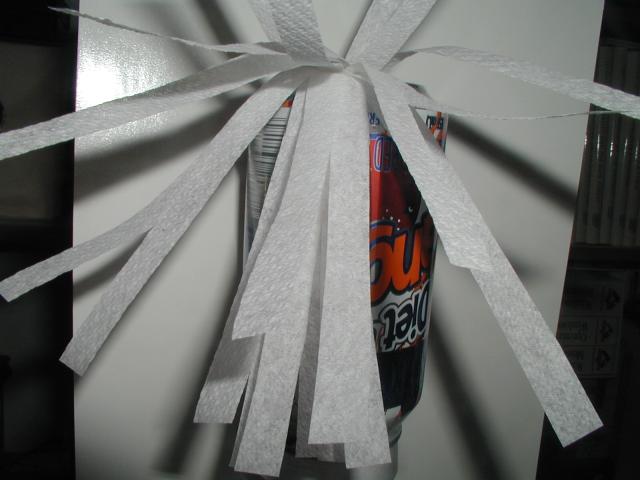
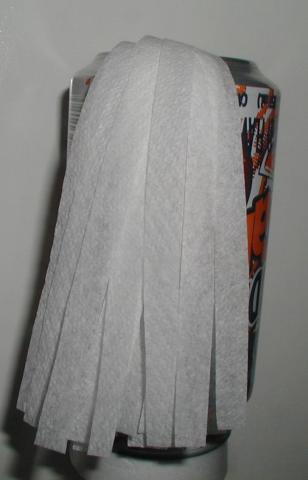 We take a paper napkin, and cut thin strips of the lightweight paper.
We then tape the ends of the paper together at one end, and tape that
end onto the Van de Graaf generator.
The effect will look somewhat like long hair cascading down the soda can.
Now turn the Van de Graaff generator on. The thin strips of paper all
get the same charge, and start to repel from one another. The effect
is "hair raising". The strips start to stand out straight from the
can, like the hair on the back of a scared cat.
We take a paper napkin, and cut thin strips of the lightweight paper.
We then tape the ends of the paper together at one end, and tape that
end onto the Van de Graaf generator.
The effect will look somewhat like long hair cascading down the soda can.
Now turn the Van de Graaff generator on. The thin strips of paper all
get the same charge, and start to repel from one another. The effect
is "hair raising". The strips start to stand out straight from the
can, like the hair on the back of a scared cat.
 Click on the image for a larger picture
First, take one piece of wire (a straightened paper clip will do),
and cut the end at an angle so it is sharp.
Bend the other end into a rough loop or triangle, so the wire will
stand up with the sharp point facing straight up. A little tape
will help hold it onto the table, or a block of wood.
Click on the image for a larger picture
First, take one piece of wire (a straightened paper clip will do),
and cut the end at an angle so it is sharp.
Bend the other end into a rough loop or triangle, so the wire will
stand up with the sharp point facing straight up. A little tape
will help hold it onto the table, or a block of wood.
 Click on the image for a larger picture
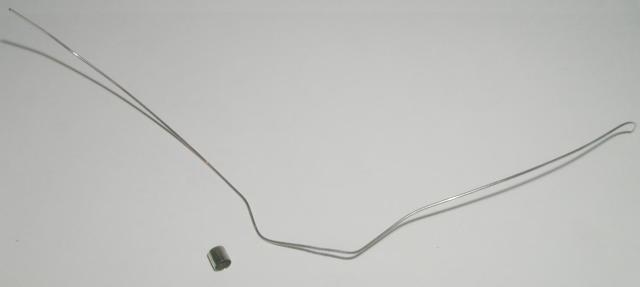
The armature (the part that spins) is made from the other piece of wire
and the metal cap we saved when we took apart the fuse.
Sharpen both ends of the wire by cutting the ends at a diagonal, like we
did with the base wire.
Bend the wire into an S shape.
The pointed ends of the wire should point at 90 degrees from the center
straight part of the wire.
Click on the image for a larger picture
The armature (the part that spins) is made from the other piece of wire
and the metal cap we saved when we took apart the fuse.
Sharpen both ends of the wire by cutting the ends at a diagonal, like we
did with the base wire.
Bend the wire into an S shape.
The pointed ends of the wire should point at 90 degrees from the center
straight part of the wire.
 Click on the image for a larger picture
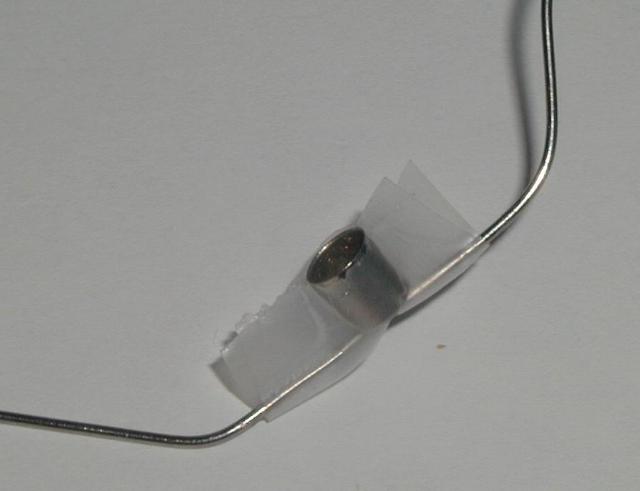
Attach the metal cap to the center of the wire with tape.
Place the cap onto the pointed end of the base wire, and bend the
S shaped ends of the armature wire down, so it will balance easily
on the sharp end of the base wire.
The armature should now spin freely if you tap it gently.
Connect a source of high voltage to the base wire using an alligator
clip or a wire. The high voltage source can be the Van de Graaff
generator, or just a couple square feet of aluminum foil pressed
against the front of your television set, as we did in earlier
projects.
As the high voltage is turned on, the armature will start to spin
in the direction away from the sharp points. The Van de Graaff
generator may need a good ground, or a person holding onto the
ground wire. The television will give the motor a good kick
every time it is turned on or off, and turning it on and off
every second will get it spinning quite rapidly.
Click on the image for a larger picture
Attach the metal cap to the center of the wire with tape.
Place the cap onto the pointed end of the base wire, and bend the
S shaped ends of the armature wire down, so it will balance easily
on the sharp end of the base wire.
The armature should now spin freely if you tap it gently.
Connect a source of high voltage to the base wire using an alligator
clip or a wire. The high voltage source can be the Van de Graaff
generator, or just a couple square feet of aluminum foil pressed
against the front of your television set, as we did in earlier
projects.
As the high voltage is turned on, the armature will start to spin
in the direction away from the sharp points. The Van de Graaff
generator may need a good ground, or a person holding onto the
ground wire. The television will give the motor a good kick
every time it is turned on or off, and turning it on and off
every second will get it spinning quite rapidly.
