
THE MOTH:
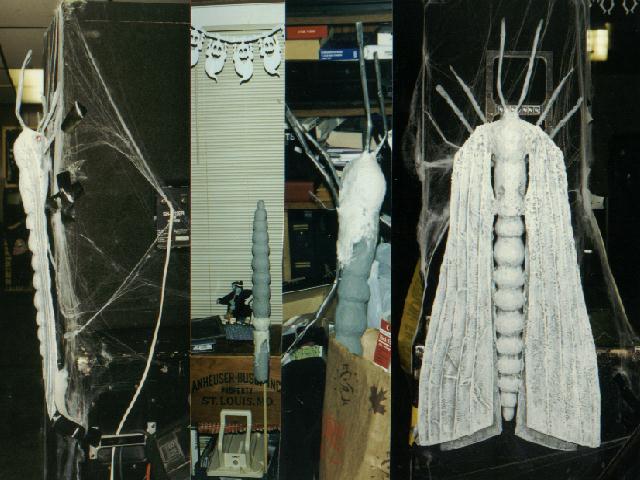
(My First Static Prop)
I hate moths!!....I hate the way they fly into your face and smack into you...yech!!!! Also, I recall seeing a
movie (when I was very young and wasn't supposed to be watching the TV at that time of night) about a woman who
turns into this big, hairy, blood-sucking, murderous moth.....so....I decided I had to have a BIG BUG.
The MOTH is just under 4 feet in length and usually hangs around sound-reinforcement equipment on Halloween....and
looks GREAT under a black light!!
MATERIALS:
1 - plastic (toy) bug to use as a reference or model
1 - bag of Amaco Claycrete Papier Mache (OR) bag of Amaco Sculptamold (OR) any other shredded/ready-to-mix papier
mache product (found in craft sections or craft stores)
1 - Gallon of Elmer's glue (you'll have lots left over...but this is more cost effective than buying a bunch of
little bottles)
2 - sheets of poster board (I used black)
1 - large roll of duct tape
1 - large roll of paper towel (you may use more,... or less than this)
1 - set of eyes (I used a set of pink teardrop-shaped faceted costume jewelry earrings......and stuck 'em in it's
head....heh, heh, heh!)
1 - styrofoam ball or egg (3 or 4 inches wide) for the 'head' of the bug
1 - heavy cardboard tube (I used a tube that commercial plastic wrap is rolled on...the type used in most restaurant
kitchens.) You could try PVC pipe for this.
Kleenex
Wire (Cloth Wrapped Floral Wire)
Latex Paint - I've been using Aleene's Latex Craft Paint for most of my small props. It dries fast, is available
in many colors, and it has proven to be pretty durable so far.
LAYOUT: I did mine by eye.....but an easier method would be to scan in a drawing or picture of the bug you want
to make, blow it up and print out a pattern.
BASIC CONSTRUCTION:
THE (SEGMENTED) BODY: Starting at the area where the larger segments would begin, I wrapped paper towel around
the tube and taped it in place with duct tape, forming and shaping each segment as I moved down the body.....and
decreasing them in size as I approached the end (or tail).
UPPER BODY: The upper body was also formed and shaped with paper towel. The 'indentations' where the wings are
attached were 'cut into' the paper towel with an exacto knife and shaped with duct tape.
APPLICATION OF PAPIER MACHE PASTE: After the segments and upper body areas were formed and secured with duct tape,
I mixed some Amaco Claycrete Papier Mache with Elmer's Glue (instead of water) until it was like a thick (but spreadable)
paste. I applied the paste (about 1/4 " thick) to the body and smoothed the surface as much as I could. Only
mix enough for 2 or 3 segments at a time as the paste begins to set up quickly (especially if you use 'Sculptamold').
EZ Cleanup: Mix your 'paste' on a piece of heavy duty aluminum foil or a similar user friendly surface. (Aliminum
foil has worked the best.)
THE HEAD: The styrofoam ball (or egg) was slightly altered in shape (by compression (or squeezing) to resemble
the plastic model's head. Any additional shaping that was needed was done with paper towel and duct tape. The head
was attached to the body with duct tape and covered with Claycrete/Glue paste.
LEGS & ANTENNAE: You can get really creative here (I didn't....time constraints, etc.). All I did was wrap
duct tape over cloth wrapped (floral) wire and secured the wrapped wire to the body with more Claycrete/Glue paste.
A 'hanging' wire was also embedded into the body at this time.
The antennae were attached by sinking wire into the head and building up the 'base' of the antennae with more 'paste'
and set aside to dry.
THE WINGS: The wings were cut out of black poster board. Cloth wrapped wire was glued and taped to the poster board
(to represent 'veins'). The wings were attached to the body with more cloth wrapped wire and secured with Claycrete/Glue
paste.
PAINT: After painting the Moth with a dark gray undercoat, I covered the wings with a layer of 'single-ply *Kleenex
Mache*' and put a thin coat of the dark gray on the wings. (I wanted to give the Moth a hairy body and use several
layers of Kleenex to make the wings feathery...*sigh!* .....but time was running out and I had to cut a few corners.)
I applied several coats of paint to the moth with an almost-dry brush.....gradually lightening the color of the
paint and reducing the surface area covered with each coat.
EYES: Since I was using earrings for eyes, I covered the gold-plated areas of the earrings with paint and sealed
the paint with a matte finish.
