|
Seashell Angel Part 1
by LovlyGypsy

I've attached the tube I used for her hair and the wood pattern I used for her head.
Download Here
Open PSP, go to FILE>NEW and use these settings...
Width: 600
Height: 600
Background color: Blue
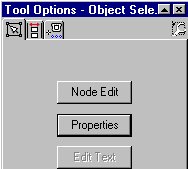
Go to VIEW>NORMAL VIEWING. Select white as your foreground and background colors. If your Tool Options isn't open you can open it by clicking the Toggle Tool Options Window button
 , click the Preset Shapes tool , click the Preset Shapes tool
 , select Ellipse, check Antialias, check Create as vector, line width 5 like this... , select Ellipse, check Antialias, check Create as vector, line width 5 like this...

Now hold down the Shift key and make an ellipse any size you want your shell to be. Click the Object Selector tool
 , on your tool Options window click Node Edit, like this... , on your tool Options window click Node Edit, like this...
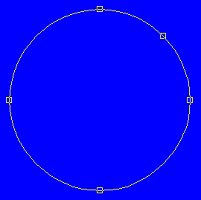
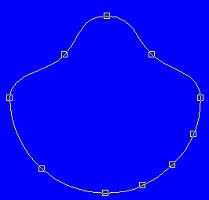
This will make your circle have little boxes (nodes) around it like this...

Hole down the Ctrl key and click on the line between the top and right middle nodes, this will place a new node there like this...
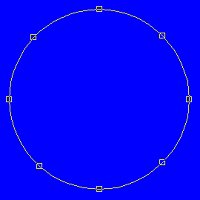
Now do the same thing for the other side and on the bottom two sides so that it looks like this...
Click on the node between the top and middle right nodes and drag it inward some like this...

Do the same thing for the other side and drag the top node down a little so that it looks like this...
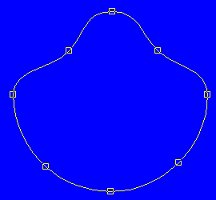
Now we have a basic clam shell shape.
Add a node to both sides of the node that's between the middle right and bottom nodes, like this...
Do the same thing for the other side, like this...
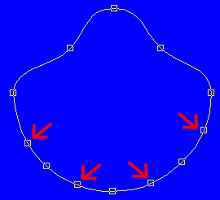
Now click on every other node (arrows pointing to them in above pic) and bring it up and in a little like this...
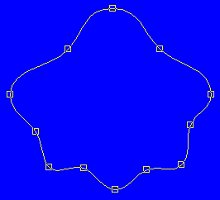
Go to LAYERS>CONVERT TO RASTER LAYER. I'd save it now as a .psp file. If your Layer Palette isn't open you can open it by clicking the Toggle Layer Palette button
 , then click the create layer button , then click the create layer button
 you don't have to name it because we will be deleting it later. Select black as your foreground and background colors, select the preset shapes tool and select Triangle, make a triangle from the middle top to the middle bottom like this... you don't have to name it because we will be deleting it later. Select black as your foreground and background colors, select the preset shapes tool and select Triangle, make a triangle from the middle top to the middle bottom like this...

It's ok if it overhangs we'll fix that later. Go to EDIT>COPY, EDIT>PASTE>AS NEW SELECTION, go to IMAGE>ROTATE and rotate to the right by 20 and place it on left middle hump like this...

With that still selected go to EDIT>COPY, EDIT>PASTE>AS NEW SELECTION, IMAGE>MIRROR and place it on the other side like this...

Go to EDIT>COPY, EDIT>PASTE>AS NEW SELECTION, go to IMAGE>ROTATE and rotate to the right by 20 and place it on left hump like this...

With that still selected go to EDIT>COPY, EDIT>PASTE>AS NEW SELECTION, IMAGE>MIRROR and place it on the other side like this...

Click on the layer with your white shell, click the magic wand  and click on the white shell, go to SELECTIONS>INVERT, click on the layer with the triangles and hit the Delete key. Go to SELECTIONS>SELECT NONE. It should look like this...

On to part 2....
Copyright © 2000-2001 by LovlyGypsy,
all rights reserved
| I, LovlyGypsy,
Give my permission to Ldy
Archrr aka Artists for PSP to place any and all tutorials
that I have made on her site.. this 22nd day of February 2001.
These tutorials were made solely by me and permission is mine to
give. |
|

