--- ThunderDogs DeCalifornication Procedure ---
^^^^^^^^^^^^^^^^^^^^^^^^^^^^
Disclaimer: I'm not a California resident. In 2000, I got a great deal on a cherry (California model) A14 from a Powersports dealer here in Florida.
Initially, I'd no intention of removing the KLR's Evaporative Emission Control System. It doesn't weigh much, and seemed to have zero effect on performance. Zero effect until one sunny day, a valve within the system (don't know what this valve's called..we'll call it the "buzzkiller valve" for now) got clogged (after 13k miles) and stranded me at the intersection of Mayhem & Chaos during rush hour. (it just died, showing symptoms of fuel starvation) The KLR had never stranded me before, this was the fatal mistake for Buzzkiller & his assembly.
First off..there's a complete diagram of the Evaporative Emission Control System hose routing, in your owners manual. Have this handy as you read this story. The vacuum hoses are color coded.
You'll want some rubber vacuum hose caps. I bought an assortment pack at a local auto parts store for 2 bucks.
First, remove both side panels to remove the seat.
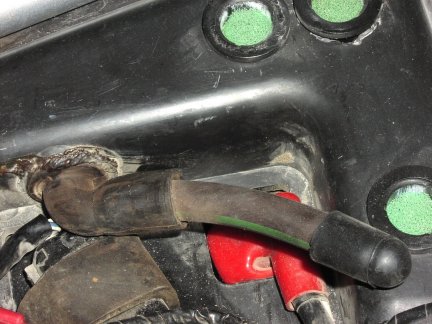
Next, remove the emissions canister in the rear. There are (2) lines.. (1 blue, 1 green) that go to this canister. Blue to the return pump, and green goes to the airbox. Unplug both of the lines from the canister. The blue line you can toss or save for later applications. The green line to the airbox needs to be trimmed close to the airbox then plugged (with your handy hose caps) as seen in Pic#1.
Pic#2 -It's a good idea to save everything in the case that you ever sell the bike in California.
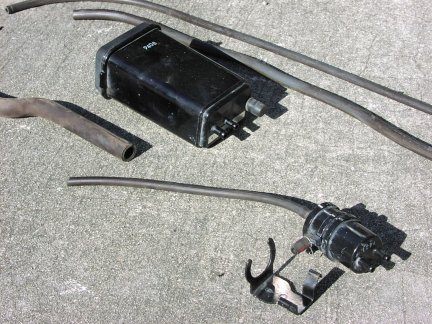
Then remove the return pump from its bracket. I cut off the part of the bracket that actually held the pump (piece seen in Pic#2) in place.
Then filed smooth the rough edge on the remaining part of the bracket that's still attached to the frame.
Now you've got red, white & blue lines dangling from where the return pump used to be. The blue line from the gas tank vents to atmosphere, I tie wrapped that one to the frame, it's likely best to run it down in front of the rear tire with the other hoses.
The red line from the gas tank needs to be trimmed/capped, as does the white line coming from the bottom of the return pump as seen in Pic#3.

I read a post by "CA (emissions fell off officer) Stu" that recommended replacing this "T" that you end up with, by using (1) line so that the petcock vacuum line goes directly to the carb. This is a really good idea, it was getting really late..I just capped off the "T".
That's it! And now you have an empty mounting bracket with cover, for storage purposes.
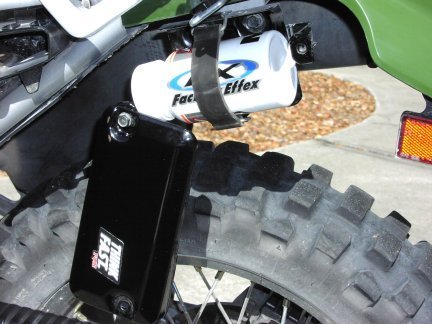
Pic#4 -I used the existing emissions box mounting bracket/hardware/cover, to house a home made (el cheapo grande) first aid kit. Using the existing emissions canister cover keeps things looking nice & stock.
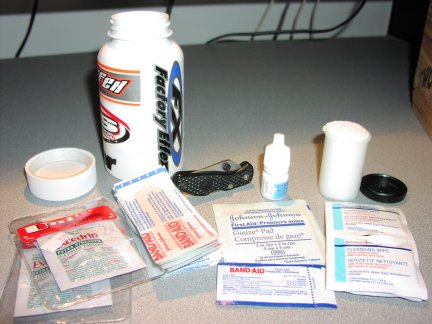
The kit itself is housed in an old Excedrin bottle. A jumbo (275 count) bottle. (Yea, the days of MX have left me an aspirin junkie)
Pic#5 -The kit includes:
Cleansing wipes
Antibiotic Ointment
Elastic bandage
Gauze Pads
Band Aids
Small lockback knife (sharp)
Aspirin
eyedrops
There's actually room for alot more stuff. The bottle's just half full. I plan on adding more disinfectant type stuff as I find it. For now, I stuffed some napkins in there for a tight fit. The bottle's been waterproof so far.
Boom! That's it! Go riding with no fear of "Emissions Control" grounding you, as mine did.
Scott A14 "thunderdog" Sorrento, Fl
ThunderDogs Airbox Picture
Moose rollchart/New Factory 909 grips
Acerbis Rally Brush w/ Flag guard ext
Custom made SS mesh headlight guard by BajaDesigns
SuperTrapp IDS2 with Dual Star heatshield
Prototype 3/4 in. drop link by Don Beck
SuperBrace fork brace
^^^^^^^^^^^^^^^^^^^^^^^^^^^^^^^^^
Back to KLR-Mods page
Click here for My KiLleR Links Page.
Back To Homepage