Photography is a rewarding, fun hobby. You don't even have to be a pro to enjoy it, as any well printed image will take you back to that marvelous instant you immortalized on film. And as it is regarded as an art, it will teach you to lay a critical eye on life and to really look at what you're seeing.The information on this page hopes to help you get on film exactly what you want on it.
- Help deciding on what kind of camera to use.
- Advice on how to use a 35mm SLR camera.
- How to make a pinhole camera.
- Choosing film for your exact needs and/or whims.
- An introduction to the development process.
Of course, questions, comments and suggestions are welcome.
Deciding on a camera.
All manufacturers spend thousands of dollars on all kinds of publicity to force people to buy their products. Don't fall in their traps! Buy exactly what you want and don't let yourself waste your money on something you won't use.
If you are taking your first steps, by all means buy a cheap point-and-shoot (yes, the auto-everything, pocket size cameras everyone has) just to be sure you really like photography. Kodak and Fuji one-use cameras do well.
Then, unless you decide you hate picturetaking, the next step is getting a camera that can be reloaded and is no in danger of being ruined if it is sat on. Canon and Minolta point-and-shoot cameras will never fail you both in quiality and durability: The extra bucks you pay for these brands are well worth it. Surf the Canon and Minolta homepages.
If you are sure you are serious about photography, and want to have real control over what your camera does (and have a few hundred bucks to spend) along with superb quality, an entry- or mid-level 35mm SLR (Single-Lens-Reflex) camera is for you. The main advantages of SLRs over a "normal" camera are the following:
Canon, Minolta, Nikon and Olympus are the manufacturers to consider. Other manufacturers are not worth mentioning, so stay away from them: it is preferrable to buy a second-hand Minolta to a new well, whatever other name comes to mind. Look at the photography links to see all kinds of different models and reviews so you can decide on what's best for you and your budget.
- You look through the camera's real lens, so you know exactly what the picture will look like.
- It is possible to control focus, aperture and exposure time for special effects.
- An immense array of interchangeable lenses lets your camera take any picture from wide angle views to telescopic shots.
- Semiautomatic and automatic functions assist the photograper in all kinds of shooting conditions.
- Accessories for all kinds of imaginable applications are readily available.
- Most can take all kinds of film.
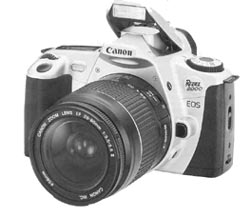
My own camera and personal recommendation is a Canon EOS Rebel 2000 with a 50mm f/1.8 lens.
How to use a SLR camera.
The following is just a very basic introduction to how a SLR camera can be used to take pictures exactly how you want them to be. If you want a more complete guide, use the links I suggest or search the web.Focal length. A 50mm lens produces an image of a distant object on the film that is the same size as would be produced by a pinhole 50mm from the film. In that fashion, the longer the focal length, the larger distant objects will appear.
F-stop. The focal length of the lens divided by the diameter of the aperture (as seen from the front). It is also called an f-number, and is written like f/8, which means the aperture diameter is 1/8th thefocal length.
The term is used both in regard to the maximum aperture of a lens and in regard to the aperture selected in a specific situation.
The brightness of the image on the film is inversely proportional to the f-number squared. The depth of field increases but diffraction is worsened when using a large f-number. The effective f-number for all 3 effects changes if the lens is focused extremely close.Depth of field. It is convenient to think of a rear depth of field and a front depth of field. The rear depth of field is the distance from the object to the farthest point that is sharp and the front depth of field is the distance from the closest point that is sharp to the object. Sometimes the term depth of field is used for the combination of these two, i.e. the distance from the closest point that is sharp to the farthest point that is sharp.
In an SLR, when you set the aperture to a shallow depth of field (such as f/1.4), you will get a sharp image at a single distance; the rest will be out of focus. If you set the aperture to a great depth of field (say f/22), you get an image in which objects far and near are in focus.
A background deliberately out of focus makes your subject outstand.
DOF (Depth of Field) Preview. It is a feature on higher quality SLR cameras that allows you to stop down the lens while looking though the viewfinder. Ostensibly it allows you to "preview" the depth of field. Of course, since this stops down the aperture, the image also gets dimmer.
Most people find it difficult to judge from a dim viewfinder image whether some part of the image will appear sharp in a slide or print. However, in many cases photographers will select a large aperture to deliberately blur background or foreground objects. DOF preview lets you see just what the effect will be.Exposure time It is the amount of time the shutter will be open. The more the film is exposed to the light, the brighter the image will be. It is used in combination with the aperture to produce an image with the correct amount of light.
It is measured in fractions of a second, so when the camera is going to use a exposure time of 250, it means the shutter will be open for 1/250th of a second. Therefore, if you use a slow shutter speed (1/60th or less), you can deliberately blur the picture to emphasize the speed of your subject. If you need to freeze movement, use a fast shutter speed.You may vary both aperture and exposure time all you like; the important thing is that you get just the right amount of light on your film.
Making a pinhole camera
Pinhole photography is lensless photography. A tiny hole replaces the lens. Light passes through the hole and an image is formed in the camera. These cameras are used for fun, for art and for science.The Pinhole
The hole is made in a thin piece of metal, brass shim (available in some car supply stores) or metal from the lid of small box or glass container (bought at a supermarket ). Some use aluminium foil from a disposable baking pan. Ordinary aluminium foil is too thin. My own experience is with brass shim and thin metal from container lids.
If the metal is taken from a container lid, it should be sanded carefully with ultra-fine emery paper (e.g. # 600) to remove any paint or varnish and to make it thinner. The hole is made with a needle. The edge of the hole should be sharp. The optimal diameter depends on the focal length of the camera, i.e. the distance from the pinhole to the film or photographic paper. In general, the smaller the hole, the sharper the image. If the hole is too small, however, the image get less sharp because of diffraction effects (light is bent around the edge of the pinhole).
Place the piece of metal on top of some hard cardboard. Carefully poke a hole with a needle taking care that the hole is as round as possible. The needle may be put through a cork to make it easier to handle. Or you may put masking tape on the head of the needle. Hold the needle steadily in a 90 degree angle to the surface. Turn the piece of metal and sand the back side carefully with fine-grained emery paper to remove the burr or debris where the needle point has penetrated. (The edges of the pinhole should be sharp). Then place the metal on the cardboard back side up and cautiously spin the needle in the hole to make sure the hole is round. The hole can be checked with a magnifier or an enlarger. You can also use an enlarger or slide projector to check the diameter of the pinhole.
The Camera
Pinhole cameras can be made of many kinds of light-tight containers. A cylindrical cardboard container, e.g. an oatmeal box or a herb tea container, is easily converted into a pinhole camera for pieces of 120 roll film or photographic paper.
- Start by making a cardboard film holder. The film holder is made of two pieces of cardboard which fit the internal dimensions of the cylindrical box. The film holder will be loaded in a darkroom by placing a piece of 120 roll film or photographic paper.
- The film holder fits into a groove on either side of the box. The groove is made by gluing cardboard strips to the insides of the box. You may make a supporting back for the film holder by gluing a piece of cardboard in the groove. This will make it easier to slide the loaded filmholder into the groove.
- Spray the insides of the box (including the lid), and the outsides of the cardboard film holder, with flat black spray paint. Make sure the lid is not translucent. If necessary glue some black plastic lining or cardboard to the lid to make it opaque.
- Make a hole in the front of the box. The "optical axis" should extend to the center of the window in the film holder - provided you are not looking for special off-center effects.
- Tape the pinhole plate to the front of the cylindrical box.
- Make a simple shutter by taping a flap of black plastic over the pinhole, e.g. plastic from a photographic paper package. The flap may be held in place by a rubber string. When you take a picture you remove the string, open the flap for the necessary exposure and close it.
- If you want a tripod bush or socket for your camera, use some araldite to glue a ¼" or 3/8" nut to the bottom of the box.
- Since this camera has to be loaded in the darkroom, it will be practical to make several cameras. The cameras are easily carried in a bag.
- If you want a curved film plane for your camera, the cardboard film holder is left out. Film or paper is taped to the inside of the camera.
- Your camera is ready for ONE picture. Plan it carefully!
Experiment with different exposure times till you get them right for the pinhole diameter and focal length you chose. Have fun!
Choosing film
There is one kind of film for every occasion. As you may have already seen, the most important feature on film is its sensitivity, given by its ISO/ASA denomination. The higher the ISO, the more sensitive to light the film will be. You will usually find ISO 100, 200 or 400, but it ranges from 25 to 6000 in factors of two.
Use low sensitivity for very brilliant subjects or if you need blurred images in low light conditions. High sensitivity film is best to freeze movement or for good pictures in low light conditions. Very high sensitivity film is used mostly for astrophotography, a fascinating field that I'm only learning about and that usually requires long exposure times (minutes or hours) in combination with a telescope and, of course, an adaptor.
Infrared and Ultraviolet film are used mostly for special applications, such as analyses of thermal losses of a house, machine or tank, and other interesting scientific appilcations. If you can find any of these, EXPERIMENT! A whole new ghostly world will pop up in your pictures; in addition, if you hav e low intensity infrared lamp, you can take pictures without bothering night animals or other light-timid subjects.
Positive film for slides provides excellent color reproduction and is cheaper to develop, althoug you cant make any over or underexposure mistakes. Yes, you need a slide projector...
Infrared, ultraviolet and positive film comes in the same ISO sensitivities and are used in a similar fashion as "normal" negative film. Experiment with your camera to find its particular exposure time correction.
Development processes
The development process is a lot simpler than what labs make it sound. In simple terms, first you take the film out of its cartridge in a darkroom. In the same room, you inmerse this long strip in a chemical that sets the colors in the film. That way, it can't be damaged by further exposure to light. The strip is hung out to dry.
Unless it is slide film, the next step is printing the pictures. Light is passed through the negative film and onto photographic paper (which is photosensitive) for a certain time. This printed paper is inmersed into still another setting solution. Once it has dried, the picture finally can be revealed in all its splendor.
This, of course, is an oversimplified version of the whole thing. If you want to set up your own darkroom and make your own prints, look for a good developing kit available at the major photography stores to learn how to develop. The rest comes naturally.
-*-Real good LNCO rated-*-