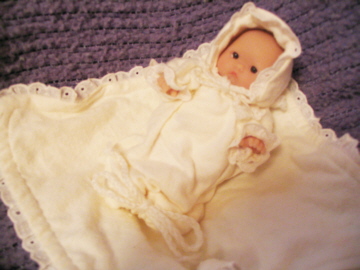
If you know how to sew, you might be able to adapt patterns and sew. It was very difficult for me to sew for such a small doll, but it is possible. I made the below layette set for my mom's doll (mine is modeling it).
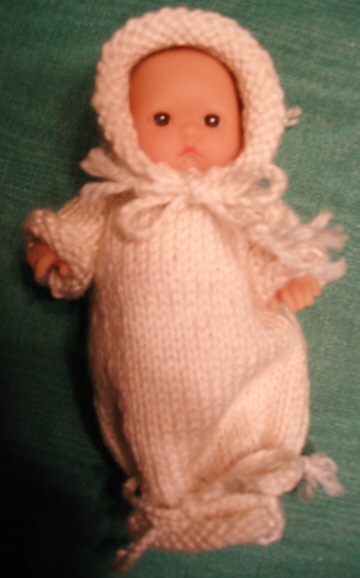 If you prefer knitting, you're in luck! Here are instructions for knitting a nightie or sacque/convertible nightie. Unfortunately, I did not keep track as I made the bonnet, but that's easy to figure out on your own, compared to a nightie. :)
Nightie Knitting Pattern for 5" Berenguer Babies
Instructions by Melissa J. Taylor; not for republication
Sleeves (make two)
Cast on 17 stitches.
Knit a row.
Purl a row.
Knit 2 together at beginning and end of next row.
Purl a row.
Knit and purl six more rows.
Knit two together at beginning and end of next row.
Purl a row.
Knit two together at beginning and end of next row.
Purl two together at beginning and end of row.
Cast off.
When you cast off, that is the "cuff" (sleeve bottom). The wider end is for attaching to the shoulders.
Front (make one)
Cast on 30 stitches.
Knit and purl 18 rows.
Knit two together at beginning and end of next row.
Purl and knit 17 rows.
Knit three together at beginning and end of row.
Purl a row.
* Knit three together at beginning and end of row.
* Purl two together at beginning and end of row.
Repeat the two starred instructions until 12 stitches remain.
Knit two together at beginning and end of next row.
Purl a row.
Cast off.
Back piece 1 (make one)
Cast on 15 stitches.
Knit and purl 18 rows.
Knit two together at beginning of next row.
Purl and knit 17 rows.
Knit three together at beginning of row.
Purl a row.
* Knit three together at beginning of row.
* Purl two together at end of row.
Repeat the two starred instructions until six stitches remain.
Knit two together at beginning of next row.
Purl a row.
Cast off.
Back piece 2 (make one)
Cast on 15 stitches.
Knit and purl 18 rows.
Knit two together at end of next row.
Purl and knit 17 rows.
Knit three together at end of row.
Purl a row.
* Knit three together at end of row.
* Purl two together at beginning of row.
Repeat the two starred instructions until six stitches remain.
Knit two together at end of next row.
Purl a row.
Cast off.
Here is what the nightie/sacque looks like when open, and without the bonnet obscuring the collar.

Back to Doll Pages