

homepage
Work With Me! Instructions for Seraphina's Shawl
NEW!!!!--Mittens!
Terminology
To be sure that you know the right terminology for any given American crochet magazine, here’s a list of the most common abbreviations, and a brief how-to for each.
Chain stitch –Ch- once you have a loop already on your hook, you will yarn over, then draw that through the existing loop. This will create a new loop on your hook, and the old one will drop off. This stitch is most often used either at the beginning of your work, as a foundation row, to start a new row, or in delicate crochet to form lacy holes or filet.


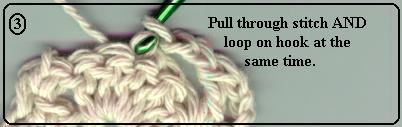
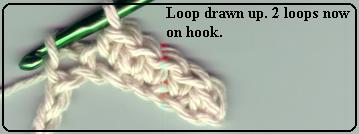
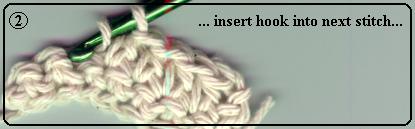
Slip stitch- sl st- This is mainly used to join rounds in a circular pattern, or to take you to another stitch without forming ‘bulky’ stitches in between. With a loop already on your hook, insert hook into next stitch. Yarn over and draw through stitch and loop on hook. 


Yarn Over- yo- This is the basis for forming most stitches. With a loop already on your hook, bring the yarn from the back of the hook, over the top, and to the front. When you next work a stitch, you will bring the hook in front of this yarn. In this way, the yarn wraps around the hook. 
Draw up a loop- (no abbrv.) – when you have inserted the hook through a stitch, you will be instructed to ‘draw up a loop’. This simply means to yarn over and pull the new loop through the bars of the stitch, forming the loop on the right side of the work and placing it on your hook.
Single Crochet –sc- You already have a loop on your hook. Insert the hook beneath the two loops of the next stitch of the previous row. Yarn over and draw up a loop. There are now two loops on your hook. Yarn over and draw through both loops now on hook.


Half-double crochet- hdc- With a loop already on your hook, yarn over and insert hook into next stitch. Yarn over and draw up a loop. This will put 3 loops on your hook. Yarn over and draw through all 3 loops at once.


Double crochet- dc- With a loop already on your hook, yarn over and insert hook into next stitch. Yarn over and draw up a loop. You now have 3 loops on your hook. Yarn over and draw through the 2 forward most loops. This leaves 2 loops still on the hook, one of them being the loop you just drew through the first two. Now yarn over and draw through these last two loops.


Abbreviations you will need:
1. jn- join. When you need to slip stitch to join at the end of a round.
2. sl st- slip stitch
3. sc- single crochet
4. hdc- half-double crochet
5. dc- double crochet
6. ch- chain stitch, usually preceded by a number
7. st- stitch
8. sts- stitches
9. grp- group, usually used with shells or other pattern stitches.
10. Rnd- round; indicates which round you are on in a circular/tubular pattern.
11. tn- turn. You will turn the work so that the last row worked is now facing away from you.
12. Beg- beginning. Usually used when you are joining at the end of a round, or to indicate starting chains for a new row/round. (ie: ‘work beg V-stitch’ may mean to chain 4 and dc in same st as turning.
Also, ‘jn with sl st to 3rd ch of beg ch-3’ would mean that you would count your beginning chains, and join with a slip stitch to the third one from the last row worked.)

A Few Simple Projects
Not sure you’re ready to do the bottle-cover/pouch? That’s all right. A lot of people are much more comfortable trying simple repetitive patterns to begin with, to get the hang of yarn tension, to train their hands into the proper position, etc.
Here are a few ideas to get you going. Have fun with it!
You’ll want to play around to see what yarn/hook combinations give you the best results.
If you’re using a size H hook, as provided in class, I’d suggest either cotton yarn or 4-ply worsted yarn of your choice. If you pay attention, you’ll see that almost every yarn on the market has a ‘suggested’ hook/needle size.
You can use that suggestion, or a larger one. It’s not recommended that you use a smaller hook than suggested.
Doing so produces a stiffer fabric and (to me) is harder to work with.
I personally like using one size larger than suggested, as that gives a more open, softer fabric that drapes nicely.
Rule of thumb, as with knitting, the larger your hook in ratio to your yarn, the more open your work.
Like I said, play around and see what you like best.
Dishcloths
Dishcloths are fast, easy, and useful. I would recommend 100% cotton for these.
Dishcloth 1:
Row 1: With a size H hook, chain 26. Sc in second chain from hook and in each ch across. Foundation row made. (25 sc) Ch 1, turn.
Row 2: Sc in same stitch as turning, and in each st across. Ch 1, turn (25 sc)
Repeat this row until you have a square. At end of last row, clip yarn and finish off.
Dishcloth 2:
Row 1: with H hook, chain 27. Hdc in third ch from hook and in each ch across. Foundation row made. (25 hdc) ch 2, turn.
Row 2: (ch 2 counts as first hdc of row) Hdc in next stitch and in each st across. (25 hdc) Ch 2, turn.
Repeat row 2 until you have a square.
( The way I crochet, it turned out to be 17 rows.)
Finish off.
Dishcloth 3:
Row 1: with H hook, chain 28. Dc in 4th chain from hook and in each ch across. (25 dc) Ch 3, turn. (ch 3 counts as first dc of next row)
Row 2: Dc in next stitch and in each st across. Ch 3, turn. (25 dc)
Repeat row 2 until you have a square. Finish off.
Dishcloth 4: (shell stitch)
Row 1: with H hook, chain 32. Sc in second chain from hook, *sk next 2 stitches, 5 dc in next st, sk next 2 sts, sc in next st. * Repeat from * to * to end of row, ending with sc in last chain. ( 5 5-dc shell groups made) ch 3, turn. (counts as first dc of next row)
Row 2: 2 dc in same stitch as turning, skip next 2 stitches of shell, sc in next stitch (top of shell group), *skip next 2 sts, 5 dc in sc between shell groups of previous row, skip next 2 sts, sc in top of shell.* repeat from * to * to last shell group. Skip next 2 sts, 3 dc in last sc of previous row. (4 shell groups, 2 half-shell groups made). Ch 1, turn.
Row 3: sc in same stitch as turning (top of half-shell), *skip next 2 sts, 5 dc in sc between shell groups, sk next 2 sts, sc in top of shell group.* repeat from * to* across. (End with a sc in top of last half-shell. This means putting a stitch in the third chain of beg chain-3 of previous row) 5 shell groups made.
Repeat rows 2 and 3 alternatively for pattern. Work until you have a square. Finish off.
Dishcloth 5: (granny square)
Note: this is how most granny squares are made. You can make several small ones and sew them together, alternate colors within one square, or make one large square in several colors to use as a lap blanket or baby blanket.
Round 1: Ch 4, join with sl st to first ch to form a ring. Ch 3. Work 2 dc in ring, ch 2, work 3 dc into ring, ch 2, 3 dc in ring, ch 2, 3 dc in ring, ch 2. Join with sl st to top of beg ch-3. You should have a little square of four 3-dc groups.
Round 2: Sl st in the next 2 stitches. Sl st into corner ch-2 space. Ch 3 (beg dc of this group) work (2 dc, ch 2, 3 dc) all in this corner space. Ch 1, sk next 3 stitches, work (3 dc, ch 2, 3 dc) all in next corner. Repeat twice more, so that you have 4 corners once more, with ch-1 spaces between. Ch 1, join with sl st to beg ch-3.
Round 3: sl st in next 2 sts and in corner space. Ch 3. Work (2 dc, ch 2, 3 dc) in first corner. *Ch 1. Skip next 3 stitches. Work 3 dc into next ch-1 space, ch 1, (3dc, ch 2, 3dc) in next corner. Ch 1* Repeat from * to* twice more. Join with sl st to beg ch-3.
Continue in this way, with (3dc, ch 2, 3dc) in each corner, (3dc) in each ch-1 space, and ch-1 in between each group, until you have the size square desired.
When you reach the size you want, join with a slip stitch to the beg ch-3 of that row, then finish off.
*Note: granny squares look very nice with one additional row, with one sc in each st across, and 5 sc in each corner.
Scarves
Anyone can make a nice, warm scarf. It’s the right time of year, and they work up quickly if you want to give some as Yule gifts.
Scarves are easy and fast. All you need to do is chain the length or width you wish your scarf to be, then work even in any pattern you like.
Example: With H hook and worsted weight yarn, ch 36. Work sc in second ch from hook and in each ch across. Ch 1, turn. Repeat this one row until scarf is desired length.
Another example: Use the instructions for the shell-stitch dishcloth above, but instead of cotton, use a nice soft yarn, such as Red Heart Soft, Simply Soft, or a similar sized hand-spun wool. (Woolease from Lion Brand is always a good yarn, as well).
Work as you would for the dishcloth, but don’t stop when you have a square. Keep going until your scarf is long enough for wearing.
If you feel ready for such a challenge, you can even put edgings around your dishcloths and scarves simply by chaining the appropriate number to start with whatever stitch you wish to use (ch-1 for sc, ch-2 for hdc, ch-3 for dc) and working along the sides of your work. Don’t worry if the first few times it comes out uneven. It’s difficult to guage exactly where to put the stitches for an edging. Just try to make it look balanced.

Helpful tips:
1. Don’t limit yourself to one sized hook or a particular yarn. One of the joys of crocheting is experimenting with various textures and stitch patterns.
2. For a really quick gift, use a large hook (N, P, S, and Q are all good) and chunky yarn. I’ve made a very simple baby blanket using a size N hook and Baby Clouds yarn from Red Heart. Took 3 ˝ hours and only 3 skeins of yarn to complete.
3. You can create tons of interesting combinations by using large hooks and combining one or more strands of yarn. One of my favorite things to do is to get mill-end cones of various yarns from Earth Guild, and mix them together as I’m crocheting. This creates some very striking, lovely fabrics.
4. When looking at pattern books, try to look at the DESIGN of something, instead of the colors. While most of the pattern companies are now catering to more vibrant colors, you might come across patterns from years ago that have some truly putrid color combinations. Try to see what the same pattern would look like in different colors and yarns.
5. Let your imagination soar! Crocheting is easy, fast, and the best thing about it is that if you mess up, you can just pull it out, insert your hook again, and start at the point where you goofed. I can’t tell you how many times I’ve had to do that! Don’t be afraid to experiment with stitch combinations and textures.
6. Build a decent library of pattern books. I get a lot of mine from thrift stores and yard sales, as well as library sales. I’m always thrilled to find a stitch pattern I’ve never seen or used before.
7. Make up little project bags to take along with you on road trips and such. I have many little projects scattered around my house and one tucked away in my glove compartment just in case I run into bad traffic or get stuck somewhere. It’s always nice to have something to busy my hands with, and after years of doing this, crochet is basically ‘mindless hand-candy’ for me. (Example: a small ball of Peaches and Cream cotton, an H hook, and an hour or so are all you need to make a dishcloth.)
I hope I haven’t confused you too much with these instructions. And I sincerely hope you enjoy many years of crocheting.
