
Again, I'm not endorsing one brand over any other. I'm just putting up photos of what I have to give you an idea of what is out there. As I get more covers, I'll put up more photos. (Yay! An excuse to buy more covers!)
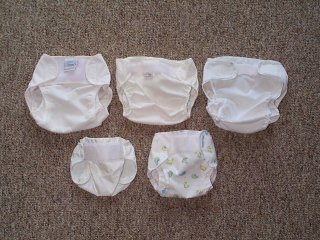
Velcro Covers: On the top row we have (L-R) a Litewrap, a Bummi Industrial, and a Prorap Classic. On the bottom we have a NB size Gerber EZ, and a small ME Rikki. The top covers are all L or XL- sorry about the variation in size. It makes it harder to compare, I know.
Advantages to velcro wraps: They hold the diaper in place so you don't have to use pins (some people choose to use pins with these covers anyway), they completely open up (making it easier to remove the cover- you don't have to pull it all the way down Baby's legs to get it off, which can be messy), velcro is quick and easy to use.
Disadvantages: The velcro can get caught on things in the wash if not secured well, the velcro can rub on Baby's tummy and cause abrasions, toddlers may find velcro wraps very fun to take off, and some people just don't like velcro.
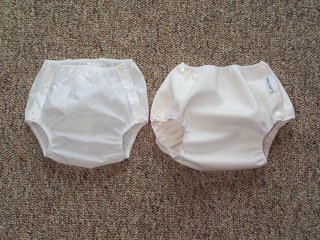
Snap Covers: On the left is an Alexis snap-on, on the right is a ME Air-Rika (a.k.a Air Flow).
Advantages to snap covers: Can completely open up like the velcro covers, good alternative to velcro if you don't like it, won't scratch Baby's tummy, harder for toddlers to un-do, the gaps between the snaps provide extra air circulation to the diaper for breathability.
Disadvantages: May not fit well while Baby is in-between snap settings, some people find certain snap covers leave red marks on their baby's legs.

Pull On's/Pants: On the left: Alexis pull-on, On the right: Basic Connection pull-on
Advantages to pull-on covers: Usually the least expensive type of cover, may be difficult for a toddler to take off, can be used later over training pants (as can some snap covers).
Disadvantages: Has to be pulled all the way down baby's legs to remove (this can be messy, and also may require the removal of shoes).
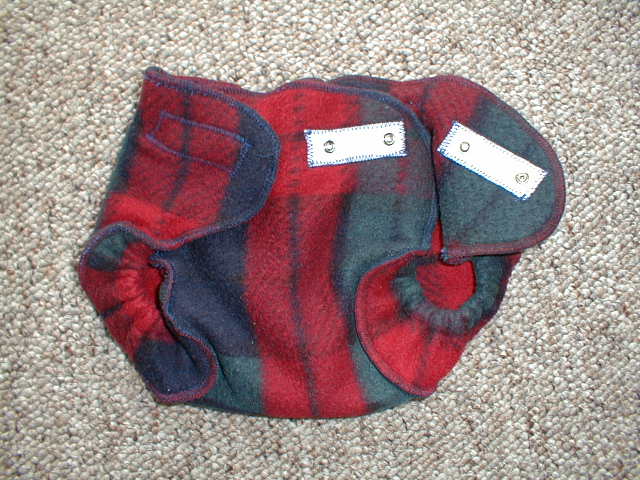
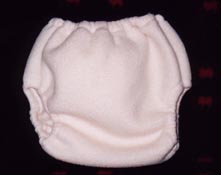
Fleece Covers: On the left: an ABC fleece cover with snaps, On the right: a Darla's pull-on fleece cover
Advantages to fleece covers: Fleece is nice and breathable, and also offers great leak protection. Can be washed in the machine with the diapers, and does not need the special care that wool does.
Disadvantages: Some fleece works better than others. It is hard to tell by looking at a cover if it will work well or not. Can be bulky under clothes. Man made fibers may not appeal to those looking for a more "natural" cover.
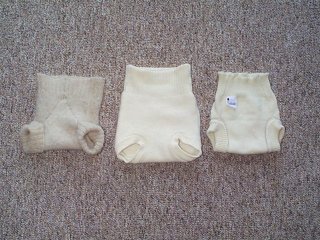
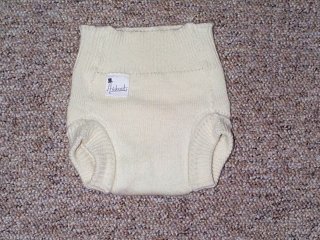
Wool Soakers: (L-R) a Butt-Sweater (I made this one myself following Phan's directions on the Parent's Place BB.) a Lotties wool soaker, and an Aristocrat wool soaker. The photo on the right is an enlarged picture of the Aristocrat.
Advantages to wool covers: Provide excellent breathability, good leak control, natural fibers may be appealing to use for aesthetic reasons.
Disadvantages: Need extra care, can be bulky under clothing, can be expensive, some people (babies too!) are allergic to wool.
How to Care For Your Wool Soaker: A wool soaker is *very* effective at keeping leaks in if it is cared for properly. It needs washing only once every week or two. It can be hand washed in baby shampoo or Eucalan wool wash (this has some lanolin added in). Wool soakers work best when clean. After a while, your soaker might need to be treated with lanolin to keep it waterproof. I treat my soakers once a month with lanolin, following directions posted at the Parents Place BB. (Note: this only needs to be done if your soaker starts leaking a little. If it never leaks, it shouldn't need to be treated.YMMV) I'll paraphrase the directions here for you:
Get a bottle with a top (anything with a cap, like a small soda bottle, or a peri bottle, or a small bottled water bottle... you get the idea), fill it 1/2-3/4 full with hot water. Add about an inch of lanolin from the tube (about 1 tsp) to the hot water in the bottle. Also add 1 Tbs vinegar. Put the top on and shake it up until most or all of the lanolin has melted. Fill your sink with warm water. Put the lanolin water into the sink with the warm water and swish it around. You should be albe to feel the lanolin on your hand if you rub your fingers together- it's sort of sticky. Add the soaker. Massage the lanolin water into every nook and cranny of the soaker. Let it soak for 15 minutes, checking every 5 minutes or so to make sure the water in the sink is still warm. Add more warm water as needed. I also massage the water into the soaker some more each time I check the water temp.
After the 15 minutes are up, take the soaker and gently squeeze the excess moisture out. (Don't wring it). You can also roll it up in a towel to help squeeze the water out. Lay the soaker flat to dry away from any direct heat source and out of direct sunlight. It will take a couple days to dry.
Sounds too complicated? It isn't really, once you do it. Most people I know think the extra care is well worth the benefits of a wool soaker.
Want to make your own soaker? Check out: Born to Love's Soaker Patterns
