
|
First model
year 2001
|
[] IowaZ Sitemap [] Send Email [] FZ1 Owner's Association [] IowaZ Vmax Sitemap [] IowaZ V65 Magna Page []
Use
the FZ1
Sitemap to navigate all of the FZ
pages.
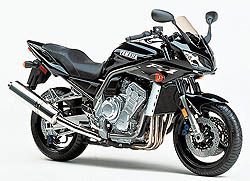
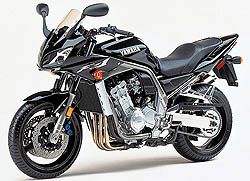
Yamaha FZ1
Chain Information and Maintenance
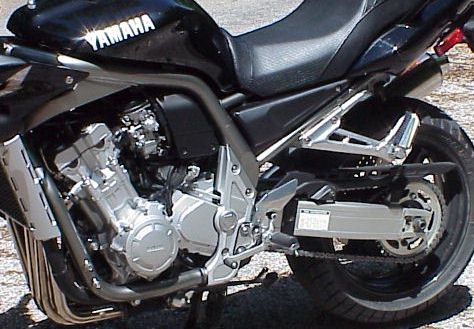
The best way to avoid chain and chain related failures is through regular inspection, adjustment and maintenance.
Cautions and Recommendations
1. Improper drive chain
slack will overload the engine.
2. Factory recommendations are 1.6-2.0 inches of chain slack.
Normal chain slack for many bikes is stated as slightly under an inch.
This may be much too tight for a FZ on center stand. When you take the
FZ off stand the suspension will come up and "lengthen" out the
swing arm. Plus when you sit on the bike it will have the same effect,
thus taking up some of the recommended slack of 1.6-2.0 inches for the bike on
center stand. You might want to have someone sit on the bike on a level
surface and see what the slack looks like.
3. Many of the early FZ owners have pondered the chain slack issue. You
will have to make an educated decision on the slack to maintain. Just
remember that too tight of a chain stresses the entire drive system, but too
loose a chain can be a safety issue if it should come off.
4. Check chain slack consistently. It nothing else, just use you
toe to see how tight/loose the chain appears.
5. After a month or so of initial worries regarding setting slack in the
FZ chain, I have relaxed a little and if the chain is not "taunt"
and not "drooping" I just run it. I am guessing the manual
recommendation is not too far off, but I am nor worrying if the chain is just
a bit tighter when on center stand. My main issue seems to be my own
tendency of getting the chain too tight upon adjustment.
Drop to the bottom of the page for a log of my chain adjustments and observations. After I get this page cleaned up a litte, will start posting in chronological order my experiences with the FZ chain.
What is a O-ring Chain??
An O-ring sealed chain has rubber O-rings between the side plates to seal in grease used to lubricate critical internal bearing surfaces of the rollers. O-ring chains are common on motorcycles because they last longer, require less maintenance, and offer a smooth, quiet transfer of power. When chain replacement becomes necessary, an O-ring chain should always be used if the motorcycle was originally equipped with one.

Chain Chat from various posts
Many o-ring chain manufacturers used to claim that they never needed lubrication. This just isn't true. While the o-rings seal the pin/bushing junction, they do nothing for outside of the chain rollers. Internally the pins and rollers have grease between them, but externally the roller and the cog teeth need lubricant on their surfaces. O-ring chain rollers still require regular lubrication for this reason, and to ward off corrosion as well.
You basically cannot lubricate an O-ring chain; the area that most needs lubrication is sealed, for better or worse. Consequently, the lubrication on an O-ring chain is mostly to keep the chain from rusting, and to extend sprocket life. 90-weight EP gear oil will work fine, as will a number of spray-on chain lubes. The latter may be slightly less messy. You can even get decent chain life with an O-ring chain with something like KalGard's 30/30 or LPS #1: lubricants that dry to a waxy film, and don't come off onto your back or bike.
O-ring chains require very little lubrication, and of the correct kind. That is, don't lube them like a regular chain, they can run almost dry. I've found that a light coat of something like WD40 will keep the rust off. If you do use regular chain lube, make sure it says on the container it can be used on o-ring chains, some lubes contain solvents that deteriorate the o-rings. If you slab a lot of chain lube on them (and your regular chain for that matter) you are making matters worse. You won't be lubricating the bushings, as they are sealed, and will only be creating a mixture of lubricant and grit (machinists know that mixture as 'grinding compound') on the outside of the chain. This is what contributes to rapid sprocket wear. Be sure to check your sprockets for wear before installing the chain. Never put a new chain on worn sprockets, it will cause premature wear of the chain.
Spray on lubricants are by far the most popular these days, offering several distinctly different options. They include silicon based sprays, WD40-type cleaners/lubricants, traditional oil based chain lubes, and the new spray on chain wax marketed by Maxima. Opinions regarding the merit of any of these lubes vary greatly, however, we've tried them all and offer the following insight based upon those experiences. Silicon based sprays, TFF, WD40 and CRC type cleaners/lubricants became popular with the advent of o-ring chains. The theory went that since the o-ring chains are lubed at the factory, all that was really needed was a coating to repel dirt and impede corrosion. Silicon base sprays are good at that, providing some lubrication for the o-rings themselves as well. Problem is though that while o-rings seal the pin/bushing junction, the chain rollers themselves remain unsealed and thus require lubrication. The other sprays like WD40 and CRC perform along the same lines, except that these sprays have solvents as well as lubricants and can be helpful removing dirt and old lubricants. The bottom line, however is that chain lubed with these space-age sprays has the tendency to wear out chain rollers, as the rollers never get sufficient lubrication.
Traditional chain lubes are essentially oils with additives to make them stickier, preventing the lubricant from flying off during use. They can provide excellent lubrication of all chain moving components for both standard and o-ring chains. The catch with traditional chain lubes is that not only do they stick to the chains moving parts, but succeed in picking up and capturing dirt, dust and sand at an alarming rate. This turns your chain lube into an abrasive mixture of chain lube and crud not unlike valve grinding compound. Regular chain cleaning can combat this scenario, however removing dried chain lube can be among the toughest bike cleaning tasks. The newest and perhaps most innovative chain lubrication is chain wax. Chain waxes provide a thick water and corrosion blocking coating on the chain and within the various moving parts. The kick with chain waxes is that once dry (after a few minutes) they're non-sticky to the touch and therefore don't attract dirt like traditional chain lubes. To give you some idea of our preferences, I typically use traditional chain lubes on our test bikes and save the coveted chain wax for my personal scoots. Enough said.
Chain tightening and alignment is an important factor in getting the most life out of your chain and sprockets. All chains stretch through the course of their life span requiring occasional tightening to achieve proper free play. A general rule of thumb is chains are stretched beyond useful service when the stretching exceeds two percent of the original length (roughly a quarter inch for every twelve inches of original length). There are numerous other methods for evaluating a chain's condition, most more subjective than the above. As the chain stretches, the free play or tightness must be adjusted. Generally, chain free play should usually be approximately one half to one inch, up and down, measured at the midpoint between the front and rear sprockets. The amount of free play can vary, so its always best to consult your particular model's owners manual. Be advised that chain wear and sprocket wear go hand in hand. If you're seeing side wear on a sprocket, this is indicative of a chain misalignment, which could be caused by the rear wheel being uncentered in the swing arm or improper wheel spacers misaligning the motor and rear wheel. The most reliable means of ensuring proper wheel alignment is to measure the distance between the rear axle and the swing arm pivot bolt, on both sides. Even with the best maintenance practices, some day a new chain will be required, as chain and sprockets are consumable parts. Not surprisingly, it's always best to replace chain and sprockets as a set. No doubt the longest service life is achieved when all are replaced simultaneously, and conversely, the service life is reduced whenever mating a new chain to used sprockets or vice versa. When choosing a new chain a plethora of options exist. We'll not tout one brand over another, however, some other rags have completed exhaustive strength tests of various chains with (yawn) expected results. Basically, you get what you pay for. However, for off-roading in eastern (read: mud, water, slime, etc.) conditions, an o-ring chain will provide superior longevity. The only riders we know that don't use them are those riding small displacement machines, where an o-ring chain would rob already lacking horsepower.
A final aside on master links. This simple and inexpensive part is probably the single greatest cause of chain failures and the damage associated with it. Inspect your master link before every ride and replace it whenever it hints of wear. For the price of a two dollar master link, you could very well save yourself the hassle of removing your swing arm on the trail (to free your wadded up chain) or even the cost of a set of cases!
Drive Train Slack
Careful....The manual says, a drive chain that is too tight will overload the engine and other vital parts. One that is too loose can skip and damage the swingarm or cause an accident. Keep the drive chain slack within the specified limits of 1.57-1.97 inches or 40-50 mm.

1. Check drive train slack consistently.
2. Place motorcycle on the centerstand in a level surface.
3. Shift the transmission into neutral.
4. Spin/rotate the rear wheel by hand several times to locate the tightest
portion of the drive chain. Slack must be checked at the tightest point on the
chian.
5. Measure the drive chain slack from the lower hang position to the
farthest top position as you gently push the chain upward.
6. Text book drive chain slack is between 1.6-2.0 inches (40-50 mm), but
be sure to read "chain chat" below for some ideas/opinions.
Adjusting Drive Chain Slack
Tools
....Buy some good tools from Sear's or
equal quality. It is worth the investment to do your own quality basic
work.
....The items below are what I will continue to use in chain adjustment.
....I feel a series of good breaker bars are absolutely necessary. Many
took assortments do not come with breaker bars. All of these tools last
a life time and then some for the average "shade tree" mechanic, so
do not skimp on tools. Buy at least one good torque wrench. The 3/8
torque wrench will be the most useful and sells for $90 from sears.
However the 1/2 inch torque is needed for the Axle nut. The Axle
nut takes 108 ft-lb of torque, which is very high. Most torque
wrenches will not go that high, but you can torque to the max for the
wrench you have (probably a 3/8 inch drive) and then tighten a a little more with the big breaker
bar, unless you feel the 3/8th is close enough.
....A flashlight is very useful when looking at the marks on the swing arm
during adjustment. Both sides must be adjusted to the same point so it
is important to see well. I wind the end of a AAA Maglite with black
electrical tape so it can be easily held in the mouth. This works great for
everything from getting into a deer stand to mechanical work.

Loosen the brake caliper
bracket bolt on the right side
....The brake calipers are held by a torsion bar, the lower bolt needs to be
loosen. Use a 12 mm box end wrench to hold the nut to the inside and
then use a six-point socket on a ratchet or breaker bar to loosen the
bolt. Initially a breaker bar may be needed on many of the fasteners as
the factory apparently used blue locktite on most of them. A breaker bar
will give the best mechanical advantage for smooth, non-damaging release of
the fasteners.
....The lock nut and the adjusting bolt are in the circle at the top of the
pic.

Loosen the Wheel Axle Nut
....Loosen the wheel axle nut on the left side. You really need a 1/2
inch long breaker bar and a 32mm socket. Sear's has both. Get a
Sear's catalog to at least know what is available. Their 32 mm socket is
a 12 point. I am not sure right now if anyone makes readily
available 6 point sockets in the larger metric sizes. Like most of the
fasteners, the factory is likely to have used blue locktite on the axel nut
and it can be a "dickens" to break loose.
....The first time you break the axle bolt loose it may seem like you are
going to "wreck" some threads or strip the axle nut. This is a
big, heavy duty fastener, "stuck" on just about as tight as you will
ever see as a basic wrench. So, get the right equipment. It was
all I could do to break the axle nut loose on my FZ. Only one other
time, on the Magna, do I remember a tougher fastener to loosen the first
time. I tired at first with a very large crescent wrench thinking, big
nut, big wrench, no problem. But it was in no way possible to
break the axle nut loose without digging out the heaviest of artillery, the
biggest 1/2 inch drive breaker bar in the tool box. Any breaker bar is the "big gun" of your tool
box.

Loosen the Lock Nuts on each side of the Swingarm
...Using a 12mm box end wrench loosen the lock nut on both sides of the swingarm.
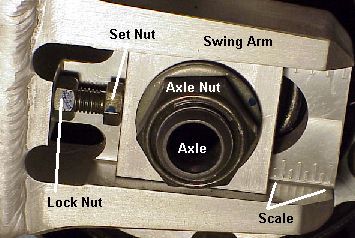
Set Chain Slack by adjusting
the Set Nut on both sides of the Cycle
.... To reduce chain slack (tighten the chain), turn the adjusting bolt on
each side of the swingarm counterclockwise (or outward).
....Work one side a little and then the other until the chain is at the
correct level of slack that you desire.
....To loosen the drive chain turn the adjusting bolt on each side of the
swingarm clockwise or inward, and then you will need to push the rear wheel
inward by hand. To tighten the drive chain burn the adjusting bolt
on each side counter-clockwise.
....Be sure to use the alignment marks on each side of the swingarm to
even out the axle/tire position. It is important to maintain proper
wheel/chain alignment by adjusting both sides evenly.
....The series of pics below show Vernier calipers being utilized. You
can find very cheap versions made of nylon/plastic at many tools stores.
They will work fine and are a real value. This type of caliper is used
constantly for many measurement operations during basic wrenching, so they are
a good investment. The pics speak for themselves in terms of use.


When Chain Slack is Correct
Tighten the Locknuts, Torque the Axle Nut and Retighten the Caliper Bolt
....When the chain slack is as desired tighten the locknuts to a torque
of 12 ft-lb or 16 Nm, and then
tighten the axle nut to a torque of 108 ft-lb or 150Nm.
....Be sure to retighten the brake caliper bracket bolts on the right
side.

Wrenching hint:
1. If you do not have a torque wrench, tighten the axle bolt until it is
very firm, but remember with extreme force any fastener thread can be
stripped. A good torque wrench is a valued very long term
investment. Sears tools are always high quality and generally my
favorite. Spend some money on good tools if you are wrenching very
much.
2. And do not, repeat do not use 12 point sockets unless they are the
only ones available such as in the larger sizes.. Give 12 point
sockets to your enemies as gifts. Buy good 6 point sockets so you do not
round off all the fasteners you are working with. On some very hard to
reach applications 12 point may be the only thing that works but in general
let your enemies destroy their "nuts."
Cleaning an O-ring Chain:
1. The chain should be
cleaned and lubricate consistently.
2. Dusty/wet conditions require more frequent inspection and
lubrication.
3. Always re-lubricate after washing or rain.
4. The chain can be cleaned with kerosene and a small soft brush by
placing a small shallow pan below the bottom of the chain and dabbing and
brushing kerosene through the chain and letting it drip back into the
pan. Do a small area at a time, then wipe the chain dry with a rag
before rolling to another section.
5.
Wrenching Hint:
1. The FZ1 has an O-ring chain. It is not advisable to clean
O-ring chains with steam cleaners, high-pressure washers, or inappropriate
solvents as lacquer thinner.
2. WD-40 is a commonly used product
used for its water displacement and solvent qualities. It will also
temporarily lubricate a surface, but quickly wears away. WD-40 can be sprayed
on a rag and used to wipe an 0-ring chain from surface dirt. It can also
be sprayed liberally to "wash" off the grim on the inside of the
links, but I would wipe the chain off of excess fluid right away. In
general a solvent like WD-40 will not be a problem to the seals of 0-rings
chians.
3. Be sure not to work in an enclosed garage where excessive fumes
can build up. DO NOT use gasoline, and never clean with gasoline in an
enclosed area where an explosion/flame up can occur from the vapors.
Re-lubricating an O-ring Chain:
1. Thoroughly lubricate the chain
with a O-ring chain lubricant, such as PJ1 Blue Label.
2. Place the bike on center stand, roll the tire and spray a bead on the
entire chain and let sit overnight. Place newsprint/cardboard under the
chain to catch any drips. By letting the bike sit overnight, the
volatile lubricate "carriers" will vaporize leaving the
wax/lube on the chain and reduce spray from a freshly lubed chain.
Wrenching Hint:
1. Do not use engine oil or any other kind of lubricant on O-ring
chains, as some of the chemicals could damage the O-rings.
Chain Chat, some thoughts by
riders:
(Some editing has occurred for
clarification/safety/ functional purposes)
Chain Adjustment:
....Is it normal that the chain would come from the factory a little loose?
....Mine too has a lot of slack so much that it hits that plastic guard under
the swing arm. I have been too busy right now to tighten it and the dealer said not
to over-tighten it
....After I rode my FZ1 for only 25 miles or so my chain was also
hitting the plastic top guard. I have adjusted my chain 3 times and need to do
it again so it will stop hitting the guard.
....All new chains will loosen the most
during the first 1000 miles and then remain relatively constant after that.
You should check the chain after every tank of gas for that first 1000 miles.
Make sure not to over tighten the chain, as this would lead to premature wear
and tear on all of the power transmission components. After 1000 miles, check
and lube it every 300 to be on the safe side.

....I don't know if the owner's manual accounts for this, but
the chain on a
single shock/swingarm type bike will be looser when you're not on it. When you
sit on the bike and compress the shock it will tighten the chain up.
Obviously, if this is accounted for in the manual's recommendations you don't
need to worry about it, but I usually have some other mechanically inclined
person check the play in the chain while I'm sitting on my bike
....Your owner's manual specifies 1.6 to 2.0 inches slack. Put your bike on
the center stand and in neutral and at midpoint on the bottom run push the
chain to its extreme in both directions and measure the travel. Adjustment is
easy. Get your axle nut wrench and its extension out of your bike's tool kit
and loosen the nut on the left side of the axle. Loosen the jam nuts and back
out the adjustment bolts to push your wheel back in the swing arm. Use the
reference marks on the swing arm to match up for proper alignment. As for any
noise coming from a loose chain, yes, a loose chain can can make a racket.
Usually when hitting bumps. Avoid overtightenting the chain
....The chain should last 20,000 miles as I heard that is not uncommon with
R1's and other high performance bikes, but then again it comes down to riding
style...if you always crank on the throttle the chain might stretch a lot
sooner then what would normal take place.

List Posts Regarding Chain Lubrication and Adjustment:
....Some of us will be moving from a shaft drive or belt drive
to the FZ1's chain. Could those of you with recent experience share your
thoughts on 1) cleaning the chain, 2) lube types (inc. wax) and 3) lube
intervals.
....I use Chain Wax. To clean the chain
I use WD40 with a rag and clean the
chain so it looks like new. Then I put the bike on the center stand and turn
it on and put it into neutral and roll the wheel as I spray the chain as it goes around a
few times. Then I turn it off and let the bike sit for 10 mins and the chain
wax gets harder and will stay on. Thats it...but also I would say after 5K-8K
miles take the cover of the front of the engine that covers the chain and
clean it out
....I am not sure I would ever put a
larger bike in gear with the engine running, regardless of being on a stand. Sounds like
an accident waiting to happen. What I do is wipe the chain down with a
rag & WD40 (I spray the WD40 on the rag, NOT the chain). Then I go out for
about a 5 mile ride, come back, and put on chain wax. Then let it sit long
enough to stick.
....I've always used wd40 for cleaning too- does a nice job of cutting through
the grime. I've been using RK chain lube instead of wax though... only problem
with this stuff is its MESSY. Hard to be neat putting it on (supposed to only
be 1 drop on each roller, but its not at all possibly to be that neat) Also,
it doesn't 'set up' like chain wax does so any over application is 'flung off'
on the first ride. Now you've got a well lubricated entire motorcycle. I'll
probably give the chain wax a shot when it comes time to service the new
one. Also, clean and lube your chain often! A stiff dirty chain can
literally rob you of 3 or 4 horsepower at the contact patch. Perhaps its not
as high with an o-ring chain, but i can still 'feel' the difference with a
just-lubed chain. I try to get to mine at least every 500-800 miles.
....I use GUNK to degrease the chain. You have to be a little careful with
that stuff but with the small straw opening and gentle application you can get
it only on the chain and nowhere else. Center stand and the Mrs. turning the
real wheel is how I do it. Have not tried chain wax but have enjoyed good
results with BelRay chain lube. Always lube after the ride when the chain is
warm. Too much lube will fling it all over your rear wheel and that can be
messy. After a time or two you will know just how much to apply and avoid
this. Never tried that wax.
....I just use WD40 for cleaning and lubrication. I have been using it for the
last 3 bikes without any negative effects. I used to go though the chain
cleaning ritual - clean off road grime and dirty lube with kerosene, dry off
kerosene, apply the chain lube - until the BMW mechanic told me to just use
WD40 and only WD40. I've had people argue that WD40 will hurt the
chain's o-rings, reduce chain life, etc. I have had my chains last 15K to 20K
miles before I started using WD40 and since using WD40; I have not seen any
difference in chain life or performance. Don't waste your time with chain lube
or chain wax. Treat your new chain right and just use WD40. Just my 2 cents.
....I like most of you clean with WD40 and I used PJ1. I've never used chain
wax. I may try the WD-40 only philosophy. The PJ1 is messy and I really don't want it
getting on the rest of the bike. My old BMW was shaft too Rich, but I had a 4
wheeler that was chain. It's different spraying chain lube on something that
you know you are going to go out in sink in mud then on something that will be
waxed more then ridden.
....WD-40 to clean the chain and Blue Label PJ-1 to lube it. This is a great
combo.
.... I also have used just WD-40 on all my bikes with O-ring chains. I read
about it in a magazine many years ago and have used it since. I have never
seen any chain wear out or any other bad effect. Even the mechanic where I
bought my FZ said to use just WD-40. It's so clean and cheap to use that I
spray the chain before any big ride, usually once a week, and wipe any excess
off with a rag. I notice the rear wheel spins a lot easier with less friction
then when the bike was new and had chain wax on it. I love the stuff, but all
riders have different opinions. Use whatever makes you happy.
....I have used nothing but WD40 on all of my
bikes in the last 10+ years. In that time I had one bike (an RR) that I had
over 20,000 miles on the OEM chain. Another bike I have has 16k on the stock
chain and it shows no signs of wearing out yet. No kinks, no rust. Just clean
and happy.
....The worst chain lube is Bel Ray chain
lube. Just spent the last 3-4 hours tearing apart my FZ1, and cleaning all the
dirt and tar like stuff off of chain, sprockets swingarm, motor, tires and
rims. What a pain. Used whole can of W-D 40 to get all the stuff off.
Now I only use W-D 40 and Maxim chain wax. Might try Red just to see how it
compares.
....Wd-40 to clean....MAXIMA to lube. I
have had great experinces with it and have had no fling off on the FZ. This
stuff is awesome. A friend of mine showed it to me 7 years ago. I have been
using it since. Long lasting, O ring safe, prevents rusting. Does not fling
....As far as frequency I do 500 miles OR
one week which ever comes first.
....I switched to WD after my first several
bikes. I just got tired of cleaning off the dirty, gooey chain lube with
kerosene and then drying the chain and then applying the chain lube, only to
have the chain get dirty again right away. I also tried chain wax – not only
was it a real pain to clean off the chain prior to lubing, but it also caused
my chain to kink and fail. Also, chain wax does not lube the chain, it only
protects the chain’s surface from rust. I have found that the WD cleans,
lubes, protects, displaces water and it only takes less than five minutes to
service the chain – what’s not to like?
....Ditto on the WD-40, it works. 5000 miles on my chain and one adjustment.
....I personally don't use WD-40 for
anything except cleaning the chain, but I can see why it would work. Thing is,
these chains are "permanently" lubricated under the O rings. I would
bet if someone relied on WD-40 on an old fashioned dry chain, they would be in
for a rude awakening
....WD-40 rules only to clean. Ever do alot
of road cycling or mountain biking? Try "lubing" with WD-40. Your
chain will be dry as a bone within 30 minutes.
....I've never used a wax, but I don't
think the Honda red can is a wax. It goes on clear (kinda like WD-40, in
fact), but gets very tacky as the solvent evaporates. I haven't experienced
any fling-off, although I clean/lube the chain when I'm done (when the chain
is warm), as opposed to before I ride, so it has all night to set up. I can't
vouch for it in a lube-and-go mode.
....Chains are a little on the high-maintenance side, even chains with
o-rings. Having a dirty and/or dry chain robs you of HP and excessively wears
the chain and sprockets. As for frequency, it depends on how often you ride
and if you ride in the rain or wash your bike. For sure clean and lube your
chain after you ride in the wet or if you wash your bike. Outside of that, I
do a visual check each time I ride, and clean and lube the chain if it looks
like it needs it-- for me, that's roughly once a week.
....I lot of folks lube the chain after every ride, but I think that's a bit
much. Of course, it won't hurt (but it may fling lube all over the place).
....Just to share something I noticed today. The excessive
chain slack that Yamaha recommends seems to be partially attributed to
the rear swingarm geometry. While I was checking out the suspension setup in
preperation to lower the ride height, I noticed the chain tightens up as the
swingarm raises. So make sure you do not overtighten the chain. If you do, you
run the risk of it binding as the rear suspension compresses.
....As far as the chain slack measuring
goes: I realize the manual's drawing could give the impression of measuring
inside edge pushing up to outside edge pushing down, but you can't change your
reference point when making a measurement. I see the drawing as simply showing
that you have to include both above and below where the chain is at rest. And
the line running through the middle, not a normal convention when drawing
dimension lines, shows that you measure perpendicularly. The drawing of the
clutch play measurement more easily shows keeping the same reference point
(the edge) when making the measurement. Of course in that measurement, you're
only going in one direction.
....I bought some Honda Pro HP yesterday
and cleaned and lubed my chain last night. Seems to work great, and there
wasn't spooge all over my back tire when I got to work today
....I used to lube the chain after cleaning
it with WD-40, but now I only use WD-40 (no other lube) after a BMW mechanic
suggested it. I have not had any problems with the last several bikes I've
owned (one chain went past 15K miles before replacement and you won't have the
lube goo all over your rim.
....The very best way to square the back wheel, is with a Rohm Precision
Machine bike alignment tool. Cost 79 bucks.
It precisly measures from the center of the swingarm bolt {hollow}, to the
rear axle {also hollow}. When the distance is the same on both sides.....the
rear wheel is exactly true to the frame.
.....What is the proper way to check the alignment?
Response----It's a simple process, normally called the
string method. Bike needs to be upright, perfectly straight upright. Center
stand on some bikes gets in the way. Tie a string around the rear of the rear
tire approximately 5 or 6" up from the bottom, have the knot on the
string in the middle of the rear of the rear tire. Run the string toward the
front of the bike past the front tire. Tie the front of the string onto a
brick,ETC, so that it is again several inches above the ground and can be
stretched to take the slIck out of the string. Now do the same on the other
side of the bike so that you have two strings along each side of the bike
going forward past the front tire. Align the front tire to as straightforward
as you can by eyesight. Now with enough tension on the string on one side to
take the slack out, slide it away from the bike so that the string is NOT
touching the FRONT of the REAR tire. Slowly slide the brick back in toward the
bike until the string just barley touches the FRONT of the REAR tire. Do the
same on the other side of the bike. You now have two parallel strings
straddling the front tire. Again straighten the FRONT tire to be straight
forward, this time do so by measuring from the string to the tire, both at the
FRONT and BACK of the FRONT tire on one side ONLY. This measurement will be
the same if the FRONT tire is now pointed straightforward. If you move the
handle bars to better align the front tire, go back and check the string to
rear tire alignment it will often change as the bars are turned right or left
and the bike moves even the smallest amount. With this Now perfect parallel
alignment, Measure from both sides of the bike from string to FRONT tire. If
you have perfect alignment front to back tire, the measurement from BOTH the
right and left side are the same. If the measurement is greater on the left
side (as sitting on the bike) the rear tire is obviously aligned to the left,
as in the left rear adjuster at the axle is to far BACK in the axle slot.
Adjust the rear axle adjusters accordingly until you get the alignment your
looking for.
Some bikers are MORE concerned about chain alignment between the sprockets. My
normal preference is tire alignment and unless chain is then WAY out prefer to
do as described above. The factory adjuster alignment marks are almost NEVER
accurate for REAL front to rear tire alignment.
….Well the string alignment method is a lot
better than the stock alignment marks, but it's a pain and nearly
requires two people to accomplish. Do yourselves a real favor, and but a Rohm
alignment tool from RPM. {ROHM PERFORMANCE MACHINE}. On the FZ, you pop of the plastic cap that covers the hollow swingarm bolt.
You then center the hollow part of the swingarm bolt, and the center of the
hollow rear axle with this tool. {it's adjustable} When both sides are the
same, the rear wheel is exactly straight. I have been using one for 2 years
now, and there is nothing better. $89.99 +tx and shipping.
.

June 17, 2001 On Chain
Adjustment---
....I am still slightly fighting the chain adjustment issue. It is me and not the
FZ. It takes just a tiny change in the adjustment screws to tighten up
the chain too much. I have run the chain 1400 miles since the last
adjustment because of the longer trip to Elkhart. It was getting sloppy
and hitting the guard way too much upon deceleration/bumps.
Seemed fine at high speed on the highway.
....Now I have it too tight and will have too loosen it up a bit. I seem
to have a tendency to get the chain too tight on every adjustment try. I would
rather have it a bit loose than too tight and stress the cogs and engine.
....The FZ chain is very easy to adjust with the right tools and because of
the quality parts. I have to keep saying, go to Sear's or another high
quality tool supplier and start collecting the "right" tools.
They are a must and a life time investment. You can pass them down to the next
little hooligan if you will not loan them out to droolers and Hardley men,
plus keep them out of the "rain" yourself.
....That big back axle nut, 32mm, is just too massive to play around with and
needs to be torqued down to a spec of 108 ft-lb. which is a lot of force.
If you want to ride with the cruiser crowd fine, but you are on a machine that
will go 150+ any moment and you need to have your "ducks" in order,
meaning "tight nuts" :)) Buy a 32 mm 1/2 inch drive socket and
a big old 1/2 inch drive breaker bar for the axle nut. Then spend
another $98 plus tax and get a good Sear's 1/2 inch drive torque wrench and
learn how to use it. You can get by with cheap tools or tools that do
not fit the job, but they will eventually get you into trouble, taking time
and money for repair/parts. Of course these little gems are just a
start of the "tool time show."
September 29, 2001 On
Chain Replacement (a FZ1OA Post from ZGuy)
The "Long Ranger" says:
.....Ok, I mentioned 20,650 on the odo. When I ran 145 on the way to TX last
week, with soft bags on, it wasn't even thinking about slowing down. I think I
could have cruised at 140 all day long.
....Now, thats with a bad chain! A little chain history. I now realize the
brown colored haze that has been showing up on my chain around a set of about
5 links was trouble.
....My theory is that the o-rings start going bad, the metal rubs and even
right after cleaning and lubing the chain, it would come right back after a
ride. The finely ground metal gets on top of the lube and oxidizes quickly so
it looks like rust.
....I think my chain has been going since about 15k miles or less. You all
might want to look out for this condition, especially if its covered under warranty.
....So I had a chain, sprockets and a new rear tire ordered overnight express
(ouch!) and the shop in Killeen fixed me up real quick like. The rear gear is
an R1 gear, thats all they had, one tooth less. I didn't notice any
difference, still showing 60 mph at 4k rpm. The chain is not yamaha but an
aftermarket, I'll have to dig the company name up. I like it though, didn't
make any adjustments all the way home! Can't say that about the yammie chain
when the bike was new, it was more like every 500 miles for a while there.
....But the bike just keeps on running great! I haven't sync'ed the carbs yet.
I did have to replace the plugs again, it makes a huge difference in how the
bike runs. Every 8k miles as the book says. I ran over a bit last time and had
to change them before the trip because it was running bad. Stock plugs.
....Hope you like this bike, its gonna last a LONG TIME!!!!....geo
Chain Links :)
O-ring
Chain Installation page
Use the FZ1 Sitemap to navigate all of the FZ pages.
[] IowaZ Sitemap []
Send Email [] FZ1
Owner's Association [] IowaZ
Vmax Sitemap [] IowaZ
V65 Magna Page []
|
|


Any reproduction of this site or it's contents requires express written consent.
|
To Open a Search or Find-a-Word Window, press "Ctrl" and "F" at the same time. |


