
![]()
![]()
Pattern Pieces and Visual how to...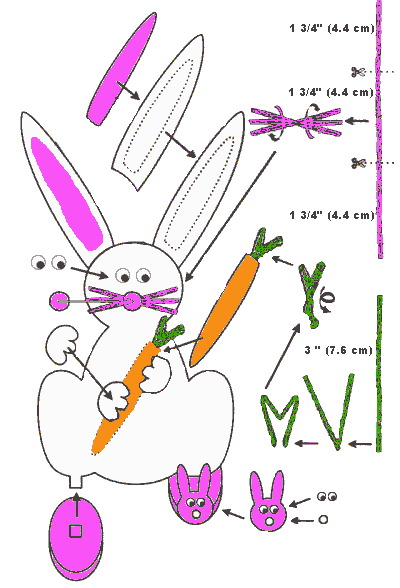
|
Foam Sheet Bunny DirectionsThis can be a great craft for younger children if you do all the cutting out ahead of time. I like to place all the pieces for each craft in a zip-lock plastic sandwich bag. This makes handing them out to a crowd much easier, and you're less likely to lose pieces. (Just a tip, keep a couple extra wiggly eyes and pom poms around just in case.) Cut out foam sheets using the pieces above as a guide. You can print these and use them as pattern pieces as well. Be careful when cutting the notches at the bottom of the bunny. These need to fit into the pink feet. Make sure to cut them the same size. You will need to cut three 1 3/4" inch pieces of pink pipe cleaner for his whiskers. Twist these together at the center and glue to the bunny's face. His pom pom nose is glued to the center of the whiskers. Glue the smaller pink sections on top of his ears, and then attach ears to the head with glue. Twist a 3" green pipe cleaner into an M shape as shown above and glue to the back of the carrot, leaving the top showing. Then you can glue the carrot to the body with his hands on top holding it. Next, glue the white tabs at the bottom of the bunny into the pink feet with the notch in the center. Glue on the wiggly eyes and pom pom noses to his bunny slippers and when dry, attach these to his feet. |
![]()
![]()
