by Life-Master A.J. Goldsby I (Started August 11, 2001)
***
(I sent this into 'Chess Life' in early spring, 2002.)
(The editor rejected my article as "too technical, and complicated.")
(It
was accompanied by about 2 dozen DEEPLY analyzed endings.
I also included a short letter, basically outlining what I wanted to
accomplish.)
***
See
my web page on, "The Philidor Position" at the web address below:
***
I first became interested in the ending of a King and Queen vs. a King and (1) Rook many years ago. (Late 60's) I had traveled to another state to play in a tournament, and two of the higher-rated players there were struggling almost endlessly in this ending, but making little or no progress. I wanted to watch and/or analyze this position in detail, but we had to leave. (Sadly - I will never know what happened in that game!)
I have seen the above scenario repeat itself many, many times. I have either personally witnessed and/or read about Masters - or even GM's!! - who have been unable to play this ending correctly. (The {then} current U.S. Champion - GM W. Browne - in 1978, was unable to defeat the computer Belle in this ending. Despite the fact that Browne played his moves at a very slow [tournament] time controls.) Events like this led to this ending basically becoming a hobby - some would say a passion! - of mine. (See the web page, above for the full story.) I have subjected this ending to deep study, (countless times!!!); and lately, I have even been able (thanks to a chess friend); to utilize a very powerful computer, (with multi-processor support and the ability to consult the endgame {ChessBase} CD-ROM set of endings,); to analyze this ending in great detail.
My goal however, is not to provide a dry, technical article with a ton of analysis. Instead I wanted to provide a simple and clear look at this ending that would do two things:
# 1.)
Enable the average player to be able to play this ending in a competent manner; and ...
# 2.) Change the course of theory for this ending.
***
I put forward the idea there are Three (3) main
positions in this ending that the student should
learn to play this
particular ending in a competent manner.
***
(This is a very radical departure from accepted theory - theory usually only gives one position!!!)
These three positions,
(See the Diagrams A through C.); are relatively easy to understand and learn.
They are also very closely inter-connected!!
You will often find you are trying to reach one of the basic positions, but can quickly wind up in any of the other basic positions!
(My deep analysis of these positions demonstrates this VERY clearly!)
Lets pretend you are playing a tournament and you reach this ending.
(A King & Queen vs. a King &
Rook.)
The basic idea, if you are playing the stronger side, is try to force the weaker
side...
---> first ... towards the edge of the board, and then towards the corner.
(It is not as easy as you might
think! There are several tricks to learn.)
Let us say for a minute that you are successful in your quest to drive the weaker side towards the corner. Your goal would be to reach the position in our first diagram. (Diagram A, see just below)
Please carefully examine the first position.
This is the first
and most important position to learn in order to be able to master the ending of
K+Q vs. K+R.
This is the famous "Philidor Position." (First published in 1777!!)
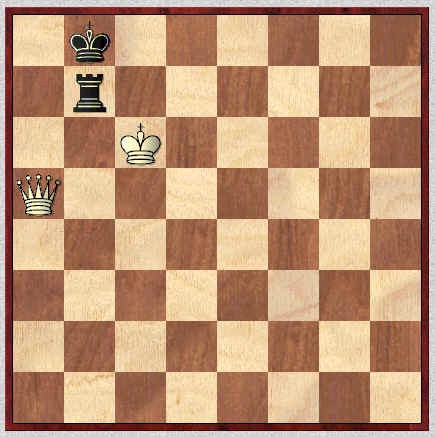
{See
the diagram just below. Position check: WK-c6, WQ-a5; BK-b8, BR-b7.}
|
|
Philidor showed this was a win over 200 years ago. This position is with White to move.
(It does not matter if White is to move, or Black to move!! Here ... it
is White to move.)
White wins easily. But it helps a great deal if you know the technique.
The winning line is
1.Qe5+!?, Ka8; 2.Qa1+, Kb8; 3.Qa5. {Diagram?}
Now Black is basically in zugzwang. No matter where Black moves his Rook,
he will lose it ... to a Queen fork.
For example
3…Rf7. (Just one square the Black Rook can travel to. See the
link at the top
of this page for a full analysis.) Now the forking square is e8, and White must arrive there
...
(on the forking square) ... WITH CHECK!
For example: 4.Qe5+, Ka7; 5.Qe3+, Kb8;
(4…Ka8; is no different.) 6.Qe8+,
{Diagram?}
and White wins the Rook. ("+/-")
I will not analyze this ending further; (here) it can be found in almost any endgame book.
(I also have built a web page where I have analyzed this ending in great detail,
the link is given at the top of the page.)
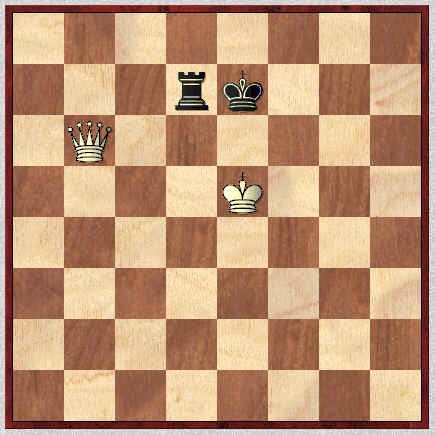
Position check for Diagram B: WK-e5, WQ-b6; BK-e7, BR-d7.
***
|
|
Now examine Diagram B. (This position is a close derivative of the position that
Keres - in his book, "Practical Chess Endings" - reached in his analysis of
K+Q
vs. K+R. My analysis was first published in several magazines, overseas.
---> Then it was also published in here in the US.)
This is another basic position in this ending.
White plays:
1.Qg6!!, Rd1!?; (Best?!?) 2.Qg5+!, Kf8; 3.Qf4+!,
Ke7; 4.Qb4+!, Kd8;
5.Qb3!!, Re1+!?; 6.Kd6!, {Diagram?}
And we have now reached, "The Goldsby Position."
This is a rather significant discovery,
I was the first to demonstrate a method or a clear technique to where the stronger side could
FORCE a win against K&R, when the Rook would become separated from the King.
(Benko thoroughly examined this ending, - and how many strong players missed utilizing this
technique - in his endgame column of the May, 1988 issue of
'Chess Life.')
White
now finishes off with a relatively easy win.
6...Kc8; 7.Qc3+, Kb7;
8.QxR/e1. ("+/-") {Diagram?}
Of course White is winning now.
Learn this technique thoroughly, it could serve you well if you ever have to play this ending
in an actual tournament game.
(To be honest, Benko found a small improvement, that actually saves one or two
tempi over my original technique,
but uses the exact same idea. It also is much harder to use,
as it gives the player playing the defense more options.
His win begins with 4.Qh4+!!, etc.)
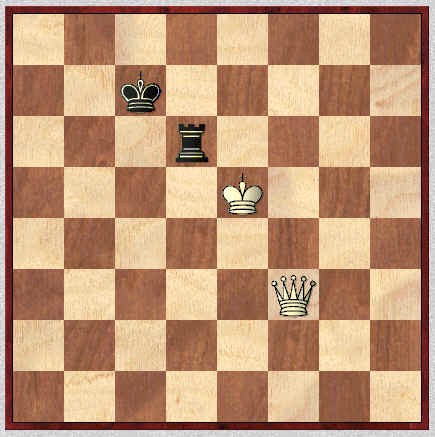
Position
check for Diagram C: WK-e5, WQ-f3; BK-c7, BR-d6.
White to move in this position.
|
|
The third and final position is Diagram C.
The first move in this position is 1. Qf4!! (Reaching the <RAM.>)
I would like to label this position,
"The RAM." (This graphic, visual-related name is a good
way remember this position. I would also suggest the name, "The Dunagan Position," in honor
of a deceased friend of mine.)
The basic winning technique is VERY simple.
The main line is:
1.Qf4!!, Rd7!?; 2.Ke6+, Kc8; 3.Qf5!, Rc7;
4.Kd6+, Kb8; 5.Qe5!, Rb7;
6.Kc6+, Ka8; 7.Qa1+!, Kb8; 8.Qa5!
("+/-") (White is winning easily.) {Diagram?}
This produces, "The Philidor Position." (See Diagram "A"
above.)
> Notice how black is 'rammed' into submission. Notice also the repeated
application
> of all the pieces in a
straight line. This pattern is just repeated - over and over,
until
> Black is forced into the
corner. Then the position is converted into the Philidor.
This weapon - often overlooked by the pundits of endgame theory
- is another graphic
and powerful tool the average player can use in this ending. The basic idea is easy and
relatively
simple to grasp. It is obvious that this technique is quickly and easily assimilated,
and gives the average player another useful method for winning this ending.
December, 2002: Now, all three of the above endgames can be studied in
some depth.
The links are found on my
"End-game List" page. (See the link at the bottom of this
page.)
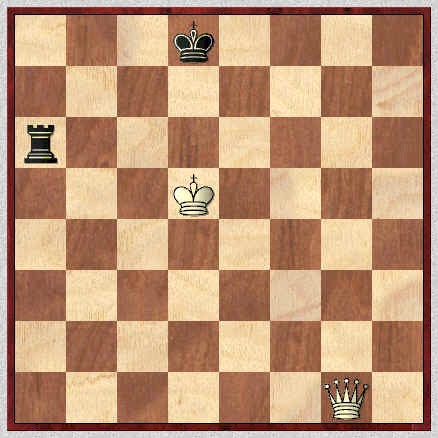
We should conclude with a final look at a position - which I call,
"The Wall."
{See the diagram just below. Position check, Diagram D: WK-d5, WQ-g1
BK-d8, BR-a6.
White to move, usually the first player plays something like
1.Qg7.}
|
|
I wanted to look at this position to give you some idea how difficult and complex this ending really can be!! (This is also
{similar to} Nunn's "Third-Rank Defence." See GM John Nunn's book, "The Secrets Of Pawnless Endings." I thought I had first discovered this position in the early 70's, in actuality many GM's were probably already aware of this position. But few - I think - realized just how difficult this position was.) I give it this name, ("The Wall"); because the weaker side uses his Rook to set up a defensive position that is like a wall, and keeps the stronger side's King at bay. The King basically remains immobile, and the Rook just zooms back and forth from a6 to h6, keeping the other sides pieces from making progress. (I am not even going to analyze this ending here, a
very detailed and deep analysis and explanation of all the ideas could run
... 20 pages or more!)
Also - I have not yet reduced this position to a formula, it seems to defy any simple
solutions!!! Even Nunn says, "You should at least study this one position."
He goes on to say while you might be able to able to figure out the win over-the-board in many of the other positions in his book, you will NOT
be able to play this particular ending correctly unless you have studied this position
...
in GREAT DETAIL!!
(See also GM Pal Benko's column, "The Endgame Lab," the May '88 issue of 'Chess Life.'
Benko carefully analyzes an ending of this type, I find his comments to be extremely helpful.)
(I analyzed this position - in some detail - in the material in the material that I sent into
'Chess Life' magazine.)
I give this position to show just how complex this ending is, and perhaps in the hope of inspiring future Masters into tackling this problem on their own. (And to continue to study privately.)
It is my hope that any player, having once played through these positions, could after studying these very basic positions, play this ending in a fairly competent manner. It is also my belief and philosophy that the study of these positions will make you a better overall player. It stands to reason that if you can completely master very simple positions, (first) you can then move up and begin to master more difficult positions. This "building-block, study method," is an essential step to moving up and in the process of attempting to become a better player. In addition to this, ALL the great GM's have had a thorough mastery of the endings.
So please study!
LM
This
HTML code was initially generated directly from MS
- Word.
(But also thanks to ChessBase 8.0,
where I do virtually ALL of my chess work.)
P.S.
I also plan on turning all of these positions into web pages (eventually) and posting them on my web site.
(March 23, 2002. Note to the editor: {DO NOT print this!}
I first started working on this project in January or February of 2000.
I only worked on it intermittently for a long time. I picked it up again seriously
in August, 2001. This involved completely throwing out the article I had originally
started on and starting over, from scratch - or a clean sheet of paper. My goal was
to provide as short as an article as possible … one or two pages. I also wanted to
provide you with an extremely deep analysis of all the possible positions that I
mention in the analysis and PROVE all my assertions, beyond any reasonable
doubt. I also wanted to warn you: Nunn's analysis is
NOT perfect, I found DOZENS of mistakes in his book … even though his analysis was [supposedly] all checked
and also meticulously verified by a computer. I also found many mistakes in ALL of the books on this topic; one was supposedly generated {entirely} by a computer.
I even have found a few errors in the CD-ROM set of endgame analysis by ChessBase.
My analysis has been checked - either by my own computer, or a SUN platform - literally
DOZENS of times. Many of these lines are very UN-NATURAL looking, i.e., to a
player - even a Master such as myself, who has studied these lines almost his entire
life! - they don't 'look right.' But in the end, you will find that the computer lines are
the quickest wins. Also, anyone who feels he can analyze these lines without a
computer is simply being foolish. It is simply too difficult a job for ANY ONE human!)
Additional study and resources: An article by Lim Loy. (On King + Queen versus a King and Rook, with no pawns on the board.)
See the article ... on K+Q vs. K+R ... in GM Andy Soltis's column, "Chess to Enjoy." (August, 2005 - 'Chess Life' ... page # 32.)
If
you enjoyed this position, and would like to study another
endgame, ("The LUCENA Position"); click HERE.
Click
HERE
to return/go to my "Geo-Cities" web site.
(My Home Page.)
Click
HERE
to return/go to my "Geo-Cities" web site.
(Chess Training Page.)
***
Click
HERE
to return to the page with my "Endgame List."
(This was the page you were on
before coming here.)
Click HERE to go to, or return to, my "Games4" Home Page.
(Or ... You could also press the back button on your web browser.)
***
(Page
{first} posted on my web-site, June 30th, 2002.
But I did NOT finish it, or establish the links ...
laziness, I guess.)
(Last update: Sunday; August 01, 2004. Last edit or save on: 07/05/2007 .)
Copyright, (c) LM A.J. Goldsby I
Copyright © A.J. Goldsby, 1994 - 2006. Copyright © A.J. Goldsby, 2007. All rights reserved.