This is an endgame that I first analyzed several years ago. I annotated it and posted it here on my web site in 2002. (I also sent a copy to a few of my students.) But, amazingly enough, I never linked the page to my endgame school! (So it is doubtful that many of you have seen this page.)
When this was recently brought to my attention, I was flabbergasted. But then I realized it was no big deal, just a chance to do the game over. I could both improve it and fix a few of the problems. (Apparently, the old js-script page did not work so well.) Tuesday; June 08, 2004.
When I was preparing, my endgame school, a few years ago, I played through literally hundreds, if not thousands, of games ... looking for just that perfect game that illustrated just one point really well. This one game - much more so than any other game I found --- clearly illustrated the dangers of a passive Rook in the endgame. There are other games - especially in the endgame books - that show this point. But few really show it in the really clear and vivid way that this one game does. It should be studied over and over again, until the student feels he has absorbed all the lessons that this game teaches.
This game was in Java-Script, but has been converted into a text score page. There are a few diagrams as well. But you will still want - or need - a chessboard in order to be able to follow this game fully. (You will NOT be able to study this game correctly without a board!)
*******
Click HERE to see this game, (UN-annotated); in the popular Java-Script Re-play format.
Click HERE to see an explanation ... of some of the more common symbols that I utilize in annotating a chess game.
GM
Evgeny Vladimirov (2598) -
IM
Penteala Harikrishna (2500)
|
|
|
**************
Perhaps White missed a move here?
Or perhaps Vladimirov saw the capture on a6 ... but thought that it would allow too
much counterplay?
Or ... with the
possible time control coming up at
move forty, (or 45); White might
have already been short of time?
Who knows, or can say for sure?
In the end, the way the game was
actually played ...
turns out to be far more interesting
to the student, than if White had
captured on a6 here.
(I also do not
entirely trust the computer, {yet}; Fritz 8.0 does not understand certain
composed endings ...
that lead to Byzantine and very complicated draws.)
[ The move of Nxa6 does seem to
be an improvement ...
but perhaps
White {thought} he saw something that I cannot see here.
After Nxa6, Fritz 8.0 gives the following continuation:
>/= 34.Nxa6! Rb2;
{Diagram?}
Trying to activate the Rooks.
( Or 34...Ra8; 35.Nb4! Rd2; 36.a6, '±' {Diagram?}
with a very large advantage
for White in this position. )
35.e4 Rdd2; 36.Nc5 Ra2;
37.a6, '±' (Maybe "+/-")
{Diagram?}
with a nearly overwhelming edge
for White here - in this line.
(This would be a difficult line to
calculate in time pressure. And
after ...Kd8; Rxd7+, Rxd7; Nxd7,
...Kxd7;
White might have thought
the game to be drawn. But after
...Kd8; White has 38.Nxe6+!)
One thing that IS certain in these
lines ...
Black has a great deal
more piece play, than he ever
achieves in the actual game!
{Perhaps this is a good reason for
White to entirely avoid these lines?} ]
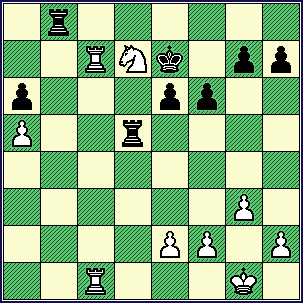
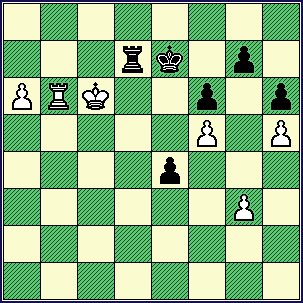
34...Rxd7;
35.R1c6! Ra8; 36.Kg2!, '±' {See
the diagram ... just below.}
Getting ready to bring the King into
the game. The advice is somewhat
over-used, yet it remains very true.
("In endgames with reduced pieces,
the King is a FIGHTING piece ... and
should be used aggressively.")
**************
|
|
**************
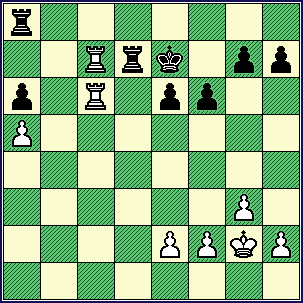
Please note this position ... we are coming up on the R+P ending that we want to devote deep study to. (!)
[ Another idea is:
36.f3!?,
{Diagram?}
and then bring the White King to
the center of the board.
(Via the route of f2, e3; etc.) ]
The next phase of the game is
fairly easy to understand. White
swaps one set of Rooks. Than, in
an effort to coax the second player into creating a new weakness, the
first party hurls his King-side Pawns
forward. When Black decides not to
cooperate, White grabs the center ... and then simply marches his King
all the way over to the Queen-side.
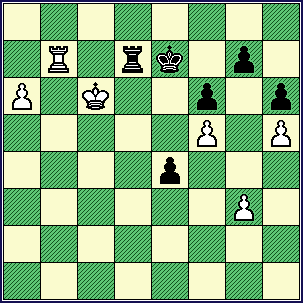
36...Ra7;
37.Rxd7+ Kxd7; 38.Rb6 Ke7; 39.h4! Kd7; {Diagram?}
Note how Black's Rook is almost
completely frozen in place ... and
therefore - virtually useless.
40.h5 Ke7;
{See the diagram - just below.}
All Black can do in this position is
to temporize.
This means simply
making Pawn moves, or even moving
his King back and forth.
**************
|
|
**************
In the meantime, the second player has to hope and pray that White cannot find a winning plan.
[ </= 40...Ra8?; 41.Rb7+ Kc6; 42.Rxg7, '±' (Maybe "+/-") ]
Now White, having first forced his
opponent's Rook into almost
total bondage, marches his King
over to the Queen-side.
(The
second player is helpless, and can
only watch events unfold.)
41.e4! Kd7;
42.Kf3 Ke7; 43.Ke3 h6!?; 44.f4 Kd7; 45.Kd4 Ke7;
{Diagram?}
Again - all Black can do is sway back
and forth, like a reed shaken in the
wind. White is almost
completely free
to do whatever he wants here.
[ </= 45...e5+??; 46.fxe5 fxe5+; 47.Kxe5, "+/-" ]
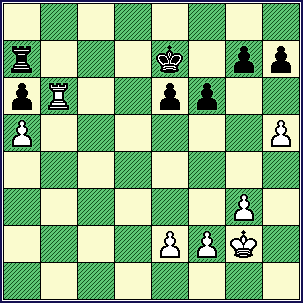
46.Kc5 Kd7;
{See the diagram, just below here.}
Black has many ways to play this
position ... but all roads here will
lead {only} to Rome. (and a loss)
**************
|
|
**************
White enjoys a free hand here
... but please note that this situation did
NOT arise be accident!
(The first
player planned this all the way.)
[
Another way for Black to go down
in flames was: 46...f5!?; {Diagram?}
Seemingly more active, {than
the text}; ... but,
really pointless in the long run.
47.exf5! exf5; 48.Kd5 Kf7;
49.Ke5 Rc7; 50.Rxa6 Rc5+; 51.Kd6 Rc3;
52.Rb6 Rxg3; 53.a6 Ra3;
54.Kc6, ("+/-") {Diagram?}
White wins easily from here. ]
White now finds an interesting
move ... and a maneuver ...
that allows him to penetrate Black's
seeming solid defense.
47.Rd6+! Ke7;
48.Kb6! Ra8; {Diagram?}
This appears to be forced.
[ After the moves:
</= 48...Kxd6?; ('??')
49.Kxa7 Kc5; 50.Kxa6 Kc6;
51.Ka7 e5; 52.fxe5 fxe5;
53.a6 Kc7; {Diagram?}
Everything loses here.
( Or 53...Kc5!?; 54.Kb7 Kd4; 55.a7 Kxe4; 56.a8Q Kf3;
57.Kc6! e4; 58.Kd5 e3; 59.Kd4+ Kf2; 60.Qf8+ Ke2;
61.Qf5!, ("+/-") {Diagram?} and Black's cause is hopeless.
)
54.g4,
"+/-" (tempo) {Diagram?}
and Black must give ground ...
and lose the game.
PLEASE NOTE:
White's earlier
pawn thrusts, beginning with h4,
made these
K+P endings relatively
simple wins. ]
*********************************************************************
The final phase of the game sees the first player win Black's QRP; and then advancing his asset in for promotion.
Black attempts counterplay ...
but it is all too little, too late.
49.Rc6 e5;
50.f5 Rb8+!?; 51.Kxa6 Rb4; 52.Rb6 Rxe4; 53.Kb7 Rd4;
54.a6 Rd7+;
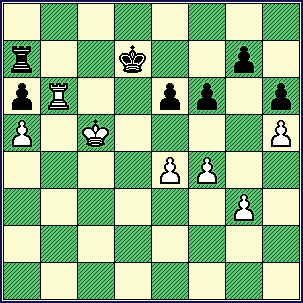
55.Kc6 e4!?; ('?')
{See the diagram - just below.}
This move is actually an error, but
it is hard to criticize Black ... his
position was completely lost here.
**************
|
|
**************
This is a good place for a diagram.
(Black's passed Pawn looks dangerous
here, but this is all a mirage.)
[ Maybe Rd6 was better ... but Black
will still lose from this position.
>/= 55...Rd6+;
56.Kc5 Rd1; 57.a7 Rc1+; 58.Kb5 Rb1+;
59.Kc6 Ra1;
{Diagram?}
Black is running out of moves.
( Or if: 59...Rc1+; then 60.Kb7, "+/-" with a relatively easy win. )
60.Rb7+ Kf8; 61.Rb8+ Ke7;
62.a8Q, ("+/-")
{Diagram?}
and Black could give up the lost
cause - and simply resign here. ]
56.Rb7!,
("+/-")
{See the diagram, just below.}
Black resigns.
**************
|
|
**************
[ After the moves:
56.Rb7! Rxb7; {Diagram?}
This is virtually forced.
( Not </= 56...e3?; 57.Rxd7+ Kf8; 58.Rd1,
"+/-" {Diagram?}
and the WR catches the Pawn. )
57.axb7 e3; 58.b8Q e2;
59.Qa7+ Kf8; 60.Qe3,
"+/-" {Diagram?}
and White will stop the Black
e-Pawn, and just in the nick
of time. ]
White's endgame technique here is
very fine, simply superb. What is
normally an extremely difficult ending
is made to look very easy ... the sign
of a true master.
This is an endgame that should be
studied very slowly and very, very
carefully. The aspiring student should
play
over it dozens of times ... (again and again and again);
until he (or she) feels that they have
completely learned
and absorbed ALL
the ideas and technique exhibited here.
*******
(All games, the HTML code was {initially} generated by the program, ChessBase 8.0.)
(The diagrams on this page were generated by the program, Chess Captor 2.25.)
*******
Game originally annotated in 2002. (And
then posted on this web site.)
Copyright (©) A.J. Goldsby, 2004.
All rights reserved.
This is the FULL version of this game. (I have not shortened it for publication.)
This
game is actually a departure from my normal method,
I developed
this version of this particular
game, primarily as a teaching tool - and for this website!!!
*******
If
you would like a full copy of this game/endgame
- in the ChessBase
format -
to study on your own computer, please drop
me a line.
Click
HERE
to return/go to my "Geo-Cities" web site.
(My Home Page.)
Click
HERE
to return/go to my "Geo-Cities" web site.
(Chess Training Page.)
Click
HERE
to
return to the page with my "Endgame
List."
(This was the page you were on
before coming here.)
Click HERE to go to, or return to, my "Games4" Home Page.
(Or ... You could also press the back button on your web browser.)
***
(Page {first} posted on my web-site, Tuesday; February 11th, 2002.) Last update: Wednesday; June 09th, 2004.
Copyright, (c) A.J. Goldsby I
© A.J. Goldsby, 1994 - 2004. Copyright © A.J. Goldsby, 2005. All rights reserved.