|
|
***
[A.J. Goldsby I]
Basic Endgame Course, Essential Knowledge; K+R vs. K+1P, Position #1
--->
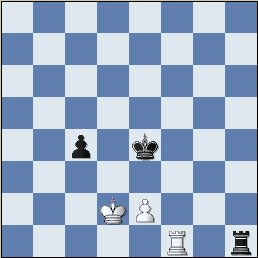
This is an actual excerpt from one of Max Euwe's games.
(Euwe is a former World Champion.)
Max was White.
Knowing how to deal with a King and Pawn when you have only a King
and Rook is a basic endgame for Student's of the game to learn. Witness
the following example.
White to move and win.
1. d8Q+,
White must act quickly, and
without delay.
[ Sometimes its easy to assume when you are studying the games of a GM,
especially when the games are that of a former World Champion, (!!!) that
the great player always made the best move.
While this may (or may not!) be true, it is NOT the best teaching method.
I was teaching this position (Sat, Apr. 28; 2001) to one of my local chess
students, (Daniel Schindler); and he asked, "Why not play the Rook to
the
last row?" (Threatening to aid in the
promotion of the pawn!)
Indeed. Why not? 1.Rc8?,
|
|
{Analysis Diagram.}
This move looks very plausible, if Black now plays 1...RxR/f1??;
then 2. PxR/f1=Q wins easily for White.
Unfortunately the move is an error. (But just barely!)
Notice also White just REMOVED his Rook from controlling the
promotion square and ... it will require an extra move to get back there.
1...Ra7[];
(Forced.)
The only move to stop the pawn from
promoting!
2.Ke8
Rxd7; 3.Kxd7,
and now it is BLACK to move.
Simple counting shows it takes 5 (FIVE) moves for Black to
get to his (or her) IDEAL position.
(The ideal position for Black = King on the 7th rank, {8th?}
protecting and supporting the Pawn; and the Pawn should be on
the 7th rank ready to promote. The ideal position for White is
King on
the 7th rank; {on the OPPOSITE side of the pawn from Black's King;}
and his Rook should be controlling the Pawn's Promotion Square.
Ideally the best place for the Rook to do this is from BEHIND the Pawn.).
Counting shows it takes White 6 (SIX) moves also (using the most direct
path) to get to his ideal position. But Black can also [possibly] interfere
with the White King's advance. Since White is at least one move behind
on the count and since Black moves FIRST -
..................
this would make the game a draw.
(OR: 4.Ke7
Ke4; 5.Kf6
f3; 6.Kg5
f2; 7.Rf8
Ke3; 8.Kg4
Ke2;
9.Kg3
f1Q; 10.Rxf1
Kxf1,
"=" draw.
Or: Many of my students think it is a simple matter to win by cutting the
Black King off from his Pawn, but this is not sufficient either.
4.Re8
Kd4; 5.Kd6
f3; 6.Re7
Kd3; 7.Kd5
f2; 8.Rf7
Ke2,
"="
|
|
{Analysis Diagram.}
and again it is a drawn position.)
4...Ke4!; Black need not lose time.
5.Ke6
f3; Now notice the position
of Black's King is INTERFERING with White's King in the pursuit of the
Black Pawn. White's most direct path is K-f5-g4-g3-g2. But
White is
prevented from going to the c4-square by Black's King.
6.Kf6 f2; 7.Kg5 Ke3; 8.Kg4 Ke2, "=" (See the diagram just below.)
|
|
{Analysis Diagram.}
and the game is a draw.
THE PROOF? 9.Kg3,
What else can White do here?
( If 9.Re8+
Kd2; 10.Rf8!;
( 10.Kg3??
f1Q; "-/+" ).
10...Ke2; 11.Re8+
Kd2; 12.Rf8
Ke1; 13.Kg3,
White tires of the
perpetual check. 13...f1Q; 14.Rxf1+
Kxf1; "=" Draw. )
9...f1Q; 10.Rxf1
Kxf1;
"=" Just two Kings left on the board is
as drawn as a position gets. ].
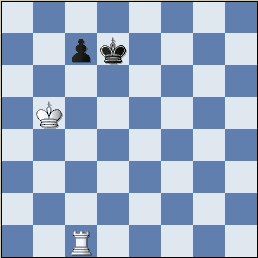
1...Rxd8; 2.
Kxd8
Ke4;
This position is very similar to Seirawan's diagram # 74, page # 68 of
the book, "Winning Chess Endings."
(By GM Yasser Seirawan.)
(Except the White Rook is on c1 instead of a1.)
The "ideal position" for the side with the King and Pawn, is "King on the
seventh rank, Pawn on the seventh rank."
The ideal position for the side with
the King and Rook is, "King one square away from the Pawn, (usually on the
2nd rank) and your Rook controlling the promotion square - either vertically
or horizontally."
Now it is a simple matter of counting.
If the stronger side moves first, (K + R) and can reach the ideal position in
the same number moves as the opponent, or even one extra move for the
opponent - then the stronger side wins.
In other words, it takes White six (6) moves to reach his ideal position.
[Ke7-f6-g5-g4-g3-g2.]
It takes Black five moves to reach his ideal position.
[Say King e4-e3-e2 (2 moves) and the Black Pawn from f5-f4-f3 (3 moves),
for a total of five moves.] So in other words, White wins.
The Proof?
(What follows is an extract from one of Euwe's games.)
Seirawan offers three important
principles about these endings:
# 1.) The King must escort the
Pawn to the promotion square.
# 2.) The Pawn should NOT
advance too far from the reach
of
the escorting King.
# 3.) The Rook (generally) should
be BEHIND the passed Pawn.
3. Ke7
f4;
Black must push the pawn as quickly as possible. Remember its a
race (!)
to reach the ideal position for each side. Tempo is essentially critical for
the side with the K & P. If Black dawdles here, White's superior force
will win easily.
4. Kf6,
It sounds dumb to say this, but many of my students have NOT found
this point. In order to catch the pawn, (the side with the K+R); that King
must approach the pawn from the OPPOSITE SIDE that the
opposing King is on.
(While this may be stating the obvious, it is an important point to note.)
[ 4.Kf7?? f3; 5.Kg6 Ke3; 6.Kg5 Ke2; 7.Kg4 f2; "=" ].
4...f3;
Run little pawn, run!
[ Slower is 4...Kf3; 5.Kf5 Kg3; 6.Rc3+ f3; 7.Ke4, and White wins the pawn. ].
5. Kg5 f2; The pawn continues to advance.
[ Or 5...Ke3; 6.Kg4 f2; 7.Kg3 Ke2; 8.Rc2+ Ke1; 9.Rxf2, "+/-" ].
6. Kg4
Ke3; 7.
Kg3
Ke2; 8.
Kg2,
Actually this move is a [very] slight error.
[ Euwe missed 8.Rc2+
Ke1; 9.Rxf2;
winning one move quicker.
He probably missed this because he already had the winning position
firmly fixed in his mind. ].
8...Kd2; 9. Rf1 Ke2; 10. Rxf2+, and Black Resigns.
Copyright
(c) A.J. Goldsby I;
(c) 1999, (c) 2000, (c) 2001. © A.J. Goldsby, 2002.
1 - 0
A
very fine and instructive piece of analysis by yours truly. ![]()
This
is the complete version of this game as it exists on my hard drive in my endgame
database,
I have NOT shortened it for publication! If you would like a copy of this
endgame
- in the ChessBase format -
to study on your own computer, please drop
me a line.
If
you enjoyed this position, and would like to study ANOTHER
Rook-and-Pawn endgame, ("The LUCENA Position");
click HERE.
Click
HERE
to return/go to my "Geo-Cities" web site.
(My Home Page.)
Click
HERE
to return/go to my "Geo-Cities" web site.
(Chess Training Page.)
Click
HERE
to return to the page with my "Endgame List."
(This was the page you were on
before coming here.)
Click HERE to go to, or return to, my "Games4" Home Page.
(Or ... You could also press the back button on your web browser.)
***
(Page posted on my web-site, January 25th, 2002.)
Copyright, (c) A.J. Goldsby I
© A.J. Goldsby, 1994 - 2004. Copyright © A.J. Goldsby, 2005. All rights reserved.