Tessellation
Projects
Supplies
and
materials needed: 2 sheets of white poster paper and markers, crayons,
or
colored pencils, access to a computer with tessellation software or the
WWW.
Before you
start:
Be sure that you have your information packet. If you have lost your copy, you may download another copy here: INFORMATION PACKET
·
You
are going to be doing three different tessellation projects: #1, #2,
and #3
·
Each
will be counted as separate grades! Do a good job.
Note:
Follow the directions exactly. Your grade will be affected by your
ability to
follow these directions.
You
will be working
on 4 different tessellation projects.
Tessellation
Project #
You
will be following directions and answering questions from Our
Tessellation
WebQuest. Be sure to obtain the
Tessellation Project #1 sheet. You may download an extra copy here: Tessellation Project #1 (Packet)
Tessellation
Project #2
You
will be tracing shapes to create a tessellation. I have
tessellation
templates and pattern blocks that may be borrowed and traced in class,
but may
not be taken home. If you wish to, you may trace the needed shapes onto
an
index card or a piece of an old file folder (stiff paper) to create a
template
that may be taken home. Color your tessellations.Write a 1/2 or more
page summary, comparing and contrasting your tessellation to another
student's tessellation. Follow the rubric provided. You may download an extra copy of the rubric here: Tessellations Project #2 Rubric (Small Poster)
Use
at least 1/4 of a sheet of white poster paper or a sheet that is 11 by 14 inches. If you do not have
poster paper,
you will have to use computer paper. If you use computer paper, you
will need
to tape together 2 sheets of paper in order for it to equal up to the
size of
1/4 of a sheet of poster paper. (See the frog example at ther bottom of this web page.)
Choose
a Format for Tessellation Project #3
Note:
Choice
1 will earn more points than choice 3.
It's
more
creative!
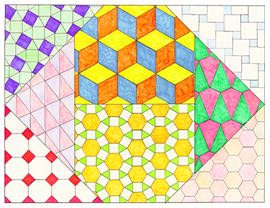
Choice 1: Use a full
sheet of white
poster paper, and divide it into 4 - 8 polygon shaped regions in any
way you
wish, but make the regions large enough to see the full pattern of your
tessellations. The example that you see
at the beginning of this handout was divided into 8 regions; you may do
as few
as 4 if you wish. Up to half of your regions may be filled with your
unique
computer software created tessellations. The others regions must be
hand drawn. (See the example at the top of this webpage.)
Be creative. This means: Don't just divide your poster paper into rectangles and/or squares. (See the example at the top of this webpage.)
Title
each of your tessellations. Include a title page and a table of
contents. You
may tape this to the back of the poster paper if you do tessellations
in all of
your regions or you may save one of the regions for your table of
contents and
titles.
Details
for
earning points for Tessellation #3
I.
Earn 10 points by doing choice 1 in a clever
manner (arrange the shapes creatively, not just as rectangles and/or
squares.
See the example on the top of the other side of this handout.) If you
do choice
2, you won't be able to earn these points.
II.
For your tessellations: Your pattern can comprise of any combination of
shapes
(no circles allowed).
(1) At least one must use two or more different
shapes. (15 pts)
(2)
At
least one must use three or more different shapes. (15 pts)
(3)
Use
different sizes of the same shape in one of your tessellations (similar shapes). (5 pts)
(4)
4
different tessellations (5 points)
(5)
5
different tessellations (10 points)
(6)
6
different tessellations (15 points)
(7)
7
different tessellations (20 points)
(8)
8
different tessellations (25 points)
III. Add color and design. (20 points)
IV.
Table of contents with a catchy/descriptive title for each
tessellation. (10
points)
Bonus
Points
for Tessellation Project #3 - You have two choices
1.
Bonus points - create your own tessellation
template, following in the footsteps of the artist, Escher. I have
posters to
get ideas from, and there are some ideas in your book. Up to 1/2 of
your
regions/pages may be your own creations. You will earn up to 5 extra
points for
each tessellation that you create on your own, not using my pattern
pieces, up
to 10 points.
2.
Bonus points - write one or more pages on the
history of tessellations that includes information about the artist,
Escher. Be
sure to cite your sources. (You may use the Internet and or/books. Be
sure that
all information is given in your own words. Do not copy. Quotes may be
used,
but must have quotation marks to show that they or direct quotes.
Possible +10
points
Project
#3 Total: Possible 100 points
Bonus Points: Possible 20 points
You may download an extra copy here: Tessellation Project #3 Rubric (Large poster or Booklet)
Tessellation
Project #
Tessellation
Project #4 is a PowerPoint presentation. You may choose to work alone
or with a group of up to three students who are in your class.
