 Creating
a Web Page
Creating
a Web PageNetscape
Communicator
Version
4.7 or 4.8
Note: It's no
longer possible to download the 4.7 versions of Netscape Communicator from
the Netscape web site. If you download Communicator you will be downloading
version 7.0.
For help with
version 7.0, click here.
The
Netscape Composer portion of Netscape Communicator makes it easy to put
together and publish Web pages. You don't need to know HTML--the code used
to make Web pages. Creating Web pages is as simple as using a word processor.
You just type what you want to see right onto the page, then you can use
a few of Netscape Composer's many tools (on the toolbar) to change fonts,
styles, add tables, links, and images.
1. Use your imagination and choose a topic for your Web Site.
2. Plan the basic elements of your Web Site. Surf the net looking for appropriate ideas and graphics.

3. Start saving graphics
that you might like to use on your webpage. You can place them in a folder
titled "graphics." Remember: You must move all graphics into the folder
where you html files will reside, before you place them on your web pages.

4. Bookmark in Netscape or copy and paste important urls to Notepad or Word. Save your file with a name that you will remember, such as "links." Don't forget to copy and paste or type title of page above each address. You may even want to type in a description, so that you can recall what the page was all about. When you place the link on your Web page, you will want to know at least the name and correct url of the site.
5. Sketch out design for web page or use post it notes. (links, numbered lists, bullet lists, tables, placement of text, placement of graphics, etc.)
Utilizing Netscape Communicator
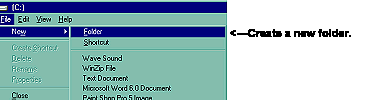
1. On the desktop of
your computer, make a new folder for all the html files and graphics for
your web page. Name the folder "webpage." Remember what you named
the folder, so that you can find it when needed. Later you can move the
contents that you wish to keep, into the folder titled "webpage" on your
floppy. Move the graphics that you have already decided to use into
your webpage folder. You can add more later. (Keep a list of which graphics,
etc. that you actually end up utilizing for you page(s). When it comes
time to load them to the Web, you'll know which ones that you used and
won't load too many or too few.)
|
2.  Open
Netscape Communicator. You don't have to be on-line to use Composer.
Open
Netscape Communicator. You don't have to be on-line to use Composer.
3. Click on paper and pen icon in lower right hand corner. This icon is one way to open the Composer part of Netscape Communicator.
![]()
4. Type a title for your page. Highlight the title that you typed with your mouse.
5. Choose a heading
size on the top left.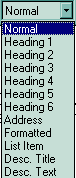
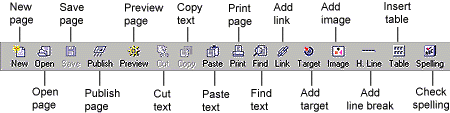
6. Netscape Toolbars.
Netscape Composer has two toolbars to help you put together your pages. The Composition toolbar contains buttons for manipulating the body and contents of the Web page. The Formatting toolbar contains buttons for altering format, including fonts, styles and alignment.
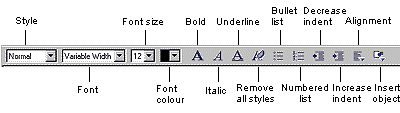
7. Choose a color for your heading. You will find the color choices to the left of the A.
The A means boldface,
A
means italics, and A means underlined text)

8. Highlight and center your title using the alignment buttons in the toolbar. Press return, 2 - 3 times
9. Type some more text, highlight it and align it to the left. While you have the text highlighted, choose a color for your text.
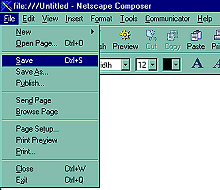
10. Practice saving your page.


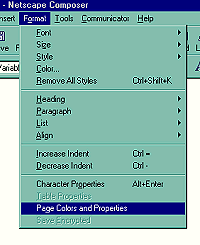
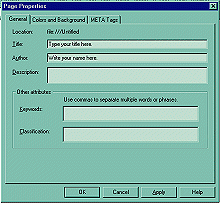
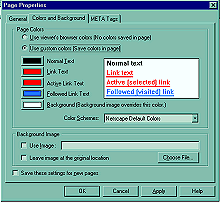
Under Format (Colors and
Background) choose background color, text colors, size, link colors, etc.
14. Placing graphics on your Web page with Composer.
To add an image to your Web page, click the your mouse pointer where you want the image to appear in the document, then click the Image button on the toolbar. This opens the Image Properties window.
In this window, you click Choose File to include an image that is currently on your hard drive.
You can also use the Image Properties window to set the image's postition relative to the surrounding text, as well as add blank space around it, add ALT text, and even add a low-resolution pre-loading image.
Using Composer, you place graphics on
your page by using the Image icon.![]()

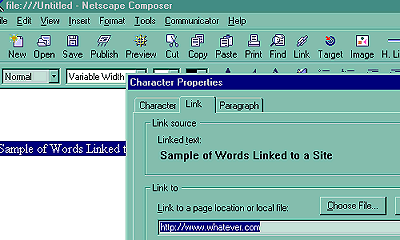
![]() To
create a link in your Web page, first highlight the word(s) you want to
form your link, then click the Link button on the toolbar.
To
create a link in your Web page, first highlight the word(s) you want to
form your link, then click the Link button on the toolbar.
This will open the Character Properties window. Type in the URL of the Web page you want to link to, or click Choose File to link to a page that is currently in your Web page folder.
If you're linking to a page on the Web, and it isn't in the same directory (and folder) that you're publishing your Web page to, you need to include the full URL ---- For example: http://www.sumter17.k12.sc.us ------- Be sure to include the http://
If you are linking to a page that is part of your Web page suite of files, within the same folder, just type the file name, such as "page2.html."
16. Continue to save your page every 5-10 minutes while you are working.
17. You really should put your e-mail address on your web page, as a hyperlink. It's very simple to set your e-mail address up as a hyperlink on your pages.

18. To create a table
for your Web page:
Click
on the table icon. ![]()
or You can choose a background image for your table. Tables also allow you to be more precise in the placement of graphics on your pages. The graphic to the right, as well as this text, are both inside of a table. Setting the border line widths to 0 pixels, gives you an invisible table, like this one. If you wish to edit your table, use your right mouse button to add rows, cells, delete the table, etc.
|
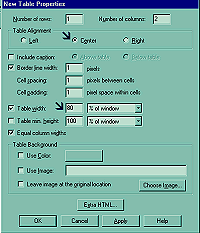
Notice that you can align your table left, center, or right. Aligning a table to the right often helps when using left border background graphics. It also helps to change the table width when using borders. If you are using a left hand border graphic, be sure to uncheck, "Equal column width." |
19. Adding targets.
A target is just like a hyperlink -- but instead of sending people to another Web page, you are sending them to another spot on your page. You have probably noticed targets on web pages that say something like: "click here return to the top"
First, you need to set up the target, which will be the area of the page that you want the click to send your visitor to.
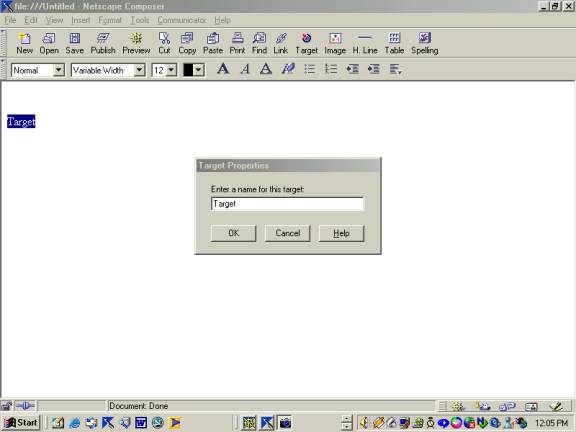
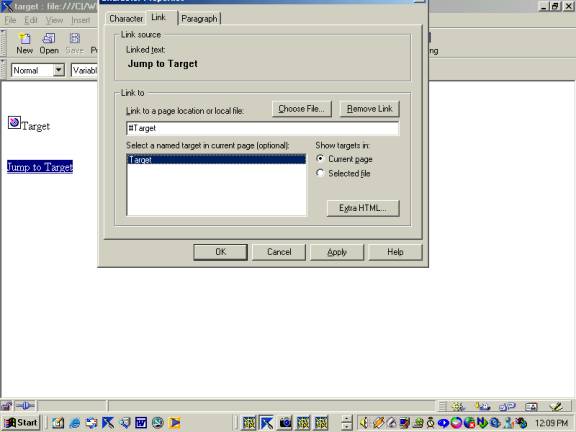
Now, set up the hyperlink that people will click to go to the target.
20 . Adding horizontal lines
One of the simplest features you can put on your page is a horizontal line. The width and thickness of horizontal can adjusted. Horizontal lines sort of take on the color of the background of your page.
To place a horizontal line on your page:
Click the button bar in the upper right
marked "H. Line" OR, go to the "insert" pull-down menu and click "horizontal
line."
This is what it looks like:
1. Put your
mouse pointer over the line until the regular arrow turns into a vertical
arrow.
2. Move it
up or down to change the thickness of the line.
You can also change the horizontal width across the page:
1. Put your mouse
pointer over the line until the regular arrow turns into a horizontal arrow.
2. Hold the mouse
and move it left or right to change the width of the line.
Another way to adjust the horizontal line is with the right mouse button:

21. Editing page source.
Once you are more experienced in making web pages using Composer, you may want to get into adding special effects or elements to your web site that cannot be done with Composer. Examples are adding sound, a counter, frames, java code, dhmtl code, etc. will can result in a number of special effects for your web page.
In order to add these special effects, you will have to manually add HTML coding to the source code of your web page. This can be done using Composer.
1. First, do a search on the web for some special effects that you might want on your page(s). There are many web sites offering free web page code. You just follow their directions and paste the code directly into the source of your web page and then save what you have done.
Here are some links to sites with free coding for web pages. There are many more.
2. Second, once you have
found the code that you wish to use, you'll have to copy and paste it from
the web into your web page. Remember that if you are going to use any sound
files, that sound has to be placed inside of your folder. Please, use only
public domain music on your site.
Here are the steps for editing
the source code of a web page in Composer.
If
Notepad does not automatically show up, you may be asked which program
to use to edit page source. Chose Notepad, because Notepad automatically
saves files as ASCII files.
22. Hit Preview occasionally
to see how your page will look.![]()
One thing to remember about
preview: When you are in preview, you cannot edit your web page. You must
have the page up in Composer to edit the page.
![]()
More Composer Information