Well, How are we doing? I reckon if you are this far, you are doing perty dang good, huh?. Have you downloaded and Installed FPExpress? Have you opened a site on Angelfire? If you have answered, "Yes" to both Questions, continue reading. You can't skip steps :-(
Preparations:
Create a New Folder for Angelfire on your C: drive:

1. Open Front Page Express by clicking on the icon on your Desktop
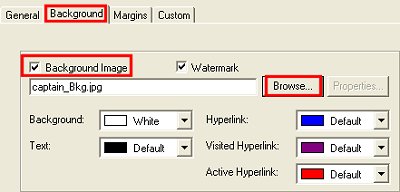
2. Background image - Go to Format--->Background--> Click on the tab, "Background"--- Put a check by, "Background Image" and "Watermark". ---> Click on the "Browse" Button. Browse to C:\Angelfire and select your background image. Click "OK " Now you should see your background image :-). You can change the colors for the "Hyperlink, Visited Hyperlink, Active Hyperlink, background and text so they match your theme.
3. Banner - Let's postion the banner
in the Top Center of the page. Click on the , "Align Center" tab ![]() Your cursor should be
in the center. Go to "Insert" ---> Image ----> Click on the tab, " Other Location"-->Put a check by,
"From
File"-->
Click "Browse" ---> Browse to
C:\Angelfire---> double click on your banner image and
"Wa La"
Your cursor should be
in the center. Go to "Insert" ---> Image ----> Click on the tab, " Other Location"-->Put a check by,
"From
File"-->
Click "Browse" ---> Browse to
C:\Angelfire---> double click on your banner image and
"Wa La"

4. Text - Now we need some text:-) Align the text to the left --> Select the Font of your Choice, Select the Size, Select the color and Indent once or twice? Where do you do these things? You think I ain't a gonna tell ya? Shame on ya! :-)
Selects the Font
Increases the text size - After you type the text, click on the large "A" until the size is increased to the size you like
Decreases the text size- After you type the text, click on the small "A" until the size is decreased to the size you like
Bold - Highlight the text , click on "B" to make it "Bold"
Italic - Highlight the text , click on "I" to make it "Italic"
Underline -Highlight the text , click on "U" to make it "Underlined"
Color - Highlight the text , click on "pait pallet" to select the color of your choice
Align Left - Highlight a image or text to Align to the left
Align Center - Highlight a image or text to Align to the center of the page
Align Right - Highlight a image or text to Align to the right
Numbered List - This list of 1-14 is an example of a numbered list.It will type the numbers for you
Bullet List - Use this selection if you want a bullet list instead of numbered. See below for an example of a bullet list.
Decrease Indent - Indents the text or image margins
Increase Indent - Indents the text or image margins
Example of Bullet List:
My Favorite Programs:
PSP
Outlook Stationery
ICQ
After you type your text which will tell about yourself, your hobbies, your interest,family, vacations or whatever you want to say on your main web site we will move on to Step 5. Are ya ready Freddy? Otay! Let's Go!!!!
5. Let's add a divider line or a horizontal line to separate your introduction from the next section of the web page:
To insert a Divider line image in the center of your page, Select the icon to align the image in the Center--> Go to Insert--> Image--->Select the tab, " Other Location"--> Select, "From File" ----> Clcik on "Browse". Browse to C:\Angelfire and double click on your divider line to select it.
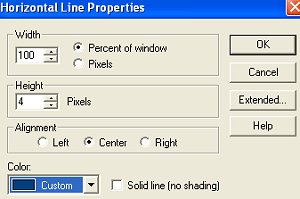
To insert a Horizontal line go to "Insert"--> "Horizontal Line".
Hold your mouse over the plain horizontal line, right click and select, "Horizontal line Properties" --> change the settings to select the Width, Height, Alignment and color--->Click OK"
Here is my example of the colored Horizontal line
6. Bullets -If you have made or saved the bullet images, this is where you will use them to link to your other web pages or to other web sites on the Internet. How will you know the URL for the web pages you haven't created? You know your main web page URL, right? Sure ya do cuz I asked ya to bookmark it and also email that web site to yourself so ya didn't loose it :-) Let me susplian sumptin to ya. This Webpage you are currently creating is you Main Web Site. It is always saved as, " index.html " when you save it. As you add more webpages, you will always make the changes on this page to link to the other page. After you upload this to Angelfire, you will see this page instead of the plain generic page we saw when we looked at the webpage after we set up the account. All future Webpages you make will have the URL as the main web page with the extention of the name of the web page you created. Yeah, I know, it sounds confusing, huh? Let me show you an example:
My main Webpage URL is https://www.angelfire.com/fl4/PSPLISA/ If I create a web page for family pictures and name the web page, "family.html" the Link to the webpage would be https://www.angelfire.com/fl4/PSPLISA/family.html . If I create a web page with a tutorial for cleaning up the Computer and I name that web page, " computer.htm", The URL for that web page would be https://www.angelfire.com/fl4/PSPLISA/Computer.htm
We want the Bullets on the left of the web site below the Divider line. Go to "Insert"--> Image--> Click on the tab, "Other Location"---> Select "From File"---> Click "Browse"--> Browse to C:\Angelfire and select your bullet image. Type a message beside the Bullet image to describe the web page. Click on the image and you will see it's selected .It will have 6 black blocks around it
While it's selected, go to Insert---> Hyperlink--> Select, "World Wide Web"---> Select " http: " for the "Hyperlink Type" Copy\paste the web page URL --> Click "OK".
** Tip** If you re on your web page when you select, "Hyperlink", it will automatically add the webpage address in the URL: field
Please don't use the links in the examples below. We want you to have your own links to future web sites so use your main web page address and we will change them as we create other pages.
Examples:
Click on the captain to view the web pages
Download ICQ
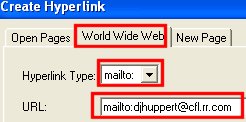
7. Email Button link - We will be making many changes to this web page but or now, let's finish this page and get it uploaded so we can solve any problems in the group before we get too far along. Plave your cursor where you want to add the Email button.Some align in the center, some on the left, and some on th right.You decide where you want it. Go to Insert--> Image--->Click on the tab, "Other Location"---> Select "From File"---> Click "Browse"--> Browse to C:\Angelfire and select your email button image. Click on the image and you will see it's selected. It will have 6 black blocks around it . While it's selected, go to "Insert " --> Hyperlink ---> Select the tab, " World Wide Web"---> Click on the arrow and select, "mailto: "--> Type YOUR email address after mailto: ---> Click "OK
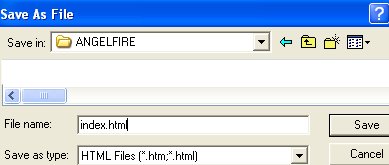
8. Save - Now we need to save this web page for now. Go to File--> Save as---> A window opens. Give the webpage a Title. Example: " Jeanie's Web Page" . You can name it anything of your choice and it can be changed later if needed:-) Click on " AS File "--Browse to C:\Angelfire and save the file as index.html--> Click "Save"
Need help?