
PAGE THREE - Compositing with the FX Tree - Pushing the effect futhter - Compositing with After Effects
6- Compositing with the FX Tree
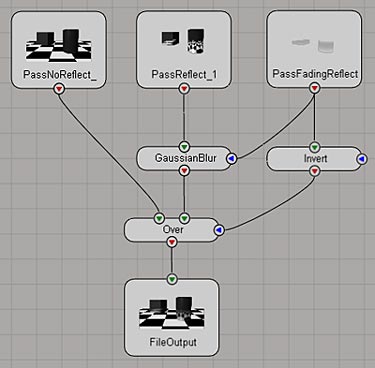
The rendering produces several files for the same image. So we have to recombine them together to get the final picture. Here we will use XSI's FX Tree.
Bringing
sources into the FX Tree
In XSI, turn one viewport into the FX Tree.
Then, in the FX Tree, do Passes > Get All Passes.
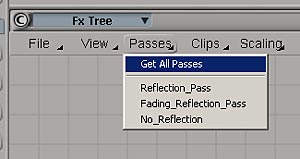
This will load all the passes we created, and create three nodes with them.

You can see that there
is a thumbnail inside the nodes, showing an approximation of the rendered result.
If, for some reason, the nodes do appear completely blank, you'll have to manually
load the rendered sequence. In this case, double-click on the Reflection_Pass
node. A window pops-up. Click on the ...
icon.

Browse to the Render_Pictures folder and double-click on PassReflect.1.pic to load it. The name of the node in the FXTree will change, but that is the only change. Repeat this for the other nodes.
Building
the FX Tree
Bring an Over node by doing Operators > Composite
> Over.

This node is used to composite several sources together. Leave the default settings (they'll do just fine for this tutorial). The input on the left is the background layer, and the input on the right is the foreground layer. The blue input on the side is an Obey Matte input, it used in all operators to force some inputs to be affected by a matte.
Connect the PassNoReflect into the background input and the PassReflect into the foreground input of the Over node.
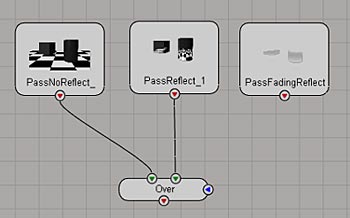
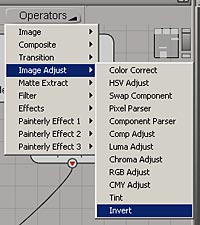
Now we have to use the PassFadingReflect node to drive the opacity of the reflection pass. The fading reflection pass will serve as a matte. Load an Invert node (Operators > Image Adjust > Invert).
Connect the PassFadingReflection into the Invert node, and then connect the Invert node into the Obey Matte input (blue input at the side) of the Over node.

There is one last node to load. Do Operators > Image > File Output.

This node will allow us to render our FX Tree to files. Place it at the bottom of the Tree, and connect the Over node into it.

Double-click on the FileOutput node to bring up its properties. Put the following settings:

You can notice that the output destination is not the Render_Pictures folder of the project folder, but instead the Composites folder. You can change this by clicking on the ... icon. You can leave the defaults for this tutorial.
Rendering
the FX Tree
The only remaining thing to do is to render the final composite, so you can
do wathever pleases you after that.
With the FileOutput operator property page still opened, click on Render. This will bring a new window, with useful rendering statistics. Click on the big Render button at the bottom to start the render. You'll see that it's extremely fast, this is because there is no 3D calculation made. This render uses the existing rendered files created with the passes and just combines them together.
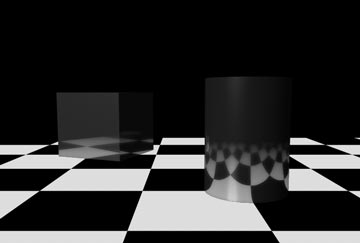
Of you go into the Composite folder of the project folder and open the Comp.1.pic file that is there, you should have something like this:

If you have this, then everything is fine and you just completed the tutorial! If you don't have this, well you must go through all the tutorial again, to find what is not working.
One aspect of fading reflections that we didn't look yet is that is the fact that most of the time, objects that have fading reflections also have a glossy effect. In other words, the reflected objects get more and more blurry with the distance from the reflecting surface.
The Gloss parameter of most surfaces shaders in XSI allows you to create this effect, in fact you will get fading reflections as well as distance-blurred reflections. You might think that since there is a Gloss parameter in common surface shaders, why would we need this tutorial anymore? The problem with Gloss is that it requires very amount of oversampling to give smooth results, thus affecting dramatically rendering time.
This tutorial can also be used to achieve the same effect as the Gloss. It will render much faster, and is easier to tweak. In fact, all we have to do is put some more opetors in the FX Tree. We don't need another custom pass, because we already have everything we need.
Adding
the required nodes
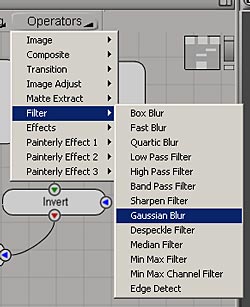
So with the FX Tree still opened, do Operators > Filter > Gaussian Blur.
Then connect the PassReflect into the input of the GaussianBlur node. Connect the PassFadingReflect into the Obey Matte input of the GaussianBlur node.
The role of the GaussianBlur operator is to blur the reflection pass. However, what we want is to blur the objects that are not distant, but not close to the reflecting surface. So we will use the PassFadingReflect node as a matte for the blur effect. Double-click on the GaussianBlur node to load its property page. There you can set the amount of blurring you want.
Now if you render this FX Tree, you should end with something like this:
One last thing. You might
find that the amount of bluring is insufficient with the GaussianBlur
operator. There are two solutions for this.
1- You can use a different blur operator. For example, the FastBlur
will allow you to crank up the blur amount up to 10.
2- You can edit the spdl file that is used by XSI. However, here I won't cover
this process in this tutorial.
8- Compositing with After Affects
Some of you may prefer to do the compositing in After Effects. So for your convenience I included the informations you need to do it. In fact, it is more straightforward to do it in After Effects than in the FX Tree, simply because After Effects is layer-based rather than node-based.
Creating
a new composition and importing the footage
Once you rendered your passes, launch After Effects. Then, create a new composition
that have the following settings:

Then we will import the footage files that we rendered. Right-click into the Project window, and choose Import > Multiple Files (or do Crtl+Alt+I).

Browse to the Render_Pictures folder of the XSI project folder, and select the 3 pic files. Click Open.
A new window appears, asking for the alpha channel interpretation. Check Premultiplied - Matte with Color, then click OK.

Click OK two more times to validate your choice for all three footages. Finally, when the Import Multiple Files window reappears, click Done.
Setting
up the composite
Drag and drop the three footages into the composition timeline, and place them
in this order:

Then, click on the Switches/Mode toggle button to switch to Modes.
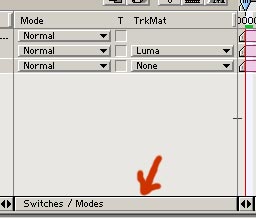
Now, click on the None button (in the TrkMat column) of the PassReflect layer, and choose Luma Matte "PassFadingReflect.1.pic".

You just applied a Track Matte to the layer. What happens is that the PassReflect layer (the reflection pass) will get matted by the layer on top, the fading reflection layer. You'll see that the PassFadingReflect layer has now a different icon and is invisible, meaning that it is being used as a Track Matte.
Et voilà, now you have an identical result as with the FX Tree:

You can adjust the levels of the reflection pass with a Levels effect applied on the PassReflect layer.
Open the Composite.aep project file (located into the Composites folder of the XSI project folder) to see by yourself.
About
the depth blurring effect
This effect is much harder to achieve in After Effects. You can use a depth
pass to mask a blurred reflection pass (see my tutorial about faking
depth of field with a depth pass in After Effects) , or you can use XSI
zpics.
