
PAGE TWO - The Second Pass - The Third Pass - Rendering
Now we will create a pass that will drive the intensity of the reflection. In other words, we will create a gradient that will mask the reflection, based on the distance in space from the reflective objects.
Create an new empty pass (Render > Pass > Edit > New Pass > Empty), name it Fading_Reflection_Pass. Close the property page.
Adding
an additional partition
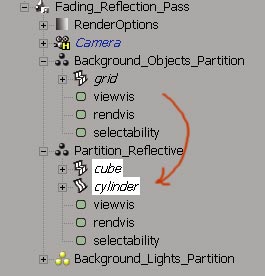
In the Explorer, expand the Fading_Reflection_Pass
item, and select it.
Add a new custom partition by doing Render > Pass > Partition > New.
Name it Partition_Reflective.

Close the property page.
Open the Background_Objects_Partition, select the reflective objects in there (in this case, the cube and the cylinder), and drop them into the Partition_Reflective partition.
Adding
the first override
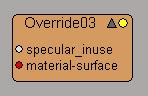
Select the Background_Objects_Partition partition,
and do Property > Override. This time, name the override Override03.
Click on Add Parameters,
and expand one object's Material node (can be any object, but in this case it's
the grid), and select the specular_inuse. The path to this is grid > Material
> Surface > Phong > specular_inuse.
Correcting
the override bug
The bug is still there, but now you know how to overcome it. So I'll let you
do this without any other explanation. It works the same way as before.
Adding
the second entry
When you have created the specular entry with the script trick, you can now
add another entry.
Now will add a Primary Rays entry, as we did earlier. The exact path to this
parameter is grid > Visibility > Primary Rays.
Leave the Specular Enable checked, but uncheck primray entry.
Adding
the third entry
Now it becomes trickier. XSI allows you to build entire Render Tree on overrides,
and this is what we are gonna do, in order to create the fading effect.
With the Override03 property page still opened, click on Add Parameters, and this time choose grid > Material > Surface (folder icon).

The resulting property page for the override should look like this:

This time there is no bug, so no need to mess with the Script Editor.
Building
the Render Tree
Now select the Override03 time in the Explorer, and hit 7 to load a Render Tree
window.
Right now there is only one node in the Tree, labelled Override03. You see, an override is like a material node. You can connect a Tree into it. The difference resides in the fact the override node has only the input that you have created, not the typical material ones (like Surface, Volume, Bump, etc.) So the only input we have is material-surface.
We will now build the following Render Tree:

The Tree of the bottom is the same as the one above, it indicates in wich inputs to plug the nodes.
Get the Scalar_state
node in Nodes > State > Scalar State
Get the Change_range node in Nodes > Math >
Change Range
Get the Scalar2color automatically when by connecting
the Change_range node into the Invert
node
Get the Invert node in Nodes > Image Processing
> Invert
Here are the setting of each nodes:

The Ray Lenght parameter will create an effect that undergoes changes based on the distance in space from the camera.

This will do take the values
that come in (the Old Range values) and convert them to values that range between
0 and 1. 0 equals white, 1 equals black.
The Old Range:End parameter will define how far in space the reflection will
reach. For example, if you want the reflection to only reflect the immediate
surrounding, put something like 5. But if you want to see far objects, put 30.
Of course this is dependant of your scene, the same values might not work in
another scene. But for now leave 20.
If you play with the Old Range:Start parameter, you will change the whiteness
of the closest pixels of the camera. In this tutorial, the white is not white,
it is a light gray. But if you put something like 4, then the light gray will
become a true white. I suggest to leave this value at 0 for now.

This will convert the scalar information to color one. In other words, the values that come in are grayscale values, that have only one channel. But the node will convert them into 4 channels values, namely RGBA.

As its name imply, this node will inverse the RGBA values, so the white becomes black and the black becomes white.
Setting
up the custom partition
Select the Partition_Reflective partition, and
do a Property > Override.
Name this new override Override04.
Adding
the entries
In the override property pages, add 2 two entries: Diffuse Enable (AnyObjects
> Material > Surface > Phong > diffuse_inuse)
and Specular Enable (AnyObject > Material > Surface > Phong > specular_inuse).
Correcting
the override bug
Same techinque as before: Open the Script Editor, drag and drop the last lines
of the History Log (those starting by SIAddEntry) onto the Script Editor, add
a , 2 at the end of the two lines, delete the override,
recreate it with the same name, run the script.
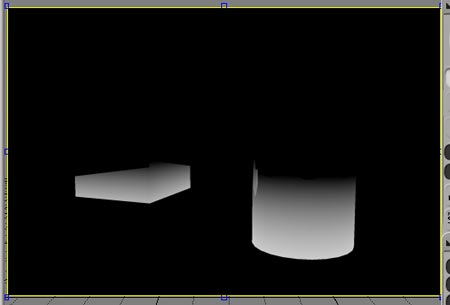
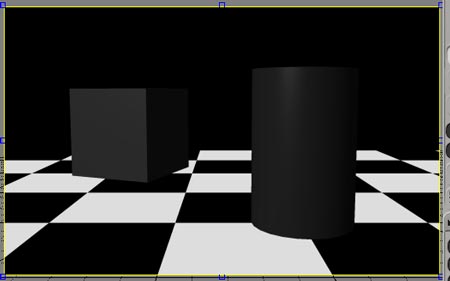
Uncheck both entries.
If you draw a render region, it should look like this:
We are now done with the second pass.
Now it's time to setup the last pass, wich require very few work. This pass will render everything, except the reflections. As you know, the two other passes took care of the reflection, so now it's time to render the other information.
Create a new pass: Render
> Pass > Edit > New Pass > Empty.
Name this pass No_Reflection and close the property page.

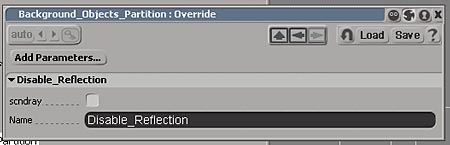
Select the Background_Objects_Partition
partition, and add an override: Property > Override.
Name this override Disable_Reflection.
Click Add Parameters, expand
any object's node down to Visibility > Secondary Rays.
Select it and click anywhere in the GUI to validate the selection.
Uncheck the entry.
Now if you draw a render region, the rendering should look like this:
So we are finished with the passes! The easy part is about to begin.
In the Explorer, delete the Default_Pass, as we don't need it anymore. However, if you use this technique in a real production environment, you are better advised to keep it. You never know when you need it.
The only thing we have to do before rendering is to define the Render Options for each pass. You can do that quickly with scripting, and for your courtesy I included a script that will do it for you, given that you named the passes like in this tutorial. Open the Script Editor and paste this script in the Script Editor field.
SetValue "Passes.*.RenderOptions.EndFrame", 1
SetValue "Passes.No_Reflection.RenderOptions.ImageFileName", "Render_Pictures\PassNoReflect"
SetValue "Passes.Reflection_Pass.RenderOptions.ImageFileName", "Render_Pictures\PassReflect"
SetValue "Passes.Fading_Reflection_Pass.RenderOptions.ImageFileName", "Render_Pictures\PassFadingReflect"
Run the script. It will give an appropriate name to the output names, and will set the render to start from frame 1 and to end at frame 1. This is all we need for this tutorial.
Finally, do Render > Render > Render > Render All Passes. This will render all three passes in one go.

Previous:
Initial setup and the first pass
Next: Compositing with the FX Tree and compositing
with After Effects
