DEM 2 RWX TUTORIAL
[ Elevation Model ]
[ World Parameters ]
[ RWX Options ]
[ RWX Texture Zones ]
[ Prop and Build Options ]
[ Tree Zones ]
[ Log Otptions ]
[ Home Page ]
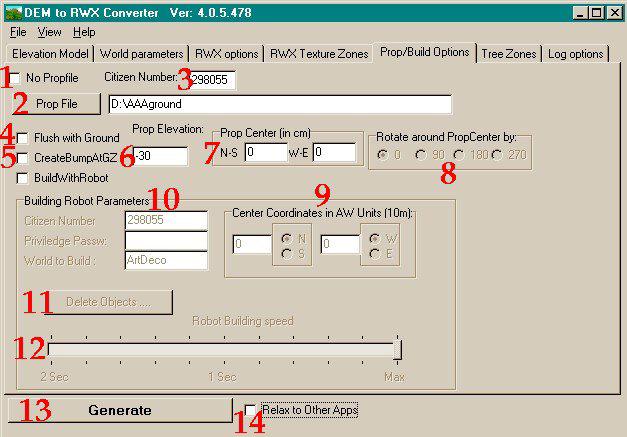
Prop/Build Options:
This is where you tell the program what to do with the objects it generates.
First you are going to tell the program whether or not you want it to
generate a prop file - which would give you a copy of all the RWX files on your
hard drive.
Assuming you do want to save the generated propfile to a file on your hard
drive, you must tell the program where to put it and how to call it.
I would like to segue here to talk about local paths. If you already know about
this, please skip ahead. I recently learned about this from Andras. You can
build ground objects, experience them in your world, never having uploaded
them to your server. This is a real time saver, since you would otherwise be
uploading 400+ objects to your server only to find you want to make some
adjustments. This really makes quick work of your project.
First, you must create a local path. To do this, you should review AW's
Tutorial on local paths because I couldn't say it better, no matter how hard I
try!
Basically, this is what my Local Path looks like on my hard drive:
C:\awart\www.imatowns.com\IngieBee\models.....\avatars....etc...
It must reflect your web address where your objects are kept. Under the
IngieBee folder, you put the folders, avatars, models, seqs, sounds and
Textures, just like you have on the net.
Next, you must tell your browser to look here, on your hard drive, before
looking up the files on the net. You do this in your AW browser. Go to Options >
Settings > Advanced and you will see this box (Below)
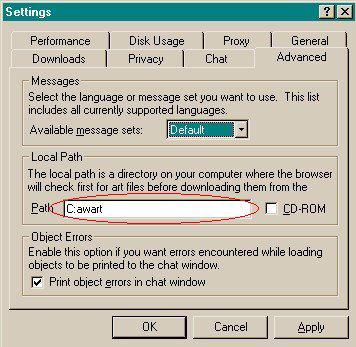
Simply tell the browser to look in the folder that contains your "false web address" which has to be the same as your object path. In this case, I put C:\awart (oops, forgot the backslash in the example ;o) )
Note: When using this option to work on your world, make sure "FTP to Host" is UNCHECKED or else all this is for nothing. If checked, the program will ftp each object to your server as they are made and you won't see anything for at least a half hour (on a 56k modem, LOL). Without having to ftp the objects to your host in order to see the results, the program builds these ground objects surprisingly fast! Also, don't forget, you will be the only person seeing the objects. And don't forget, when you do this, D2R will have actually "Planted" the objects in your world, so you will need to delete them before installing something different. (deletion coming up)
OK, back to our regular programming:
Here, you insert the citizen number for the citizen (hopefully you ;o) ) who
has building rights in your world (and bot rights)
This option tells the program to create ALL objects at the ground (effectively
changing the object's minimal elevation into 0) and position them to the
proper height within the propfile and with the bot).
This option will create a street object at ground zero which will bump warp a
visitor up to the ground elevation at gz. Or, in other words, flies the visitor
up to where the ground is at the point of entry)
You can adjust the prop. elevation here in tiny increments (centimeters). A
positive number will lift your ground up, a negative number will sink it down.
This is very useful if you want to get an exact match of ground to, say a
building you've already built, and don't want to relocate, pc. by pc.
Here, again, is where you can make tiny adjustments for an exact match but
in the horizontal direction. Use 500 as a value within those boxes if you plan
to generate 30x30m objects (those objects are too large for AW to properly
handle the solidity and with this trick you can make it solid all the time).
If you wish to rotate the ground object, making west face east or any other
direction, just choose the appropriate rotation here.
Here you can adjust the horizontal placement of your ground object in large
(10 m) increments (useful if you create only a small island or such terrain).
This is where you give the building robot permission to use your citizen
account to build in the world you choose.
You must enter:
a. Your citizen Id number
b. Your privilege Password
c. The name of your world
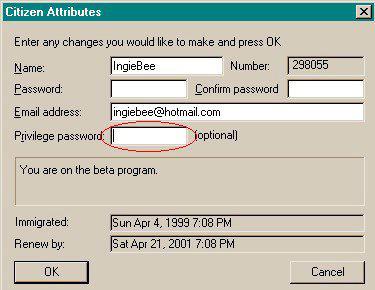
Note: Your privilege password is NOT your citizen password. It is a password that you create to give a friend, or
a bot, the right to build in your name with. usually temporary, so it's easy to change.
You can create a privilege password by looking in your AW browser under Options= citizen
Deleting objects can be a real pain, however D2R makes it really easy. That's why it's a dangerous tool
if you aren't careful!
Make sure your ground objects have a unique name, so that when you need to delete them, you won't have
to worry about inadvertently deleting, say, every object that starts with walk or the like....
Lets say you try out your settings and build your ground in your world using D2R. You then go into
your world and survey how it looks. You see how yo could make some improvements, in texture, or adjusting
location a bit, make notes, then go back into D2R to do the adjustments. If the adjustments involve only
changing the location of the object, then all you need to do is delete the objects from your world and use the
Building Robot to reinstall them with your updated information. If your changes involve the textures, you
really only have to change the zipped RWX files. Update the information in the texture zones window
and generate new rwx files. (Make sure you delete all the rwx objects in your local path file, otherwise your
rwx files will not be updated
Also, make sure you clear your cache or set your world's "Refresh" value to 0, or you may not see any
of the changes you made, even though the changes did occur.
Remember to fully remove all of the old objects, or remember NOT to "build" new objects on top of the
old or you will quickly reach your building limit!
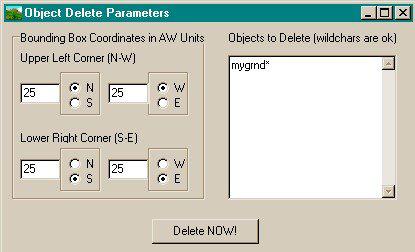
(see above) To remove the objects, put in the parameters of your world in AW units. (My ps8 goes from 25N 25W
to 25S 25E 1=10m) You can choose any two opposite corners (beware, the default give the same corner so the
program will error unless you change one set to the opposite coordinates ).
Then in the field to the right, give the prefix name of the object you wish to remove.
Note: * means everything, name* would mean anything with the prefix "name" will be deleted( name1,
name2.....name50, etc.....)
You may name as many object prefixes, or exact object names as you like on each line and all objects within your parameters will be deleted.
Here you can adjust the speed at which the building robot builds. This could
be useful if you wish to watch as each object loads in your world, so you
may want to slow it down. Other than that, I would think everyone would
want it to build as fast as it can!
You have seen this button on every window. It is the "go" button and can be
pushed from any window in the program.
The "relax to other apps" button will tell this program to defer the system
resources to other applications you may be running at the same time. It is
also available from each window of the program.
Go ahead, make my day, push it, lol..... or just move on to the next section....Tree Zones

