|
This tutorial is designed to go with Dishpatcher Babes Body Forms..Here I will show you how to create and paint different faces for different effects. I have included a zip file with the head and bust to help you practice.
The following is just one example of the face. Once you have learned these techniques I'm sure you will be able to design different faces. Maybe even your own..Smiles..
____________________________________________
Lets begin:
Open your PSP. Open a new transparent background, 16mill col. 400 x 400 pixels. Open your psp file I provided both the head and the bust. Edit copy the bust, edit paste as a new layer, then edit copy the head and edit paste as a new layer. Move the bust to the bottom of your working space, then position the head on the neck.
Name your layers head and bust.
First the nose!
As you can see, I have shown you two views of the nose. They are both created the same way. Change your foreground colour to #D2C0A4. Create a new layer. Select the tool draw, change your settings to freehand, solid line, stroked, line width two. Draw a curved line where you think the side of nose should be. Start at the forhead down. You may have to do it a few times until your satisfied. If you find your line is too straight, go to the second tab on your tool palette, and change the tracking to square joins and the tracking to closer to 20.
Now if your making the front view, duplicate this layer on your layer palette and image, mirror it.
Make a new layer and draw this curve under the nose. Now to make this curve how I did it was painted the left side c first then added the second line without removing my mouse from the image.
Now duplicate this layer and mirror it. Then line it up with the first bottom curved line. Making both nostrils.
Now for the side view, just bring the line into a curve as shown above, on the side view.
Turn off the bottom 3 layers on your layer palette then merge the rest visable. Now you want the nose to be the least visable on your face. Go to blur, gaussian blur 2. Then go to your layer palette and slide the opacity down to 50.
Now take your paint brush size 10, pen, hardness 0, opacity 30, step 25 and density 100. Paint a shadow along one side of the curve between the eyes going down to the nostrils. Then over the other nostril and up a bit. Then change your foreground colour to white, chang the opacity to 80 and paint a drop of white on the tip of the nose. Now you can reduce the opacity on the nose more depending on how content you are with the nose. I know this takes a bit of practice.
Turn off the head and bust and layer 1 and merge visable and call this nose.
____________________________________
Now for the Lips
Decide what colour you want the lips to be. Is it a female? If so is she wearing lip stick? For no lipstick I would go with a #CAAEA8. Take your preset tool change the settings to ellipse, filled, antialised checked and create as vector checked. Draw a wide oval the size you want the mouth to be. Then click on your node edit tool and click node edit on the palette. Then by holding the control button and clicking the mouse add two nodes that are coloured in below, in the following example.
Now you have 5 nodes. One on top, two at the sides, two just below the sides at the widest point of your oval and one on the bottom. Move the two you just made in and up towards the top node. Move the bottom node down very slightly. Then click on one of the sides of the widest point, where the arrow shows above, Right click and make sure your on cusp. Now move the bottom of the lip arrow in and up a little. Then move the top of this arrow on an angle. Do the same for the other side. Then move the top center node down some. Then click on the two beside this one and move the arrows out a little. Now both sides are not going to be identical. Go to your layer palette when your done moving the nodes, and change this layer to a rastor layer. Now taking your selections tool..rectangular, antialised checked and feather at 0 draw a square over the side of the mouth you like best. Try and make the ants dance in the center of the lips and selecting all of the lips as follows.
Now go to your options, got to selections, and go to invert. Then hit your delete key clearing the part of the mouth you dislike. Then go back to invert. Edit copy, then edit paste as a new selection. Line this new selection of lips even with the other. Then go image mirror. Then move the lips equal. Then hit select none.
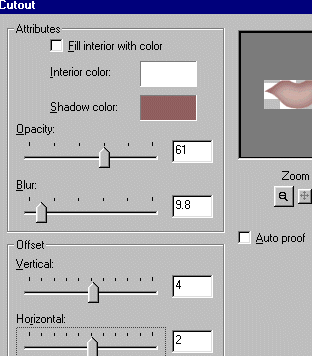
Go to selections option, select float then to cutout. Change the colour to #936363. With opacity 61. blur 9.8 and horizontl 2 and vertical 4 apply the cutout. Change the vertical and horizontal to a negative and apply once more.
*Note: To make mens and childrens lips make them less curvy and hardly move the new nodes you add.
Add a new rastor layer. Select a colour darker than the one you have on your foreground, To go with the above paint try #744F48. Go to your draw tool same settings except change your line width to 1, draw a line from one corner of the mouth to the other, curving it and draw just slightly past the corners. Go to blur, gaussian blur and change this to 2, apply.
Add a new rastor layer. Go to a shade lighter than your lips. For the above paint go with #F2D7D2. A nice light colour. Draw with the paint tool a line along the bottom lip..and a dot in the top center lip. Gaussian blur. Then change your colour to white and add a new rastor layer. Add a drop of white the center of the bottom lip. Gaussian blur. Turn off the nose, head and bust layer. Merge visable and call this lips.
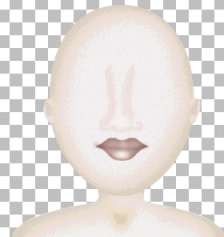
This is what you should have so far..
______________________________________
Now for the Eyes..
Go to your presets tool. Use the same settings except change the style to stroked and filled, line width=1 and make certain vector is checked. Change your foreground to black and your background to white. Draw an oval the size you want your eye to be. Click on node edit. Then follow the diagram below. What I did was add the two coloured nodes and deleted the node in the center corner of the eye, then changed the other corner eye node to a cusp and moved the arrow bottom and top in..and then moved this node down some.
Go to your layers palette and convert this layer to rastor. Add a new rastor layer make your foreground black and using your draw tool freehand width 2, draw a line for eyelashes. Add a gaussian blur of 1.
Using colour #D2C0A4, add a new rastor layer, using the same tool and settings, draw a line to make an eyelid. Now give it a gaussian blur of 2.
Go to your presets tool, style filled, change your foreground colour to a colour you like. Draw a circle for the eyeball. Make it oval with it longer than wide. Make it longer than the eye. Then select it, float it and flood fill with the pattern given in the download. Then go to colour colourize and change the colour to your preference. Then go to cutout do not change the settings and apply then reverse the cutout vert and horiz. to positive and apply. Then using the eraser tool, 100% opacity, erase the top portion and bottom portion of the eyeball where it is larger than eye itself. This gives more of a recessed appearance. Now add a gaussian blur of 1.
Then change your foreground to black, using your preset tool same settings, make a black oval in the center of the eye. You can create this on a new layer if you want to be able to move it. Change your foreground colour to white. Using your paint tool, size about 8, pen, paint a white dot twice in the same place in the center of the black iris of the eye.
Turn off layer 1, bust, head, nose, lips layer and merge the rest. Then duplicate this layer and mirror it, place opposite of the first eye.
____________________________________
Last Step: Facial Contour
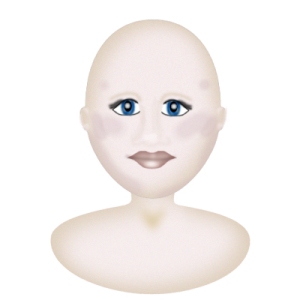
Change your foreground colour to #CBB1B9. Using paint brush size 30, opacity 30. Select the head layer then select, float the head paint a line along the cheek bone and around the sides of the face and add a dot above the temples. Select none. Below is the finished image.
You are finished this tutorial. You have now learned how to paint a face. You could at this point save each section, the nose, lips, eyes as tubes by edit copying each layer and pasting as new images. Then going to Dispatcher Babe's tutorials on body forms and the paint on the face.
______________________________________
Hope you enjoyed this tutorial!
All rights reserved on this tutorial. Under no circumstances can any profit be made even from the finished product. Do not copy this tutorial in any form. Do not duplicate and certainly do not save any images given in this tutorial. This is copywrited
©2001 The Tilly Garden
|