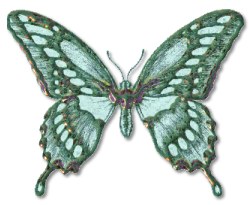
Here is what this tutorial shows you how to make. This was originally a black and white graphic. I increased the color, promoted it to a layer and removed the white background, resized it and saved it as a psp file. I have many different black and white graphics on a cd that are royalty free. I never know what to do with them. So I started trying different effects and came up with this idea.
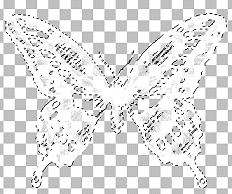
To make this graphic you should have some knowledge of psp, the program and blade pro. Although this could be done with just a solid flood fill. Downloads: The download includes the graphic and also a butterfly font. ___________________________________ Lets get Started! Open your PSP program and the buttfly.psp file I gave you. Holding the shift key down and clicking on the D key, make a copy. Minimize the original. You may want to make a different one later. 1) Go to colorize, adjust, brightness and contrast. Change the brightness to 255, the contrast does not apply. This makes your graphic white. 2) Go to your selections tool, make the setting rectangle, feather 0, antialised checked. Draw a square around the butterfly then click on the butterfly to select it. Here is what you should have so far.
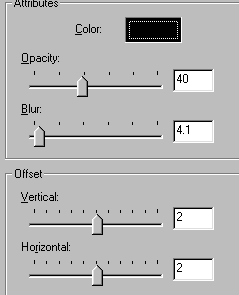
Go to your plugins and select blade pro and add whatever setting you like. Shiny gold is very pretty. But then so are many others. Deselect. Save. You should have a coloured butterfly of your liking. But just an outline. It still needs to be filled. To fill your butterfly take your magic wand tool and click anywhere outside of the butterfly. Go to Selections option, then invert. Go to Selections modify and contract by 2. Go to your layer palette. Right click on your layer one. Add a new rastor layer. Move this layer below layer one by clicking on layer two and moving it below layer one. Now choose a colour you like and that you feel would look good with the butterfly. Take your flood fill tool, solid colour, no texture and flood fill your image. You could save it now as it is or add a little more detail. Select none. Go to your layer palette and select layer one. Then add the following drop shadow. Which is..opacity 40, blur 4.1, vertical and horizontal 2. This does make it slightly less shiny. Its whatever you like best.
Merge visible, by going to layer options and selecting merge visible. Save, your done. Now I've also added the font which has butterflies of different patterns. To make these butterflies make your forground white. Open a 300 x 300 transparent image. Using your text tool click on the new image you created. Click on the butterflips font. Create it as a vector 72 point size. Once you have created it, move the tabs around your butterfly out making the butterfly about 3/4's the size of your image. Right click on layer two in the layers palette and change it to a rastor layer. Then follow the above instructions from instruction 2 down. Hope you enjoyed this very simple tutorial. _______________________________ Do NOT copy this tutorial for any reason. It is owned by The Tilly Garden. You may use your finished graphic any way you would like.
To view my other tutorials..Go Here! |