
Figure 1.0 Simple Circuit Showing Current Direction and Voltage Polarity.
For a verbal description click here.
Chapter 1 DC Circuits.
1.1 Solving Complex Circuits Using Loop Equations.
1.2 Voltage Dividers.
1.3 Thevenin's Theorem.
1.4 Norton's Theorem.
1.5 Current Measurement, the D'Arsonval Meter.
1.6 Voltage Measurement.
1.7 Measurement Using Multimeters.
1.8 Problems.
1.9 Answers to Problems.
Chapter 1.
DC Circuits.
It may be said that after mastering the contents of chapter 0 we have in hand all of the tools we need to solve any electric network we are likely to encounter. While this is true, there are a great many shortcuts and additional theorems to be learned. It is not possible to cover all of these. We will cover a few of the most useful ones here.
Back to Fun with Transistors.
Back to Fun with Tubes.
Back to Table of Contents.
Back to top.
1.1 Solving Complex Circuits Using Loop Equations.
There is a theorem in network analysis which states that the total current flowing in any circuit element is the sum of the individual currents produced by each voltage source with all other sources removed and replaced by short circuits. This is called the superposition theorem. This theorem tells us that it is possible to solve for the individual components of current and add them together to obtain the total current.We could remove the two sources, one at a time, from the circuit of Figure 1.1 and use circuit reduction to find the values of current being drawn, or injected into, each battery, but this is still an arduous method.
Instead we will consider that current flows round and round each loop and where two currents pass through the same resistor The actual current is the algebraic sum of the two. We assume a direction for the currents because we can't always figure out the current direction by inspection. We will sum the voltages around each loop of a circuit according to Kirchhoff's voltage law.
Voltage Rises and Drops.
The least confusing way to sum voltages around a loop is to give a rise a positive sign and a drop a negative sign. That's simple isn't it? Going up is positive, going down is negative. To sum voltages around a circuit you select a starting point, it doesn't matter where, and move around the circuit until you come back to the same point. If you travel across something from minus to plus you have traversed a rise. If you traverse from plus to minus it is a drop.A battery is not automatically a rise. What matters is which way you walked across it. If you walk from plus to minus it is a drop. Similarly a resistor is not automatically a drop. If you move across it from minus to plus it is a rise. It depends on which way you go not whether it is a battery or a resistor.
Obviously assigning the plus and minus signs is key to solving a circuit. If the signs are wrong the answer will be wrong. First of all a battery is what it is. If current is flowing out of the battery, normal discharging, or into the battery, charging, the positive side is positive and the negative side is negative. That cannot change.
A resistor is a somewhat different story. The direction of current through the resistor determines the polarity of voltage across it. The current flows into the positive end and out of the negative end. This can be made clear with the simplest of all possible circuits.
Figure 1.0 Simple Circuit Showing Current Direction and Voltage Polarity.
For a verbal description click here.
Since there are only two elements in the circuit the voltage polarity is obvious by inspection. The current direction is also obvious. It flows out of the positive terminal of the battery, downward through the resistor and back to the battery. So you see that the end of the resistor where the current exits is the negative end. If you forget which way it goes you can recreate this drawing at any time or in any place and refresh your memory.The current direction must be assumed in complex circuits but as long as consistent rules are followed the answer will be correct. If you assume wrongly the answer will have a negative sign attached but the magnitude will always be correct.
Loop Equations.

Figure 1.1 Circuit Containing Two Voltage Sources.
For a verbal description click here.
Consider the circuit of Figure 1.1. Instead of trying to solve for the voltage and current at each resistor we will take a somewhat different approach. Assume that the current in each loop follows a closed path as indicated by the arrows in Figure 1.1. The current I1 flows through E1, R1 and R2. The current I2 flows through R2, R3 and E2. The current in R1 is I1 while the current in R3 is I2. The current in R2 is the algebraic sum of I1 and I2.We cannot tell by inspection which direction the current in each loop is flowing. You might say "obviously the current is flowing out of the positive terminal of each battery." You might be right, you might be wrong. Suppose that E1 is the power source in a battery charger and E2 is the battery which is being charged. In that case the directions indicated by the arrows would be correct. If E2 were the source and E1 were the battery being charged the true current directions would be opposite to those shown in the figure. The true current directions may or may not be as you would tend to assume by inspection. The point is, you cannot tell in advance what the directions of the currents will be. The usual procedure is to assume that all currents are clockwise. If the guess is wrong, the answer will come out with a minus sign attached and we will know that the true current is in the opposite direction.
There are two unknowns in the circuit, I1 and I2. The circuit will produce two equations. A circuit with three loops would produce three equations in three unknowns. In general then it can be said that a network with N loops will produce N equations in N unknowns.
It is assumed that the student at this level of study has already mastered at least one technique for solving systems of N by N equations. Solving systems of 3 by 3 or larger is a job best left to a computer program. We are here to learn techniques, not to get exercise from solving systems of N by N equations. For this reason the problems and examples in this text will not exceed systems of 2 by 2.
Writing the Equations.
To write the equations we sum the voltage rises around each loop. It does not matter that there are branches in and out of the loop. Kirchhoff's voltage law applies. In the circuit of Figure 1.1 the equations are written as follows.E1 - R1 I1 - R2 I1 + R2 I2 = 0 (1.1) The polarity of the voltage sources is fixed and cannot change. The polarity of each resistor drop is marked inside of each loop. Moving in the direction of assumed current, E1 is a rise and therefore positive. The drops across R1 and R2 due to I1 are drops and therefore negative. The current in loop 2 has an influence on loop 1 and so we must include this in the equation. The term "R2 I2" reflects this influence. The term is positive because the voltage difference produced by I2 is a rise when moving in the direction of I1. In loop 2 (equation 1.2) the voltages due to I2 are all drops and therefore negative as is E2. The only positive term in equation 1.2 is the effect of I1 on loop 2.- E2 - R3 I2 - R2 I2 + R2 I1 = 0 (1.2)
It may seem as if there is some magic going on here. Each equation is just a statement of Kirchhoff's voltage law for that loop. The techniques for writing these equations were covered in chapter 0. If you do not understand how to write these equations, review section 0.3.
Assuming that the individual currents run in circles may be a little more difficult to understand. Intuition and visualization tell us that the currents really don't do that. However, this is a mathematical model. Mathematical models do not necessarily describe physical reality; they permit calculations to be made which will give the right answer.
Do not attempt to memorize equations 1.1 and 1.2. Learn how to write the equations from the circuit as it is given.
Example 1.1.
In the circuit of Figure 1.2, what is the voltage drop across R2?

Figure 1.2 Circuit Containing Two Voltage Sources.
For a verbal description click here.
Solution:
The equations areUnderstanding loop equations is very important. You may be thinking that this is just an exercise and you will never see this type of problem again. If you are thinking that, you are wrong. Problems and derivations in transistors and integrated circuits use these methods again and again. If you haven't mastered loop equations, go over this section until you do. If you go on without understanding loop equations, you will start to feel disoriented somewhere around chapter 3 and be totally lost by chapter 5. Don't say you weren't warned.12 - 330 I1 - 75 I1 + 75 I2 = 0
6 - 100 I2 - 75 I2 + 75 I1 = 0
Rearranging yields
- 405 I1 + 75 I2 = - 12
75 I1 - 175 I2 = - 6
Solving these equations simultaneously yields
I1 = 39.08 mA
I2 = 51.03 mA
These values are stated to 4 digits because they are intermediate values. Note that both have positive signs, which means that the assumed directions are correct. The question being asked is "What is the voltage across R2?" The current in R2 is made up of two components, 39.08 mA downward and 51.03 mA upward. If we define up as positive then
IR2 = - 39.08 mA + 51.03 mA = 11.95 mA
The current flows upward in R2; therefore, its upper end will be negative. The magnitude of the voltage is
V2 = I2 R2 = 11.95 mA x 75 ohms = 0.896 v
The answer is 0.896 volts upper end negative.
Back to Fun with Transistors.
Back to Fun with Tubes.
Back to Table of Contents.
Back to top.
1.2 Voltage Divider.
One application of the series circuit is known as the voltage divider. Voltage dividers are used to reduce voltages by some fixed factor. They also appear as parts of more complex circuits. The circuit of a simple voltage divider is shown in Figure 1.3.
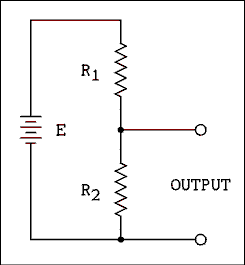
Figure 1.3 Simple Voltage Divider.
For a verbal description click here.
The following is based on a voltage divider with no significant load. The output voltage is the voltage across R2. To find the voltage across R2 we need to find the current through it. The current through R2 is the same as the current anywhere else in the circuit. The current in the circuit is given byI = E / (R1 + R2) (1.3) The voltage across R2 is given byVO = I R2 (1.4) Substituting equation 1.3 into equation 1.4 gives us the voltage divider equationVO = E R2 / (R1 + R2) (1.5) This is one of the most often used equations in electricity and electronics. Although memorization is usually not recommended, make an exception for this one. Remember not only the equation but the procedure for obtaining it.Often the input voltage to a voltage divider is not a battery E but sometimes a known voltage VIN. In this case the equation would be
VO = VIN R2 / (R1 + R2) (1.6) If the voltage divider has more than two resistors the equation is basically the same. The numerator is the sum of all of the resistors the output is taken across. The denominator is the sum of all resistors in the divider chain. An example will illustrate.Example 1.2.
In Figure 1.4 if the VIN is 100 volts, what is the output voltage between common and; (a) 1, (b) 2, (c) 3, (d) 4, and (e) 5?

Figure 1.4 Voltage Divider.
For a verbal description click here.
Solution:
(a) When the output is taken from common and point 1, the output is connected to the input by wires. The output voltage is 100 volts.(b) VO = VIN (R2 + R3 + R4 + R5) / (R1 + R2 + R3 + R4 + R5)
VO = 100 v x 300 k ohms / 1000 k ohms = 30 v
(c) VO = 100 v x 100 k ohms / 1000 k ohms = 10 v
(d) VO = 100 v x 30 k ohms / 1000 k ohms = 3 v
(e) VO = 100 v x 10 k ohms / 1000 k ohms = 1 v
Back to Fun with Transistors.
Back to Fun with Tubes.
Back to Table of Contents.
Back to top.
1.3 Thevenin's Theorem.
The circuits we have studied so far have been self- contained. It may seem to you as if these circuits are of limited usefulness and you are right. The most useful circuits are those which have output terminals. A circuit which has output terminals can deliver electrical energy in various forms for use by other circuits. Figure 1.5 is the schematic diagram of a circuit which has output terminals.

Figure 1.5 Complex Network With Output Terminals.
For a verbal description click here.
Suppose that we wanted to find the current which would flow in a certain load resistance. Based on what we have learned to date the procedure would be to draw the load in the circuit and then solve the 3 by 3 system of equations for I3 which would be the current in the load. If it is necessary to solve for the current in a number of different loads, the system of equations must be solved as many times as there are loads. Enter Thevenin.Thevenin's theorem states that any circuit no matter how complex may be replaced by a single voltage source in series with a single resistor as shown in Figure 1.6. The voltage source is equal to the open-circuit voltage of the complex circuit and the resistance is equal to the resistance looking in at the output terminals with all voltage sources replaced by short circuits.

Figure 1.6 Thevenin's Equivalent Circuit.
For a verbal description click here.
Finding the values for the voltage source and resistor involves solving the complex circuit only once. The original circuit and the Thevenin's circuit will act exactly the same for any load resistance. If you had each circuit sealed in separate black boxes which you could not open or x-ray, there would be no way to tell which was which. Let us work some examples to illustrate the application of the theorem.Example 1.3.
Find Thevenin's equivalent circuit for the circuit of Figure 1.7. E1 = 30 v, E2 = 3.0 v, R1 = 240 ohms, R2 = 400 ohms, R3 = 350 ohms, R4 = 750 ohms, and R5 = 100 ohms.

Figure 1.7 Circuit For Example 1.3.
For a verbal description click here.
Solution:
In the circuit of Figure 1.7 if the output is open-circuited there will be no current in R5. I3 = 0. If there is no current in R5 there is no voltage drop across it. The output voltage is the same as the voltage across R4. This effectively reduces the problem from a 3 by 3 to a 2 by 2. The only unknowns are I1 and I2 and there are two loops to give us two equations.E1 - R1 I1 - R2 I1 + R2 I2 = 0
E2 - R2 I2 - R3 I2 - R4 I2 + R2 I1 = 0
Substituting Values.
30 - 240 I1 - 400 I1 + 400 I2 = 0.
3 - 400 I2 - 350 I2 - 750 I2 + 400 I1 = 0.
Combining and rearranging.
-640 I1 + 400 I2 = - 30.
400 I1 - 1500 I2 = - 3.
We need to know I2 but don't care what I1 is. Multiplying the second equation by 1.6 gives.
-640 I1 + 400 I2 = - 30.
640 I1 - 2400 I2 = - 4.8.
Adding the two gives.
0 I1 - 2000 I2 = - 34.8.
I2 = - 34.8 / (- 2000) = 17.40 mA.
I2 is the only current flowing through R4 so.
VR4 = VTh = 17.40 mA x 750 ohms = 13.05 volts.
Now we must obtain the Thevenin resistance.

Figure 1.8 Figure 1.7 With Voltage Sources Removed and replaced by short circuits.
For a verbal description click here.
The Thevenin resistance is the resistance at the terminals with all voltage sources removed and replaced by short circuits. The method here is to start farthest from the terminals and start combining resistors. R1 and R2 are in parallel so.
R12 = R1 R2 / (R1 + R2) = 240 x 400 / (240 + 400) = 150 ohms.
R12 and R3 are in series so.
R123 = R12 + R3 = 150 + 350 = 500 ohms.
R123 is in parallel with R4 so.
R1234 = R123 R4 / (R123 + R4) = 300 ohms.
R1234 and R5 are in series so.
R12345 = RTh = R1234 + R5 = 400 ohms.

Figure 1.9 Thevenin's Equivalent Circuit of Figure 1.7
For a verbal description click here.
Example 1.4.
Use Thevenin's theorem to solve example 1.1. "In the circuit of Figure 1.2, what is the voltage drop across R2?"Solution:
Because the voltage across R2 is what is wanted, we will treat R2 as a load resistor and remove it from the circuit. The result is shown in Figure 1.10.Maybe we should have carried 5 digits in our intermediate results. The error in the third decimal place is a result of using a finite number of significant digits, not any defect in either method of solution.

Figure 1.10 Figure 1.2 With R2 Removed.
For a verbal description click here.
We will now write the loop equation around the outside loop to determine the current in the two resistors which are now simply in series.
12 - 330 I - 100 I + 6 = 0
18 = 430 I
I = 18 v / 430 ohms = 41.86 mA.
Now we will write the loop equation around the loop of the 12 volt battery, the 330 ohm resistor, and the load terminals. Don't be concerned that the load terminals are open. It is easily possible to have a voltage existing across an open circuit. The load voltage is what we want to know.
12 - 330 I - VL = 0
VL = 12 - 330 I = 12 - 13.814 = - 1.814 volts.
This is the Thevenin's voltage source for the equivalent circuit. If both voltage sources are replaced by short circuits the two resistors are in parallel with each other. The equivalent resistance is 76.74 ohms . This is the Thevenin's resistance for the circuit. Now we draw the Thevenin's circuit and connect R2 to it, Figure 1.11

Figure 1.11 Thevenin's Equivalent Circuit
With R2 Connected as a Load.For a verbal description click here.
Now we apply the voltage divider equation to determine the voltage across R2.
VR2 = -1.814 v x 75 ohms / (75 ohms + 76.74 ohms) = -0.897 v
Thevenin's theorem can also be used on circuits so complex that they cannot easily be analyzed mathematically. An example is the function generator used in the laboratory. An electronics engineer could study the schematic diagram of the generator and calculate the Thevenin's resistance (also known as output resistance) of the generator. If the function generator had not yet been constructed a calculation would be the only way to find the Thevenin's resistance (or output resistance) of the generator.
Example 1.5.
When the function generator has no load connected, its output voltage is 7.87 volts. When a 100 ohm resistor is connected as a load the voltage is 5.20 volts. What is the output resistance of the function generator?Solution:
The Thevenin's voltage source is always equal to the open-circuit output voltage of any Thevenin's circuit. Figure 1.12 shows the circuit with everything we know about it to date.Thevenin's theorem can be used: 1) to solve for the load conditions in circuits which have output terminals, 2) to simplify circuits by allowing a key resistor to be removed and 3) to find the output resistance of devices such as signal generators even when we do not know what is in the box. This is why it can be said that Thevenin's theorem is one of the most useful theorems in circuit analysis.

Figure 1.12 Thevenin's Equivalent Circuit
of a Function GeneratorFor a verbal description click here.
You could apply the voltage divider equation and solve it for the unknown resistor. But suppose that this is a test and you don't remember how to do that. The proper procedure is to put the best computer ever designed to work on the problem, the human mind. Kirchhoff's voltage law gives the voltage drop across the unknown resistor.
V? = VTh - VL = 7.87 - 5.20 = 2.67 v
Ohm's law gives the current through RL.
IL = VL / RL = 5.20 V / 100 ohms = 52.0 mA.
Kirchhoff's current law gives the current through the unknown.
I? = IL = 52.0 mA.
Ohm's law gives the resistance of the unknown.
R? = V? / I? = 2.67 v / 52.0 mA = 51.3 ohms.
The output resistance is 51.3 ohms.
Back to Fun with Transistors.
Back to Fun with Tubes.
Back to Table of Contents.
Back to top.
1.4 Norton's Theorem.
The Ideal Current Source.
Before we look at ideal current sources let us look at what we know about ideal voltage sources. An ideal voltage source will maintain a constant voltage across its terminals regardless of the amount of current being drawn. The ideal voltage source will keep its voltage constant even if it has to deliver an infinite amount of current to do so. Do I hear someone saying "That's impossible!"? This is an ideal voltage source. In the ideal case, anything is possible.An ideal voltage source delivers zero power when it is open-circuited. In the open-circuit case, the current is zero. If the current is zero, the power is zero.
We are accustomed to thinking of open-circuits as being a "zero power" condition and short-circuits as being damaging. In the real world any attempt to take anything to infinity is usually damaging to something.
Items we normally think of as voltage sources, such as batteries, are actually Thevenin's equivalent circuits with very low values of output resistance.
An ideal current source will maintain a constant current through its terminals regardless of the amount of voltage being delivered. The ideal current source will keep its current constant even if it has to deliver an infinite amount of voltage to do so. Do I hear someone saying "That's impossible!"? This is an ideal current source. In the ideal case, anything is possible.
An ideal current source delivers zero power when it is short-circuited. In the short-circuit case, the voltage is zero. If the voltage is zero, the power is zero.
We are NOT accustomed to thinking of short-circuits as being a "zero power" condition and open-circuits as being damaging. In the real world any attempt to take anything to infinity is usually damaging to something. An open-circuit current source will attempt to go to infinite voltage and that is an undesirable condition.
The Theorem.
Norton's theorem states that any circuit no matter how complex may be replaced by a single current source in parallel with a single resistor as shown in figure 1.13. The current source is equal to the short-circuit current of the complex circuit and the resistance is equal to the resistance looking in at the output terminals with all voltage sources replaced by short circuits and any current sources replaced by open circuits.

Figure 1.13 Norton's Equivalent Circuit.
For a verbal description click here.
Norton's theorem is not used as often as Thevenin's theorem but it can make short work of example 1.2. Pun fully intended.Example 1.6.
Use Norton's theorem to solve example 1.2. "In the circuit of Figure 1.2, what is the voltage drop across R2?"Solution:
Figure 1.14 shows the circuit with R2 removed and replaced by a short circuit. This completely isolates the two loops so they cannot affect one another.

Figure 1.14 Figure 1.2 with R2 Replaced by a Short.
For a verbal description click here.
The current due to the loop on the left is
I1 = 12 v / 330 ohms = 36.364 mA downward.
The current due to the loop on the right is.
I2 = 6 v / 100 ohms = 60.000 mA upward.
With up defined as positive, the current in the short is.
IS = 60.000 mA - 36.364 mA = 23.636 mA upward.
To make current flow upward in the load, current must flow out of the bottom terminal of the current source. The Norton's resistance is the same as the Thevenin's resistance, which is 76.744 ohms . Thus we have the circuit as shown in Figure 1.15 which shows R2 restored to the circuit.

Figure 1.15 Norton's Equivalent of Figure 1.2.
For a verbal description click here.
The current source delivers its 23.636 mA to the parallel combination of RN and R2. The voltage across R2 is the current source multiplied by the parallel combination of RN and R2.
VR2 = -23.636 mA / (1/75 + 1/76.744) = -0.897 v
Thevenin Meets Norton.
Example 1.7.
Find Thevenin's and Norton's equivalent circuits for the circuit of Figure 1.16.

Figure 1.16 Voltage Divider Circuit.
For a verbal description click here.
Solution:
The Thevenin voltage is the open-circuit output voltage of the circuit. This voltage is given by the voltage divider equation as follows.VTh = 30 v x 1 k ohm / (1 k ohm + 2 k ohms) = 10 v
When the battery E is replaced by a short circuit, R1 and R2 are in parallel and their equivalent resistance is RTh = 666.7 ohms. The circuit would be that of Figure 1.9 except the values will be the ones calculated here. For Norton's theorem the current is equal to the short- circuit current of the original circuit. With a short on the output terminals, R2 is completely shorted out and the current is determined by R1 and the battery.
IN = 30 v / 2 k ohms = 15 mA
The Norton resistance RN is equal to the Thevenin resistance RTh.
If you place a short on a Thevenin's equivalent circuit the current will be given by
I = VTh / RTh (1.7) If you open-circuit a Norton's equivalent circuit the output voltage is given byV = IN RN (1.8) The two circuits must behave exactly alike or one or both of the theorems would be invalid. In equation 1.7, the current I is the short-circuit current which is the same as the Norton's current source and, therefore, is IN. In equation 1.8, the voltage V is the open-circuit voltage which is the same as the Thevenin's voltage source. In reality then, the two equations are one which can be written asRTh = RN = VTh / IN (1.9) If you have any two of these three quantities, you can find the other one. Depending on the circuit it may be easier to find the short-circuit current and the open-circuit voltage. You may want to do this even though you have not been asked to find Norton's equivalent circuit.Back to Fun with Transistors.
Back to Fun with Tubes.
Back to Table of Contents.
Back to top.
1.5 Current Measurement, the D'Arsonval Meter.
The measurement of current is basic to many electrical measurements. For example the measurement of voltage is accomplished by setting up a circuit of known resistance, placing the unknown voltage across the circuit and measuring the current in the circuit. Other quantities (resistance for example) are converted to current for reading on a meter.The D'Arsonval Meter Movement.

Figure 1.17 Diagram of a D'Arsonval Meter Movement.
For a verbal description click here.
A D'Arsonval meter movement consists of 4 basic parts. A permanent magnet, a coil of fine wire which is suspended so it can pivot, a pointer attached to the coil, and a scale for the pointer to point to. Figure 1.17 shows only the magnet and coil with its pivot and support. The circular object with a cutout at one point is the permanent magnet. The field is concentrated in the small circular cutout at the bottom. The red object is the coil of fine wire. The support is shown in green. The coil is supported by taught metal bands which provide spring tension to return the pointer to zero when no current is flowing through the coil. The pointer and scale have been omitted to avoid making the drawing too complicated to draw.When a current is applied to the coil of wire, the magnetic field created by the current interacts with the field of the permanent magnet which causes a torque to be applied to the coil. The torque is opposed by the springs according to the equation
T = K Theta where T is the torque, K is the spring constant and Theta is the angle of deflection. An equilibrium will be established at some given angle which is also the deflection of the pointer. If the current in the coil is doubled, the torque will be doubled and the angle of deflection will have to be doubled to establish a new equilibrium. The angle of deflection of the moving part of the meter is directly proportional to the current in the coil. A linear scale may be marked off and used to read current without any conversion graph.Measuring Current.
The schematic symbol for a meter is a circle with one or more letters inside to indicate the quantity which the meter can measure. Occasionally the letter G for galvanometer or M for meter is used. A D'Arsonval meter measures the current which flows through its own coil. Thus, if we want to measure a current, we must allow that current to flow through the meter. Let us look at the circuit of a flashlight which was used in chapter 0 and is shown in Figure 1.18a. If we want to measure the current in this circuit we open the circuit and insert the meter as shown in Figure 1.18b. Because this is a simple series circuit, it makes no difference where the meter is inserted.

Figure 1.18 (a) Flashlight, (b) With Current Meter Inserted
For a verbal description click here.
If we desired to set up the circuit of Figure 1.2 to measure the currents we would have to be careful where the meters were inserted. If we want accurate measurements of I1 and I2 the meters must be inserted in places where only these currents are flowing. That is to say the branch containing R2 must not have one of the meters in it. A meter connected here would measure the algebraic sum of I1 and I2. Figure 1.19 shows how to connect the meters to measure I1 and I2. Since we do not know the directions of the currents the polarity of the meters will have to be determined experimentally. In other words if the pointer goes backward, reverse the connections to the meter.

Figure 1.19 Figure 1.2 With Current Meters Inserted.
For a verbal description click here.
Because current meters are connected in series with the circuits they are measuring, any voltage drop across the meter is lost to the circuit. The voltage drop across the meter must be kept small or inserting the meter will seriously disturb the circuit under test. By Ohm's law, to keep the voltage drop small, the resistance must be small. The typical resistance of a meter will cause a voltage drop of 100 mV (millivolts) when the meter is indicating full scale. That means that a typical meter which reads 1 ampere full-scale will have a resistance of R = 0.1 v / 1 A = 0.1 ohms.An all-too-common student mistake is to connect an ammeter in parallel with a low resistance Thevenin source. If the above meter were to be connected across a 12 volt battery, how much current would flow through the meter?
I = 12 v / 0.1 ohms = 120 Amps. A current of 120 amperes will virtually and instantly destroy a meter designed to read 1 ampere full-scale. When in the laboratory (or anywhere else for that matter), don't connect an ammeter or milliammeter across a power supply or battery.Extending the Range of the Meter Movement.
Meter movements are most often sold in two common forms. One requires 50 uA (microamps) for full-scale deflection and the other requires 1 mA for full-scale deflection. These are sometimes referred to as 0-50 uA and 0-1 mA but most often are called 50 uA and 1 mA meters. Meters which come from the manufacturer with different full-scale currents are most likely one of the aforementioned types with one or two resistors added to extend the range to a higher current.The process of adding a resistor to extend or increase the range of a meter is known as shunting the meter. The resistor which is added is called a shunt resistor. A meter with a shunt resistor connected is shown in Figure 1.20. The logical reasoning for determining the value of the shunt resistor is as follows.

Figure 1.20 Meter With Shunt Resistor Connected.
For a verbal description click here.
For those who prefer them, the equation for this is
- The desired full-scale current I, the meter's full-scale current IM and the meter's resistance RM will be given.
- The voltage across the meter may be calculated by VM = IM RM (by Ohm's law).
- The voltage across the shunt resistor is the same as the meter voltage (by Kirchhoff's voltage law).
- The current in the shunt resistor is IS = I - IM (by Kirchhoff's current law).
- The value of the shunt resistor is RS = VM / IS (by Ohm's law).
RS = IM / (I - IM) (1.10) Example 1.8.
A meter movement has a full-scale current of 50 uA and a resistance of 1800 ohms . Calculate the value of the shunt resistor to extend the range of the meter to 200 uA.Solution:
The voltage drop across the meter isVM = 50 uA x 1800 ohms = 90 mv
The voltage across the shunt resistor is also 90 mv. The current through the shunt resistor is
IS = 200 uA - 50 uA = 150 uA
The resistance of the shunt resistor is
RS = 90 mv / 150 uA = 600 ohms.
The Two Resistor Current Shunt.
The resistors which are used in meter circuits must be precise if the meter is to give precise readings. Precision resistors are often difficult for a person working in a physics lab to find. If a second resistor is added to the circuit as shown in Figure 1.21 the value of the shunt resistor may take on a higher value than the one indicated for the single resistor circuit.

Figure 1.21 Meter With Two Resistor Shunting Circuit.
For a verbal description click here.
The steps for using this circuit are as follows.The equation is as follows.
- Use the procedure (or equation 1.10) given above to determine the minimum value for the shunt resistor.
- Locate a resistor close to, but above, the calculated value.
- Calculate the voltage drop across this new shunt resistor by the equation VS = IS RS. The value of IS has not changed.
- Calculate the total resistance of the meter branch by RMT = VS / IM.
- Calculate the resistance of R1 by R1 = RMT - RM.
R1 = RS (I - IM) - IM RM / IM (1.11) Example 1.9.
After working out the answer to example 1.8, you go to the stockroom and locate a 750 ohm precision resistor. Calculate the value of R1 in Figure 1.21 to permit the 750 ohm resistor to be used as the shunt.Solution:
The voltage drop across RS isWhat happens if you cannot find a 450 ohm resistor? To be perfectly frank, the values used in this example are in a range of resistance in which precision resistors are easy to find. A precision resistance bridge may be used to select resistors from a stock of less precise resistors. Statistically, if you look through a large stock of 470 ohms 10% resistors you will find a 450 ohm resistor. It might have been just as easy to find a 600 ohms resistor. A better example is required.VS = 150 uA x 750 ohms = 112.50 mv
The total resistance of the meter branch is
RMT = 112.50 mv / 50 uA = 2250.0 ohms
The value of R1 is given by
R1 = 2250 ohms - 1800 ohms = 450 ohms.
Example 1.10.
A meter with a current of 1 mA has a resistance of 88 ohms . This meter is to be shunted to allow it to have a range of 0 to 1 ampere. The following precision shunts are available in the lab: 0.01 ohms , 0.1 ohms , 0.5 ohms and 1.0 ohms . How should the meter be shunted?Solution:
Precision shunt resistors in values less than an ohm are difficult to find. We are restricted to what is available. First, assume the circuit of Figure 1.20 and use equation 1.10 to determine the minimum value for the shunt resistor.RS = 1 mA x 88 ohms / (1 A - 1 mA) = 0.088088 ohms.
Among the available shunt resistors the 0.1 ohm is the next highest one from 0.088088 ohms. Use the 0.1 ohm shunt in the circuit of Figure 1.21. The value of R1 as given by equation 1.11 is as follows.
R1 = 0.1 ohm (1 A - 1 mA) - 1 mA x 88 ohms / 1 mA = 11.90 ohms.
An 11.9 ohm resistor can easily be found in a bin of 12 ohm resistors.
Ammeter Perturbation of a Circuit.
Figure 1.22 shows an ammeter being used to measure the current being drawn by some sort of load which is indicated as a resistor. When the ammeter is added into the circuit, its resistance adds to the resistance which is already there. If the resistance is changed, the current is changed, which means that the current we measure is not the same as the current was before the ammeter was put into the circuit. Is it possible to figure out what the current was before the ammeter was inserted? Let us list what we know and see what we can figure out.

Figure 1.22 Ammeter Connected to Measure
the Current Drawn by a Load
For a verbal description click here.
- We know the resistance of the ammeter, (RAM).
- We know the power supply or battery voltage, (E).
- We know the current, (I), being drawn by the series combination of the ammeter and the load. The ammeter is telling us that.
Using these knowns, what can we figure out?
- The voltage drop (VAM) across the ammeter. Multiply the ammeter reading (I) by the ammeter resistance (RAM).
- The voltage dropped across the load (VL). Subtract the ammeter voltage drop (VAM) from the power supply voltage (E).
- Load resistance (RL). Divide the voltage drop across the load (VL) by the ammeter reading (I).
- And finally the load current before the ammeter was inserted (IL). Divide the power supply voltage (E) by the load resistance (RL).
For those who prefer an equation, it is
IL = E / (E - I x RAM) (1.12) It is true that some loads are nonlinear, which means that the load resistance changes as the load voltage changes. (The load does not obey Ohm's law.) In most cases this second-order perturbation is small enough to be neglected.Logical Check.
Remember that the insertion of an ammeter or milliammeter into a circuit will always reduce the current. The calculated load current IL must always be larger than the measured current I. If your calculated current is less than the measured current, the answer is wrong.Example 1.11.
The 200 uA meter of example 1.8 is being used to measure the current in a load as in Figure 1.22. The power supply voltage is 5.00 volts and the meter is indicating 195 uA. What was the current in the circuit before the microammeter was inserted?Solution:
First of all we need to calculate the resistance of the ammeter. It is the parallel combination of the 600 ohm shunt and the 1800 ohms of the meter movement. This works out to 450 ohms. The voltage drop across the microammeter is 195 uA x 450 ohms = 87.750 mv. The voltage left across the load is 5.0000 v - 87.75 mv = 4.91225 v. The resistance of the load is 4.91225 v / 195 uA = 25191 ohms. If this load were placed across 5.0000 v the current would be 5.0000 v / 25191 ohms = 198.5 uA.Example 1.12
Calculate the percent error of the measurement in the above example.Solution:
The calculated value of 198.5 uA is the standard of comparison or reference. The percent error is given by% error = 100% x (Measured - Reference) / Reference (1.13)
% error = 100% x (195 uA - 189.5 uA) / 198.5 uA = -1.76%
If we substitute equation 1.12 into equation 1.13 using I as the measured value and equation 1.12 as the reference value we eventually obtain
% error = 100% x (-I) x RAM / E (1.14) where I is the current measured by the meter, RAM is the resistance of the ammeter (milliammeter or microammeter) and E is the voltage of the power supply or battery. Another equation can be obtained by inverting ohms law.
I/E = 1/(RAM + RL) which is% error = 100% x (-RAM) / (RAM + RL) (1.15) if RL is known, this equation can be most useful.Example 1.13
It is desired to measure the current to an accuracy of Plus or minus 2%. The meter has a full-scale range of 20 mA and has a voltage drop of 200 mv when reading full scale. The power supply voltage is 9.00 v and the meter reads 16.5 mA. Is this reading within plus or minus 2%?Solution:
The meter resistance is 200 mv / 20 mA = 10 ohms. RL + RAM = 9.00 v / 16.5 mA = 545 ohms. RL = 545 ohms - 10 ohms = 535 ohms. Using equation 1.15 we have% error = 100% x (-10 ohms) / (10 ohms + 535 ohms) = -1.83%
The measurement is of acceptable accuracy.
Back to Fun with Transistors.
Back to Fun with Tubes.
Back to Table of Contents.
Back to top.
1.6 Voltage Measurement.
Connecting a Voltmeter Into a Circuit.
Voltage is the electrical potential difference between two points in a circuit. If it is desired to measure the potential difference between point A and point B in a circuit, the meter must be connected between points A and B. That is one lead to point A and the other lead to point B. To measure the voltage of a battery, the voltmeter is simply connected in parallel with the battery. A voltmeter is never connected in series with a circuit. Ammeters are connected in series, voltmeters are connected in parallel.The Voltmeter Circuit.
The D'Arsonval meter is a current measuring device. As example calculations have shown its voltage drop is typically 0.1 volts. Still, it is possible to use such a meter to measure voltages over a wide range.What is required is a circuit in which a current will flow which is proportional to the unknown voltage. The D'Arsonval meter can be used to measure the current in this circuit. Ohm's law states that I = E / R. A resistor is all that is required to cause a current to flow which is proportional to the voltage. A voltmeter circuit is shown in Figure 1.

Figure 1.23 Circuit Diagram of a Voltmeter.
For a verbal description click here.
The total resistance in the circuit is such that the full-scale current of the meter will flow when the desired full-scale voltage is applied to the circuit. The total resistance is RV + RM; therefore, an equation may be writtenRV + RM = VV / IM (1.16) where VV is the full-scale voltage of the voltmeter, IM is the full-scale current of the meter movement, RM is the resistance of the meter movement and RV is the resistance of the multiplier resistor. The multiplier resistance is given by the following equation.RV = VV / IM - RM (1.17) Example 1.14.
Find the value of the multiplier resistor to convert a 50 uA meter into a voltmeter having a full-scale voltage of 5 volts. The resistance of the meter movement is 1800 ohms.Solution:
The total resistance of the meter circuit isRT = 5.00 v / 50.0 uA = 100 k ohms.
The multiplier resistor is
RV = RT - RM = 100 k ohms - 1.8 k ohms = 98.2 k ohms.
Ohms Per Volt.
Figure 1.24 is the diagram of the voltmeter of example 1.14 with an addition. It is desired to temporarily convert the 5 volt meter of example 1.14 into a 6 volt meter. As you can see in figure 1.24, this will be accomplished by adding another resistor to the circuit.Example 1.15.
Calculate the value of RV in Figure 1.24.Solution:
The total resistance RT = 6 v / 50 uA = 120 k ohms. But we already have 100 k ohms of resistance in the circuit. So we have RT = RV + 1.8 k ohms + 98.2 k ohms. Therefore, RV = 120 k ohms -100 k ohms = 20 k ohms.

Figure 1.24 5 volt meter with a resistor added to convert it to a 6 volt meter.
For a verbal description click here.
Example 1.16.
Calculate RV to extend the range of a 5 volt meter to 10 volts full-scale.Solution:
The total resistance RT = 10 v / 50 uA = 200 k ohms. So we have RT = RV + 1.8 k ohms + 98.2 k ohms. Therefore, RV = 200 k ohms - 100 k ohms = 100 k ohms.Notice in examples 1.15 and 1.16 that for every volt of range extension, we must add 20,000 ohms. In example 1.15 we added 1 volt of range and to do so we added 20,000 ohms. In example 1.16 we added 5 volts of range and to do so we added 5 x 20,000 ohms or 100 kilohms.The number 20,000 is not standard for all voltmeters but is dependent on the current of the meter movement being used. The amount of resistance to be added for each additional volt of range is given by
RAdded = 1 v / IM This is called the sensitivity of a voltmeter and is given asS = 1 v / IM (1.18) The sensitivity of a voltmeter is a figure of merit which may be used to judge the relative quality of various voltmeters. The higher the number, the better the voltmeter.Example 1.17.
Calculate the sensitivity of a voltmeter which used a 500 uA meter movement.Solution:
The sensitivity isS = 1 v / 500 uA = 2,000 ohms/volt.
Voltmeter Perturbation of a Circuit.
Figure 1.25 shows a voltmeter being used to measure the output voltage of a Thevenin's circuit (voltage source and resistor). If the voltmeter resistance is too low in comparison to the Thevenin resistance, the voltmeter will perturb the circuit by a significant amount and the reading will be in error.It is possible to determine the voltage of the Thevenin generator (voltage source) if we can determine the value of the Thevenin resistance. This can be done in many cases. Let us now list the things we know and see what we can figure out.
- We know the resistance of the voltmeter (RVM).
- We know the voltage drop across the voltmeter (VVM). The voltmeter itself is telling us that.
- We know the Thevenin resistance (RTh) of the circuit whose voltage we are trying to measure.

Figure 1.25 Voltmeter Measuring Output of Thevenin's Equivalent Circuit.
For a verbal description click here.
The microammeter and its series resistor are included in the circle with a V in the center.We can now calculate the following.
- The voltmeter current (IVM). Divide the voltmeter reading (VVM) by the voltmeter resistance (RVM).
- The current flowing through the Thevenin resistance. It is the same as the current through the voltmeter.
- The voltage drop across the Thevenin resistance (VRTh). Multiply the current from 2 above (IVM) by the Thevenin resistance (RTh).
- And finally, the voltage before the voltmeter was connected (VTh). Add the voltage drop across the Thevenin resistance (VRTh) to the voltmeter reading (VVM).
For those who prefer an equation, it is
VTh = VVM (RVM + RTh) / RVM (1.19) Logical Check.
Remember that the connection of a voltmeter to a circuit will always reduce the voltage. The calculated voltage VTh must always be larger than the measured voltage VVM. If your calculated voltage is less than the measured voltage, the answer is wrong.Example 1.18.
A meter with a full-scale voltage of 10 volts and a sensitivity of 10,000 ohms /v is being used to measure the voltage of a Thevenin's equivalent circuit as shown in Figure 1.25. The Thevenin's resistance is 10 k ohms . The meter reads 9.25 volts. What is the voltage of the Thevenin's voltage source?Solution:
The resistance of the voltmeter is RVM = 10 v x 10 k ohms/v= 100 k ohms. The current in the voltmeter is IVM = 9.25 v / 100 k ohms = 92.5 uA. The drop across the Thevenin's resistor is VRTh = 92.5 uA x 10 k ohms = 0.925 v. The Thevenin's voltage source is 9.25 v + 0.925 v = 10.175 v.Example 1.19.
Calculate the percent error of the measurement in the above example.Solution:
The calculated value of 10.175 v is the standard of comparison or reference. The percent error is given by equation 1.13 as follows.% error = 100% x (9.25 v - 10.175 v) / 10.175 v = -9.09%.
If we substitute equation 1.19 into equation 1.13 using VVM as the measured value and equation 1.19 as the reference value we eventually obtain
% error = 100% x (-RTh) / (RTh + RVM) (1.20) where RTh is the Thevenin's resistance of the circuit being tested and RVM is the resistance of the voltmeter.Example 1.20.
Use equation 1.20 to verify the results of example 1.19.Solution:
Using equation 1.20 gives% error = 100% x (-10 k ohms) / (10 k ohms + 100 k ohms) = -9.09%.
The result is verified as correct.
Back to Fun with Transistors.
Back to Fun with Tubes.
Back to Table of Contents.
Back to top.
1.7 Measurement Using Multimeters.
A multimeter (pronounced multi-meter) is an instrument which is capable of measuring more than one electrical quantity. The usual multimeter is capable of measuring voltage, current and resistance. Such meters are also known as volt-ohm-milliammeters or VOMs for short.The analog multimeter (or VOM) is exemplified by the Simpson 260 which is used in the laboratory. This instrument consists of a D'Arsonval meter movement, two switches, several resistors and two diodes.
The VOM has full-scale voltage ranges from 2.5 volts to 1000 volts. The voltmeter circuit is exactly like the one studied in this chapter. To determine the input resistance of the voltmeter on any range, multiply the sensitivity by the setting of the range switch. The voltage being indicated does not affect the input resistance. The sensitivity of the Simpson VOM is 20,000 ohms per volt on DC and 5,000 ohms per volt on AC. The two diodes are used to change the AC to DC because the D'Arsonval meter will only respond to direct current.
The ammeter portion of the VOM has current ranges from 50 microamperes to 10 amperes and works only on DC. It employs a rather complex shunting arrangement which prevents the resistance of the switch contacts from affecting the accuracy of the reading. It is felt that the student would profit little from a detailed study of this shunting circuit.
The resistance or ohmmeter section of the VOM employs a battery to energize the circuit. The battery applies a known voltage to the unknown resistor and the meter measures the current which flows. The meter face incorporates a scale for reading resistance so that no calculation is necessary. Because I = V / R the scale is highly compressed at high resistance values.
The Electronic Multimeter.
Electronic multimeters most often have a digital readout instead of a D'Arsonval meter movement. The digital readout gives better accuracy than an analog meter. If the voltage being measured has some noise on it, its value is varying slightly in a random manner, a digital meter may give confused and jumpy readings.The thing which all electronic multimeters have in common is a complex electronic circuit which will convert a voltage into an indication on the readout device. This circuit will be studied later in this book but for now it will be treated as a mysterious black box.
The basic measurement circuit of a digital multimeter is a voltmeter which will measure from 0 to 200 millivolts. The readout is from 000.0 mv to 199.9 mv. This is called a 3 and 1/2 digit readout. The most significant digit can only be 0 or 1 and this is called a 1/2 digit. The DMMs (digital multimeters) we are using in our lab are 4-1/2 digit models which means that the basic range is from 000.00 mv to 199.99 mv. To save time and space this basic range will be referred to as a 0 to 200 mv range.
The voltmeter section of a DMM uses a voltage divider similar to that of Figure 1.4. The resistance values are R1 = 9 Meg ohms, R2 = 900 k ohms, R3 = 90 k ohms, R4 = 9 k ohms, and R5 = 1 k ohms. The input resistance of the basic measuring circuit must be very high, in excess of 10 G ohms . The unknown voltage is connected to the VIN terminals in Figure 1.4 and the measuring circuit is connected between common and one of the connection points. The voltage range selector switch is what connects the measuring circuit to the selected tap on the voltage divider. Some DMMs are auto-ranging, which means that a small microprocessor will select the proper range for the voltage which is being applied to the meter. The voltage ranges work on AC or DC. The input resistance is always 10 Meg ohms on any range on AC or DC.
For current measurements the basic measuring circuit is connected in parallel with a low-value shunt resistor. For example, if a 1 ohm resistor is used as the shunt, a current of 200 mA will cause a voltage drop of 200 mv; thus a 1 ohms shunt will provide a current range of 0 to 200 mA. To change current ranges a new shunt resistor is switched in. The current ranges work on AC or DC.
The resistance measurement circuit consists of a constant current source and the basic measuring circuit. A known current is made to flow through the unknown resistor and the resultant voltage drop is measured by the measuring circuit. For example, if a current of 100 uA flows through a 2 k ohm resistor the voltage is 200 mv; thus a current of 100 uA will give a resistance range of 0 to 2 k ohms . To change ranges the magnitude of the current is changed.
Back to Fun with Transistors.
Back to Fun with Tubes.
Back to Table of Contents.
Back to top.
1.8 Problems.
- In the circuit of figure 1.1 the values are as follows. E1 = 15 v, E2 = 12 v, R1 = 1 k ohm, R2 = 500 ohms, and R3 = 1.2 k ohms. What are the values of (a) I1, (b) I2, and (c) the voltage drop across R2? (d) Is the battery at E2 being charged or discharged?
- In the circuit of Figure 1.3 R1 = 50 ohms, and R2 = 120 ohms. If E = 6.6 v, what is the output voltage?
- In the circuit of Figure 1.4 the values are as follows. R1 = 6.8 Meg ohms, R2 = 2.2 Meg ohms, R3 = 680 k ohms, R4 = 220 k ohms, and R5 = 91 k ohms. (a) What is the total resistance of the divider? If 100 volts are applied at VIN what is the output voltage between common and (b) point 1, (c) point 2, (d) point 3, (e) point 4, and (f) point 5?
- In the circuit of Figure 1.3 if R2 = 3.3 k ohms, what should the resistance of R1 be for the output voltage to be one third of E?
- In the circuit of Figure 1.3 R1 = 5.6 k ohms, and R2 = 3.3 k ohms. What must the input voltage (E) be to give an output voltage of 6.1 volts?
- Apply Thevenin's theorem to solve problem 1. What is the voltage across R2?
- In the circuit of Figure 1.4 use the values given in the figure. Calculate the Thevenin's resistance if the output is between common and (a) point 1, (b) point 2, (c) point 3, (d) point 4 and (e) point 5.
- A signal generator has an open-circuit output voltage of 8.00 volts. When a 1 k ohm resistor is connected across the output terminals, the voltage is 5.00 v. Find Thevenin's equivalent circuit for this generator. Draw the circuit!
- Apply Norton's theorem to solve problem 1. What is the voltage across R2?
- In the circuit of Figure 1.4 use the values given in the figure. Calculate the Norton's resistance if the output is between common and (a) point 1, (b) point 2, (c) point 3, (d) point 4 and (e) point 5.
- A signal generator has an open-circuit output voltage of 8.00 volts. When a 1 k ohm resistor is connected across the output terminals, the voltage is 5.00 v. Find Norton's equivalent circuit for this generator. Draw the circuit!
- A D'Arsonval meter movement has a resistance of 1653 ohms and a full-scale current of 100 uA. Calculate the value of a single shunt resistor to make a 1 mA meter. Draw the circuit!
- The meter movement from problem 12 is to be used in a two-resistor shunting circuit to make a 1 mA meter. The shunt resistor has the value 219.4 ohms. What is the required value of R1? Draw the circuit!
- A milliammeter which has a full-scale current of 10 mA has a voltage drop of 250 mv when it is indicating full scale. When the meter is connected into a circuit where the voltage source is 6.00 v the meter reads 7.75 mA. (a) What was the current in the circuit before the meter was inserted? (b) What is the percent error of the measurement?
- A D'Arsonval meter movement has a resistance of 1653 ohms and a full-scale current of 100 uA. Calculate the value of the multiplier resistor to make a 1 v meter. Draw the circuit!
- What is the sensitivity of a voltmeter which employs a meter movement having a full-scale current of 25 uA?

Figure 1.26 Circuit of a 5-range Voltmeter.
For a verbal description click here.
- The circuit of Figure 1.26 is of a 5-range voltmeter. As the range switch is changed from range to range, the arrowhead moves from one circle to another. As the circuit is drawn the meter is set to the 10 volt range. The switch may be set to any range, it just happens to be shown on the 10 volt range. The meter movement has a resistance of 4476 ohms and a full-scale current of 25 uA. Calculate the resistances of (a) R1, (b) R2, (c) R3, (d) R4, and (e) R5, for the voltage ranges shown. Do not jump to conclusions, look carefully at the circuit. It may be helpful to redraw the circuit with the switch set to the voltage range you are currently working on.
- A digital voltmeter which has an input resistance of 10 Meg ohms is being used to measure the voltage on a circuit which has a Thevenin's resistance of 470 k ohms. (a) What will be the percent error of the measurement? (b) If the indicated voltage is 8.523 volts, what was the voltage before the meter was connected to the circuit?
- A 5,000 ohm-per-volt VOM is being used to make a measurement on a given circuit. The Thevenin's voltage and resistance of the circuit are unknown. When the meter is set to the 2.5 volt range it indicates 2.22 volts and when it is set to the 10 volt range it indicates 3.33 volts. (a) What are the Thevenin's voltage and resistance of the circuit? (b) What was the voltage before the meter was connected? Hint: try two equations in two unknowns. This is a situation that users of VOMs encounter regularly.
- A digital multimeter has a basic range of 2 volts (1.999 volts). What is the resistance of a current shunt to provide a range of 0 to 20 uA?
- A digital multimeter has a basic range of 2 volts (1.999 volts). When this meter is set to the 200 ohms resistance range, how much current is flowing through the unknown?
Back to Fun with Transistors.
Back to Fun with Tubes.
Back to Table of Contents.
Back to top.
1.9 Answers to Problems.
- (a) I1 = 8.4783 mA, (b) I2 = -4.5652 mA, (c) V = 6.522 v upper end positive, (d) E2 is being discharged.
- V = 4.659 v.
- (a) R = 9.991 Meg ohms, (b) V = 100 v, (c) V = 31.94 v, (d) V = 9.919 v, (e) V = 3.113 v, (f) V = 0.9108 v.
- R1 = 6.6 k ohms.
- E = 16.45 v.
- VTh = 13.63634 v, RTh = 545.455 ohms, VR2 = 6.522 v.
- (a) RTh = 0, (b) = 210 k ohms, (c) = 90 k ohms, (d) = 29.1 k ohms, (e) = 9.9 k ohms.
- VTh = 8.00 volts, RTh = 600 ohms, Figure 1.6 with these values.
- I1 = 15 mA, I2 = 10 mA. By inspection I1 is clockwise and I2 is counter clockwise. IN = 25 mA downward through the short. RN = 545.455 ohms. VR2 = 6.522 volts.
- (a) RN = 0, (b) = 210 k ohms, (c) = 90 k ohms, (d) = 29.1 k ohms, (e) = 9.9 k ohms.
- IN = 13.33 mA, RN = 600 ohms, Figure 1.13 with these values.
- RS = 183.7 ohms. Figure 1.20.
- R1 = 321.6 ohms. Figure 1.21.
- I = 8.009 mA, % error = -3.23%.
- RV = 8,347 ohms. Figure 1.23.
- S = 40,000 ohms / volt.
- (a) R1 = 35,524 ohms, (b) R2 = 60,000 ohms, (c) R3 = 300,000 ohms, (d) R4 = 1,600,000 ohms, (e) R5 = 8,000,000 ohms.
- (a) % error = 4.49%, (b) V = 8.924 volts.
- (a) VTh = 3.996 volts, RTh = 10 k ohms. (b) V = 3.996 volts.
- R = 100 k ohms.
- I = 10 mA.
Back to Fun with Transistors.
Back to Fun with Tubes.
Back to Table of Contents.
Back to top.