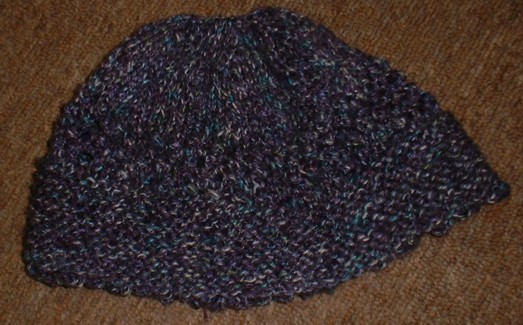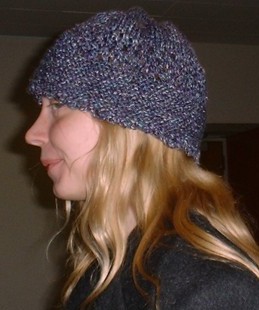
Courtney's hat came from dissatisfaction with a bucket hat pattern I found on the internet. I probably blocked it incorrectly, but I was still unhappy. It slid off my head, and Courtney has a smaller head than me. So, I played around, and this is what I came up with. It's not a bucket hat, if anything, it's like one of the Chinese skullcaps. In 3 sizes. Enjoy!
Needles: 10 circulars and DPNs
Crochet Hook: Size H8 or so
Yarn: 1 skein worsted weight (I used Red Heart TLC Tweed for the hat Courtney is modeling. Half a skein or so makes the hat. So make an extra and give it to charity!
1 yarn needle
Gauge: about 4 stitches to an inch- 16 stitches = 4"
Fits: 18"-19" head (20"-21", 22"-23")
Cast on 75 (90, 105) stitches on your size 10 circulars. Join. BE SURE NOT TO TWIST STITCHES! Work 16 rows in garter stitch. (In circulars, that means knit a row, purl a row). You should have 8 visible rows.
K2tog. Knit 4 (5, 6) stitches, then K2tog. Repeat to the end of the round. You should have 60 (75, 95) stitches on your needle. Knit a round plain
Here, you can either start the eyelet pattern or knit plain stockinette. The eyelet pattern is stolen/borrowed from this pattern written by the lovely Mama Kate.
Eyelet pattern (worked over a multiple of 2 sts)
Row 1: *yo, sl1, k1, psso, rep from * around to marker.
Row 2: K
Row 3: K
Row 4 begins 1 st before the marker!: *yo, sl1, k1, psso, rep from * around to 1 st before marker, K last st.
Row 5: K
Row 6: K
Knit for about 2" if you want a close fitting cap, 3" if you want something a little longer. At desired length, begin decreases:
K2tog. Knit 4 (5, 6), then K2tog. Repeat for the rest of the row.
K2tog. Knit 3 (4, 5) then K2tog. Repeat for the rest of the row.
Repeat as follows until there are 6 (7, 8) stitches left on the needle. Break yarn and thread through to finish.
Crochet Edging:
The edging is unnecessary but creates a nice look. (Note: I'm not a crocheter, so sorry if my terms aren't exact)
Join yarn at start of the hat with RIGHT SIDE FACING YOU. *Ch 3 stitches. Join with a normal crochet stitch 2 stitches over from your joining spot. Repeat from * to the end of the hat.
Finishing:
Sew in ends. Model your new hat for all your friends!
I tend to be sloppy in my stitch approximations. If anything's wrong, please email me and I'll do my best to fix it!