
Grindal Worm Cultures ... heard about but never seen
... and that was the case until I bought my first starter culture from a Canadian friend sometime in late 2001. Since then, I've experimented with various media, feeds and trays. Each has it's merit but then again, YMMV.
Anyway, these little crawlies are thread-like between 4-6mm in length and sized somewhere between microworms and whiteworms*, which fills the gap nicely before young fishes move up to chopped tubifex worms.
For those unfamiliar with grindals, I should mention that these worms are relatives to the common earthworm and unlike the bloodworms, it's not a larvae that'll morph into a six-legged, bloodsucking bug!
* Nope! I've not been able to get any whiteworms nor would I want to try since these fellas can't deal with our warm weather.... but I understand they'll do well in our fridges!!
Also, tubifex is commonly mis-spelt as tubiflex or tublifex... nadda!!
 |
This "poor man's raising tray" uses takeaway plastic
containers; 2 lower base and one lid.
The middle container, with ventilation and drainage holes, houses the worms and peat bedding. Excess water drains into the lower container and serves as a humidity check since the worms require a damp, but not soggy, bedding. Cotton is stuffed into a hole on the lid for ventilation and preventing fruit-flies infestation. |
 |
Grindals gathered at the previous feast.
To help 'migrate' or spread the worms, sprinkle food around the edges of the worm mass. 030212 |
 |
A second design similar to one above but using circular
plastic 'tubs' instead.
Expanded clay pellets were originally at the base to prevent the bedding going anaerobic and also for drainage. Following a mites infestation (tiny little buggers that competes with the worm for food but harmless to humans), I submerged the entire contents in water to try and drown the mites. Since the expanded clay are lighter than peat.... they didn't sink like the Titanic! A bottom water-filled tray will help prevent ants making out in the worm's bedding too! |
 |
Most worms dislike bright light and promptly make a hasty
retreat.
Click on the image for a clearer view of the grindals. |
The following box was an inspiration while researching
on vermiculture/vermicomposting and can be considered a down-scaled version
of a vermiculture bin. "Project Vermi" is presently on the drawing
board since the local supplier is out of it until end of March 2003, but
I'm itching to see if my killies take well to "red wigglers" (specifically
Eisenia foetida) as supplementary diet.
UPDATE:
The worm bin is operational
as on Feb 18th.
 |
This is a plastic critter-keeper with holes 'punched'
out with a 40w soldering iron.
I realized from earlier designs, that drainage and ventilation was inadequate... so now, I've added a whole lot more! One can also use a dremel to drill the holes but it'll be dusty and the acrylic might crack. It's so much easier with an iron... fast and clean. Just make sure you don't inhale too much of the fumes!! |
 |
The bottom critter-keeper is left intact (no holes) and
solely for the purpose of collecting excess water.
Note that not all the holes are blocked by the lower segment. |
 |
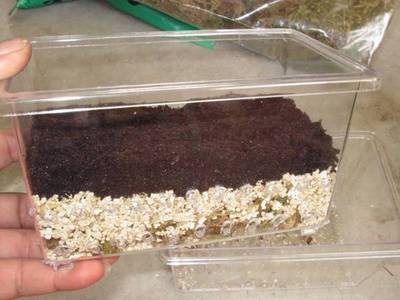
I'm feeling naughty.... let's get our hands dirty!
The new bedding now consist of horticultural grade vermiculite, spaghnum moss and seedling/potting mix. |
 |
Spaghnum moss (bottom layer) retains water very well
and doesn't clog up the drainage holes..
Vermiculite retains moisture too but not as much as moss. Potting mix (at top) that's pH buffered, will make a nice bed... all they need now is a pillow and blanket. |
 |
Moisten the bedding liberally with a a gentle spray and
run off excess water.
You don't want it to be soaking wet! |
 |
Take a small portion of grindals from a thriving culture
to the new bed and sprinkle a few bits of food around it.
The tiny orange globs are not worm-eggs but floating pellets for small fishes. Dried potato flakes and oatmeal is cheaper but I prefer
to give the worms a varied diet too!. Your killies and other fishes
will also benefit from the gut-loaded grindals.
030213 |
 |
A fine netting, thin cotton cloth or critter cover will
allow air in and fruit-flies out.
Now, store the raising box in a dark place and feed the little fellas once every few days. Gauge the worm's food intake and be careful not to overfeed. |
 |
There're two utility closets outside the apartment for
Gas/Water and Electrical mains.
All my grindals are kept in this cool 'closet'. |
 |
This was one of the earlier cultures that used mostly
spaghnum moss as bedding with a thin layer of peat (seen in the darker
section on the left).
I observed that they don't 'migrate' as easily on moss as on peat. Perhaps it was an acidity issue?? .. that I wouldn't know... me ain't no rocket scientist! Reproductive rate was also considerably slower and often leaves behind uneaten food. |
 |
... which turns moldy. |
Other things that keeps me busy ...
Spinnin'
round n round
'da
Mossie Wall
There's an article by Dennis Heltzel titled "Raising Grindal Worms" that's a very good read.
If you've better ideas going about this, I'd luv
to hear from you.

Created 030214 / Updated 030223 - Ronnie Lee 2003
