This is an ending I first saw in a small book of pawn endgames when I was very young. It is also an ending that I have personally pulled on IM's and GM's. Most do NOT solve this position correctly. (Of course I had no clue ... when I first saw this position!) Its a fun position to pull on people - and nearly impossible to solve! (OTB)
This
is BOTH a text-score page
and there is a js-replay board for you to play through the main line of
the solution. BUT! ... you
still should probably have a chess board to be able to follow
this game in a
relatively reasonable manner.
Click
HERE
to go to a page where I explain most-or-all of the symbols that I normally use
in annotating a chess game.
|
|
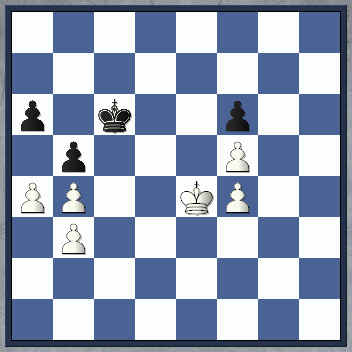
A study by Bahr, done in 1936.
*********************************************************************************
White to move, wins.
{Black to move draws?}
*********************************************************************************
One of the greatest and strongest
composers of all time, (Grigoriev);
praised this ending
as one of the
finest examples of its kind.
*********************************************************************************
Position check:
****************************
White - King on c1;
White Pawns - a4, b4, b3,
f4 and f5.
****************************
Black - King on c7;
Black Pawns - a6, b5, & f6.
****************************
*********************************************************************************
See the most excellent book: "Pawn Endings,"
by GM Yuri Averbakh and
also I Maizelis.
Page # 212, Diagram # 677.
Put the following numbers on
these squares for White:
e4=1, f3=2, e3=3, d4=4,
d3=5, d2=6, e2=7, f2=8.
For Black his square designations
are as follows:
d6=1, e7=2, d7=3, c6=4,
c7=5; c8=6, d8=7, e8=8.
(White's 'a' square is h5, and
Black's 'a' square is on g7.
These number designations help
you to understand what I like to
call ... "The Dance of the Two Kings.")
*********************************************************************************
1.Kd1! Kd7!; {Diagram?}
Black maintains the ... "distant opposition."
This ending is much more difficult
than it looks, Black must be able to
cover squares
on BOTH sides of
the chessboard.
[ Black loses after:
1...Kb7?!; 2.Ke2 Ka7?; ('??') 3.Kf3 Kb7;
4.Kg4 Kc7;
5.Kh5 Kd7;
6.Kg6 Ke7; 7.Kg7, "+/-" {Diagram?}
And once the g-pawn falls, the
win is relatively simple. ]
2.Ke1!!,
{Diagram?}
A brilliant, sneaky and totally
unexpected move.
[ More conventional methods may
not yield White success:
2.Kd2!?
Kc6; 3.Kd3 Kd5; 4.a5!? Kc6!; 5.Kd4 Kd6;
6.Kd3 Kd5;
7.Ke3, {Diagram?} This is forced for White.
(Note: If There were no White
Pawn on b3 in this position,
Black - having pushed White
back by means of the
OPPOSITION -
would play
...Kc4; and win!)
( 7.Kc3?? Ke4; ("-/+") )
7...Kc6?;
8.Kd4 Kd6; "="
{Diagram?}
and the game is drawn. ]
2...Ke7; 3.Kd2! Kd8!?; (Maybe
- '!') {Diagram?}
A (futile) attempt to save himself
with the aid of ... the 'distant opposition.'
[ Black also loses after ...Kd6.
For example:
3...Kd6!?;
4.Ke2! Ke7; 5.Kf3! Kd6!?; {Diagram?}
Black has few choices here.
( Black loses after: </= 5...Kf7?;
6.Ke4 Ke7; 7.Kd5 Kd7; 8.a5, "+/-"
or </= 5...Kd8?; 6.Kg4 Ke7; 7.Kh5 Kf7; 8.Kh6 Ke7;
9.Kg7, "+/-" )
6.Kg4! Kd5;
7.Kh5 Kd4; {Diagram?}
There is no choice for Black
in this position.
( 7...Ke4?; 8.Kg6 Kxf4; 9.Kxf6, "+/-" )
8.Kg6 Kc3;
9.axb5! axb5; 10.Kxf6 Kxb4; 11.Ke5! Kxb3;
12.f6 Kc3;
13.f7 b4; 14.f8Q, "+/-" {Diagram?}
with a relatively simple win
for White ...
from this position. ]
4.Ke2!, (Probably - '!!')
{Diagram?}
The correct move for White.
[ Right after Fritz 6.0 came out,
I gave it this position. It 'thought' for over an hour,
(while I ate
supper); and then played the line:
4.Kd3!? Ke7;
5.axb5?? axb5; 6.Kd4, "~" {Diagram?}
when the game is probably
drawn. ]
White now wins by applying
the
theory of "corresponding squares,"
to help determine exactly where
his King needs to be when Black's
King is on certain squares.
4...Ke8!; 5.Kd3! Kd7; 6.Ke3!!, {Diagram?}
An odd sort of ... lateral triangulation.
[ 6.Kd4!? ]
6...Kd6; 7.Ke4!, {Diagram?}
The correct move.
[ The instinct would normally be
to grab the 'opposition' ...
and
play the move: 7.Kd4, '±' {Diagram?}
]
7...Kc6; {Diagram?}
Black appears to be defending ... he has all the invasion points
covered here.
**********
|
|
(The position here after 7...Kc6.)
**********
White's next maneuver is both surprising and artistic.
8.Kf3!, {Diagram?}
This odd retreat definitely goes
against both training and what
you are
taught early on. (To win,
you have to advance with your
King.)
[ 8.Ke3!? Kd6; 9.Kd4 Kc6; "~" ]
8...Kd5; {Diagram?}
Black now has no choice.
[ After the simple moves:
8...Kd6?; 9.Kg4 Kd5; 10.Kh5,
10...Kd4;
11.Kg6, ("+/-") {Diagram?}
and White wins ... and this
position was covered in an
earlier note. ]
9.Kg3!!, {Diagram?}
Once again, White must resist
the normal impulse to advance
with his King.
[ Most players would probably
play the move 9.Kg4!?,
"~" {Diagram?}
here
without even thinking! Black responds with 9...Ke4;
"=" {Diag?}
which probably draws. ]
9...Kd4; {Diagram?}
Once again, Black is forced
down a very narrow path!
[ </= 9...Ke4??; 10.Kg4, "+/-" ]
10.Kh4!, (Maybe - '!!')
{Diagram?}
Pretty. White grabs a "distant,
and lateral opposition" ...
en route to the g6-square.
The only problem with this move
is that Black gets to White's pawns
first ...
BEFORE White reaches
Black's Pawns!!!
[ White should not play:
10.Kg4!? Ke4!; "=" {Diagram?}
and Black will probably draw! ]
10...Kc3; {Diagram?}
Black finally gets ready to eat
some White Pawns and create
come counterplay.
[ Black should not play:
10...Ke4?!; 11.Kg4 Ke3; 12.Kh5! Kxf4;
13.Kg6 Ke5;
14.a5!, ("+/-") {Diagram?}
and the first player has a fairly
simple win from this position. ]
11.axb5!, {Diagram?}
This precursor move is very
necessary for White to win.
[ The continuation of:
11.Kh5!? Kxb4; 12.axb5 axb5; 13.Kg6,
13...Kxb3;
14.Kxf6 b4; 15.Ke5, '±' {Diagram?}
is probably better for White, but not nearly as accurate as the
main line that is given here. ]
11...axb5; {Diagram?}
Of course Black had to play
this move.
[ One student suggested ...Kxb4;
in this position. But after the moves:
11...Kxb4??;
12.bxa6 Kb5; 13.a7, "+/-" {Diagram?}
Black quickly wanted to make
... "a retraction!" ]
Now the win is relatively simple ...
at least compared to what transpired
previously in this problem!!
12.Kh5 Kxb4; 13.Kg6 Kxb3; 14.Kxf6 Kc3!; 15.Ke5! b4;
16.f6 b3; 17.f7 b2; {Diagram?}
White obviously will promote
first, but Black has {vain} hopes
of
a draw by perpetual check.
18.f8Q b1Q; 19.Qc5+ Kd2; 20.Qf2+! Kc3; 21.Qd4+ Kb3; {Diagram?}
Black is lost, it does not matter
what square he chooses for his
King.
[ White also wins after:
21...Kc2; 22.Qe4+ Kc1; 23.Qxb1+,
23...Kxb1;
24.f5, "+/-" ]
22.Qb6+ Kc2; 23.Qxb1+ Kxb1; 24.f5, ("+/-") {Diagram?}
Most players would concede that
White is winning in this position!!
A truly amazing 'King-and-Pawn' end-game!
(And one of the most
complicated I have ever seen!)
Copyright (c) A.J. Goldsby I. Copyright (c) A.J.G; 2003.
(All games - HTML code initially) Generated with ChessBase 8.0
|
|
Click HERE to go to (or return to) my "Games 4" Home Page.
Click HERE to go to (or return to) my "End-Game School."
*******************************************************************************
Click HERE
to go to (or return to)
"A.J.'s Chess Home Page."
(This is my main chess
web-site.)
Click HERE to go to (or return to) my (Chess) "TRAINING PROGRAM."
Click HERE to go to (or return to) my page for the "Article List for CV-CHESS."
Click HERE to go to (or return to) my FIRST Article for the "CV-CHESS" organization.
Copyright (c) A.J. Goldsby I Copyright (©) A.J. Goldsby; 2003, 2004, & 2005.
Copyright © A.J. Goldsby, 2006. All rights reserved.