|
What this tutorial creates..
This Tutorial Teaches how to make a Pattern from your very own little drawing. I'm sure you will find this interesting, fun and it may surprise you. Also your pattern is unique. This is the basis to creating snowflakes, dings, decorative borders..these patterns can be used for so many graphic creations, I cannot list them all here. This idea came from my own imagination. I was thinking about a crocheted doily I recently made and thought about how it created a pattern. I knew this could be duplicated in psp so I set forth trying different things until I had the idea down. Do not copy it in any way, shape or form to create a new tutorial. This idea and tutorial is copywrited. All images are watermarked. But use the idea to create graphics and patterns. Lets begin: Open your psp program. Create a new canvas 300 x 300, black background. Change your foreground colour to white. On your tool bar, click on the draw tool. Type freehand, style stroked, width 7, antialised checked, and create as vector checked, and you can use closed path if you prefer. What it will give you is an additional line to your graphic. "This tutorial teaches the process, there are no exact rules, the choices are your own." On your canvas, in the center, draw a curled line, anything you want. Smiles..you can make it zigzag, have loops, waves, the choice is yours and the outcome will be your own individual pattern. The larger you make it, the bigger the graphic becomes. I prefer to stay around an inch in diameter or a little larger. Now as you can see, its vectored, you can use the vector, as you would for any design to alter or change your pattern by moving the sides around, or go to node edit and play more with your line. I will not be using the vector in my example. Go to your layer palette and change it from a vector to a rastor layer. Here is what I drew.
Ok now the fun begins. Go to your layer palette, find duplicate and apply. Now go to image, mirror, apply. Now go to your layer palette and make the background invisable by clicking on the layer visability toggle. The glasses, in psp6. Below is what I have so far.
Right click on either of the above layers and merge visable with the background invisable throughout this tutorial. The background is there to help you see what your creating. Duplicate again, and go to image flip this time. Click the background off again, if it is visable. Merge these two layers. Now mine looks like something from outerspace..Laughs..
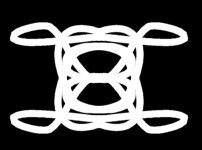
Don't worry I know it will look good soon. Now duplicate again, but this time go to image rotate and change the direction to right, and then the degrees to 90. Make sure all layers is not clicked, then apply.
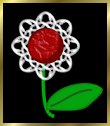
Now I like it!! It has perfect dimensions. At this point, you can save your image if your satisfied with the pattern. But I want to try one more step. With the background invisable again, go to the above layer, merge visable. Duplicate, but this time go to image rotate, and enter the value 45 for degrees. Again turn off your background layer and merge the above layers visable. Now this to me looks like a flower. Look at what you ended up with. This is where I decide how I'm going to use this drawing. You can now delete your background and save your pattern as a tube or as a psp..you can even create a folder for your patterns. I will be making more tutorials on how to use your patterns for different techniques. But for now I will explain some simple ways to make your pattern into something pretty. Because mine looks so much like a flower I'm going to make it a flower. I select the center by using the selection tool, you can also use the preset shapes tool and draw the circle changing the shape to circle, going to the exact center and considering I'm using a 300 x 300 canvas size, the center is at 150, 150. I then increase my circle enclosing the center. Go to selection float. Colorize the center with a flood fill. Then flood fill a second time using a lighter or darker colour and this time a pattern to add texture. I used fog, use whichever you like. If you feel you haven't enough texture, try using the paint tool. Then I went to cutout. Changed the colour to the brown but a darker shade. I changed the settings to 50, blur 4.1, horizontal and vertical negative -7. Then I added a second cutout of horiz, and vert of 15. Once I was happy with the center I went to selection, promote to layer. This moved all of the center to a new layer. Now my original image was still there. Go to the layer your pattern is on. Go to selections, select all, select float. Add two cutouts to the petals of the flower with black as your shadow colour. horiz, and vert -2, same settings for the rest. Then the second cutout positive 2. I then went to the promoted layer and added a drop shadow of opacity 54, blur 4, vert and horizontal 2. I then turned off my background and merged visable, then resized, and moved and duplicated my flower. I added a few stems, simply by drawing a line with the draw tool, stroked, size 4, colour green, then changed the stroke to fill and drew the shape of a leaf, and here is the finished result. A lacy flower.
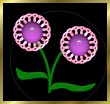
Two more examples of the flower, the pink one is done using the gem tutorial, then the stem and leaves were added.
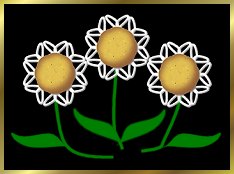
Now what you need to do is take a look at your pattern and decide what it looks like. Then follow one of my examples..or select one of your own. Below is another example of graphics you can create from your pretty patterns. To make this clear, I'm going to go through the steps once more. 1)Open a 300x300 black background canvas. 2)Select your draw tool, freehand, stroked, width 7, antialised checked, vector checked, path can be checked. 3)Change your foreground to white. Scroll something an inch in diameter, or larger on your canvas.
4)Go to image, mirror. 5)Turn off your background. Click on the above layer and right click, merge visable. 6)Right click again on your merged layer, duplicate. Image, flip. **Note: At any point if you are happy with your pattern you can create your image from there. Instead of adding more duplicates and rotations.** Now you can move your pattern if necessary. Necessary is when the pattern is overlapping too much or when they are not touching. NOTE: If you move the duplicate make certain the two match. As in the next example. I purposely spaced this to show you.
Now I moved it up. See how all the corners match? 7)Turn the background invisable, click above, merge visable. Duplicate. 8)Image rotate 90 degrees to the right. 9)Turn the background off, merge the above layers. Duplicate. 10)Image rotate 45 degrees to the right. 11)Save as a tube or psp. To make an image, look at your pattern and decide what you would like to do with it. You can follow either of my examples. Examples Make it into a flower?(example is above)..
©June 08, 2001 To The Tilly Garden
|


 This is cropped and resized to allow for faster loading I have no idea what the outcome of my pattern will be but I do know it will create something interesting and something with exact measurements.
 Looks a little odd doesn't it?