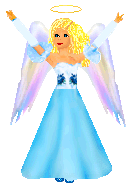
Now using your Darken RGB Tool, darken around the outer edges of the wings. Then use your Lighten RGB Tool and lighten the inside rim of those wings. Just make a thin line right below the dark one.
 Now I use "Effects", "Enhance Photo", "Automatic Saturation Enhancement" using "More Colorful" and "Strong". Click okay.
Not much more to go. Add another layer. Take your Line Tool and set it to size 1. Have all the boxes "UNchecked", and draw the little thin lines that seperate the feathers on the wings, going downward.
Now I use "Effects", "Enhance Photo", "Automatic Saturation Enhancement" using "More Colorful" and "Strong". Click okay.
Not much more to go. Add another layer. Take your Line Tool and set it to size 1. Have all the boxes "UNchecked", and draw the little thin lines that seperate the feathers on the wings, going downward.
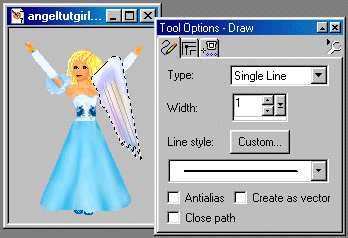 Using "Effects", "Blur", "Gaussian Blur", set it to 1.00, and click okay. Lower the opacity on this layer to suit yourself, so that the lines don't look too prominent. I lowered mine to 66.
 Merge your WING layers again. Do not merge the doll here. We have to move the wings down like so first (Layers, Arrange, Move Down) and do any clean up that's needed. There may be a pixel or two as usual that you'll want to erase or push into place to make it look better on the doll. Copy your wing and paste it on as a new layer so that she has two wings.(you'll find these under the top menu under "Edit"....most of you already know how to copy and paste by now.) Mirror it, (Image, Mirror) put it where you want it and NOW you can Merge the wing layer with your doll layer, and TA DA...we're all finished. :) Took long enough, huh?
 Tutorials Index Tutorials Index
|