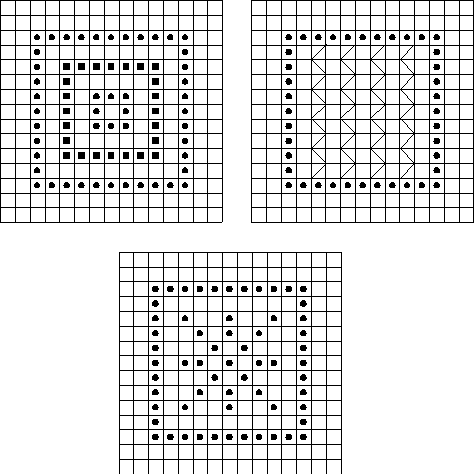

Here are three little potholders which should be worked on 28 count fabric. Very simple and there are many more designs you can come up with once you get started. You can do your designs all one color, shades of one color, various colors, etc. The designs are all based on an 11 count square which is a little less than 1/2" (6 inches in real life). When you have finished your potholders, here's how to finish them. Just cut them out in the first row of holes away from the border. After you've cut them out, pull out the one thread on all sides and you'll have fringed potholders. If you don't want the fringe, iron the potholders onto iron-on interfacing before you cut them out. Then just for extra insurance, run a line of Fray-Chek all around the border. When it's thoroughly dry, cut the potholders out right up against the border. And that's it - Bon Apetit!


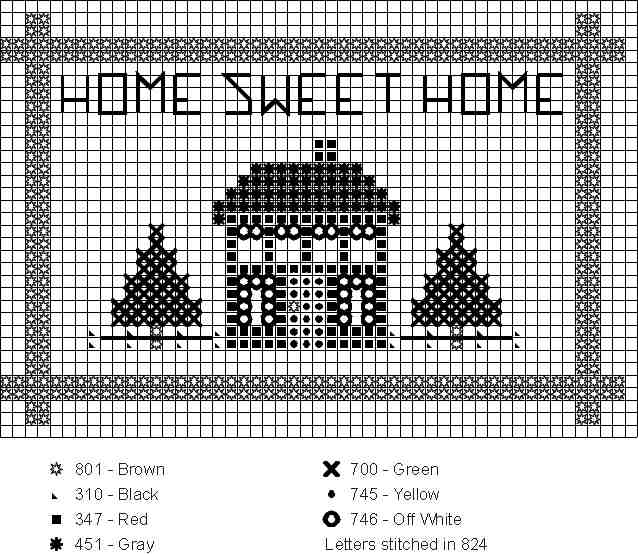
The stitch count is 51w x 33h and if worked on 28 count fabric finished size will be a little less than 1-3/4" wide x 1-1/4" high. The floss colors are DMC embroidery floss.
After you have finished stitching the sampler, wash in lukewarm water, towel dry, and then iron dry with the stitching face down on a padded surface. When it has dried completely, iron a piece of lightweight fusible interfacing on the back of the fabric. Next, run a bead of Fray-chek all the way around the outside edges of the "frame". When that has dried thoroughly, very carefully and with very sharp scissors, cut out around the frame. You can either cut out one "hole" away from the edge of the frame (and the little bit of white fabric that is left really won't show that much once it is hanging on your wall) or if you're feeling brave, you can cut right up against the stitching. I do this successfully, but, again, I cut very carefully. When I'm done, if it looks like it might want to ravel anywhere, I use more Fray-check. For mounting it on the wall, I'd suggest cutting out a piece of thin posterboard that is smaller than the frame and then using either a thin disk of Fun-tak or the repositionable glue type product to attach it to the wall. Hope this little sampler helps to make your house a home : ) If you have any questions, please e-mail me.
P.S. - of course, you could also frame the embroidery the traditional way - with an actual frame, but if you're not into framemaking, this is a nice alternative.
