Converting a AMC 304 V8 to Fuel Injection
Istallation

Removing the Original Intake
Once I got the intake, I dove right in and started to disassemble the Jeep. I
disconnected the gas line to the carb, drained the anitfreeze, removed all of
the water hoses, removed the throttle cable, and took off the coil. Here's a
cool thing about AMCs! I didn't have to remove the distributor! I'm used to GM
350s, and that would normally have to go. Anyway, I continued on by removing
all the intake manifold bolts, and carefully persuading the intake off the motor
in the following manor;
1-Beat softly with 3lb hammer on front of intake.
2-Pull with all my might, on the intake.
3-Beat a little harder with same hammer.
4-Pull with a vengance.
5-Beat angerly with above said hammer till I'm blue in the face.
6-Pull like my life depends on it.
7-Take a break to blow off some steam.
8-Return with a chisel!
9-Carefully place the chisel between the engine block and intake by front seal.
10-Beat softly.
11-Beat harder.
12-Beat harder still.
13-Observe loud SSNNAAAAPPPPP!
14-Realize that I forgot to remove one of the manifold bolts and cracked the manifold.
15-Remove the bolt.
16-Easily remove all peices of the manifold :)

Now that that drama is over, I stuffed towels in all of the holes in the heads,
layed clean rags in the lifter valley, and proceeded to clean all the sealing
surfaces with a razor blade and paint thinner. This consumed ALOT of paper
towels and rags, but I have bad luck with vacuum leaks, so I'm trying to avoid
my usual lack of gasket integrity.
Installing the New Intake
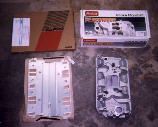
The gasket for this intake is a big square piece of metal about 13"x16". It's flat
as a pancake when you get, and has to be coaxed into the v shape
of the motor. After doing this, which was easier than I expected, I put RTV around
all of the passage ways on the heads, and placed the gasket on the motor. I also
placed a large bead of sealant along the front and rear seal areas of the engine
block, because Edelbrocks instruction suggest doing this instead of using the
rubber seals that come with the gasket. I would grade my job with a "B".
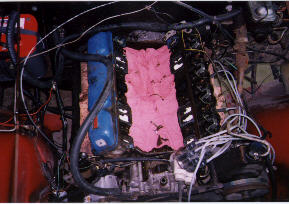
I continued on quickly, since the RTV was setting up. I applied RTV to all the
sealing surfaces, and all the bolt holes. By this time, I had been squeezing
this tube of RTV for about 20 minutes, and my hand was starting to give-up. It
was really becoming difficult to apply the stuff evenly, as my hands started to
shake. I know that may sound funny, but it really was starting to take its toll!
Anyway, I finished appling the RTV and picked up the intake and put it on the
motor, this went O.K. at best. When I finally had it on there straight, I noticed
that the intake didn't touch the large bead of sealant I had applied to the front
and rear seal areas! That bead was probably 1/4" thick! It will come down a little
when I tighten the bolts, but not that much, so off it comes. What a mess. I applied
more RTV to the front and rear seals, and tried it again. This went a little better,
but I had RTV all over the place. I tightened all the intake bolts down to 25 ft/lbs
as the instructions said, and it seamed to sit good, but I still don't know how well
the front and rear seals are going to do. Oh well, practice makes perfect. I then
installed the supplied temp. sensor, and all the old fittings into the new intake.
Email: mriley@dotnet.com

