Quite a lot of the time, we need to know whether or not a transistor is working. I do a lot of "filching" of components from equipment that isn't used anymore, and the part numbers are usually either unreadable or don't exist in my databooks. So how do you tell whether or not a transistor is working? You will need the following:
1 multimeter that has a diode test function.
1 9V battery
1 1K resistor
1 LED
Some hookup wire.
Now for the first part - determining whether the transistor is NPN or PNP. Grab your multimeter, and set it to diode test. Now test all the different combinations of legs that the transistor has:
If you label the three legs leg 1, leg 2 and leg 3, then you test the continuity of:
1 to 2
2 to 1
1 to 3
3 to 1
2 to 3
3 to 2.
If the transistor is working, then you will have gotten a value of about 0.5 - 0.7 volts for two of the six tests. The rest of the tests should have said that there is infinite resistance between the legs tested. If you get more than two positive results, or you get less than 2 positive results, then the transistor is fried.
What's more, the two tests that return a positive result will have a common leg. ie: if you test a BC548 transistor, you will get a result for testing legs 2 to 1, and also 2 to 3.
The common leg is the base of the transistor. Always.
If the common leg conducts with the positive lead of the multimeter connected to it, then it is a NPN variety. Always.
If the common leg conducts with the negative lead of the multimeter connected to it, then it is a PNP variety. Always.
So for our BC548, the common leg is leg 2, and since the red probe was on Leg 2 when it conducted, then it is an NPN transistor.
So how do you figure out which legs are the collector and emitter? This is a bit trickier, but still not that difficult. You will need the rest of the components mentioned earlier. You need to build this circuit:
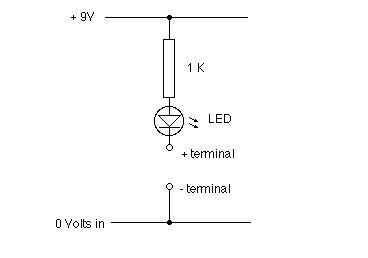
What we have here is a simple continuity tester - a 9V battery, a resistor, a LED, and two terminals, all in series. Short out the + and - terminals, and the LED will light up.
Before we go much further, I just thought you might like to know that transistors DO work backwards - that is, if you mix up the collector and emitter of a transistor, then they will work. Not very well, maybe, but they will work.
The way we figure out which is the collector and emitter goes like this:
For the NPN transistor:
Connect the + terminal to one of the 2 mystery legs on our transistor, and connect the - terminal to the other mystery leg.
Now connect your multimeter so that the black probe touches the 0 volt rail, and the Red probe touches the base. You should see the LED light up. Note how bright it is.
Now take the transistor out of the circuit, and change the connections to the + and - terminals on our circuit, so that both the mystery legs get a turn at being the one connected to the 0 volt rail.
Again, touch the black probe of the multimeter to the 0 volt rail, and the red probe to the base of the transistor. Again, note how bright the LED is.
The emitter is the leg that, when connected to the zero volt rail, makes the LED glow the brightest. And, since we only have three legs, the collector must be the one left over!
For the PNP transistor:
Connect the + terminal to one of the 2 mystery legs on our transistor, and connect the - terminal to the other mystery leg.
Now connect your multimeter so that the red probe touches the + terminal of our circuit, and the black probe touches the base. You should see the LED light up. Note how bright it is.
Now take the transistor out of the circuit, and change the connections to the + and - terminals on our circuit, so that both the mystery legs get a turn at being the one connected to the 0 volt rail.
Again, touch the red probe of the multimeter to the + terminal of our circuit, and the black probe to the base of the transistor. Again, note how bright the LED is.
The collector is the leg that, when connected to the zero volt rail, makes the LED glow the brightest. And, since we only have three legs, the emitter must be the one left over!
Note the differences between the two testing procedures. Just remember that (in drawings) the emitter is the side with the arrow on it, and when the transistor is in the right way, the current follows the direction of the arrow.
Sometimes, with small signal high gain transistors it is difficult to figure out which way round makes the LED the brightest. You could add a resistor between the multimeter and the base leg, or set your multimeter to Ohms instead of diode test, or add another LED in parallel with the first one, or by changing the resistor value. I leave this circuit permanently set up on a breadboard so I can just plug the transistor in, check the brightness, and then turn the transistor around. This lets me identify all the transistors that I have tried.
Go to Ben's home