
1. File>New Image (set at transparent, size 400 x 400)
2. Click on the "T" tool. Choose the pleasantly plump font. ( You can obtain that font at www.fontseek.com putting Pleasantly Plump in the font search) Use any color for your text, size around 55 depending how long your name is.. you can always resize it later. Mode is 3D. [When text box comes up, check antialias & auto line spacing. All others boxes reflect zero.]
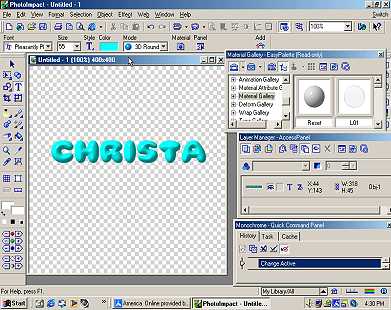
3. Click on the arrow tool... Then click on your text. Your letters should have marching ants. Using the transform tool, (under the T) resize to stretch to the size you want the text.
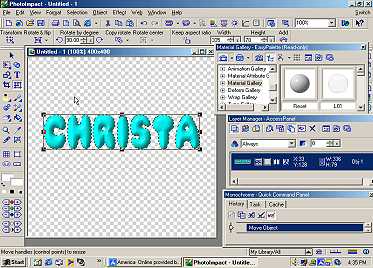
4. Click again on the arrow. Ants should still be marching. Using the Gallery Easy Pallete, Click on Galleries icon (looks like Jefferson monument) from the Material Galleries pallette. Choose material gallery. Choose the aqua one L03 (double click L03).

5. Go to the objects tool, and choose "Convert Object Type>From Text/Path to Image".
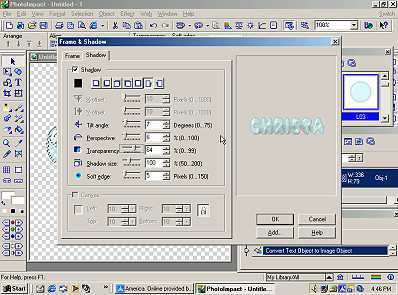
6. Go to Format> Frame Shadow ****Optional... if you sign your work, at this point Go to "T" choose any font/color size =9 & type name >okay. Move name to place it where you want it. You will then need to go to "Objects" on tool bar > select all objects > Merge as Single object. ****
(Settings: Choose shadow tab, Select next to last shadow icon [bottom right slant]
Tilt angle=7, Perspective=6, Tranparency=64, Shadow Size=100, Soft Edge=5)
Choose okay.
7. With Ants still marching go to Edit > Duplicate > Base Image with Objects . [Do this twice so you have 3 windows.] 
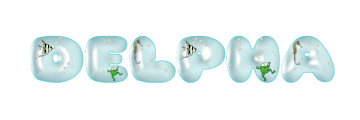
8. Using Stamp tool, Choose aquatic stamps & place your "stamps" on each of the three windows. (All the aquatic fish etc, and pearls. Make sure you alternate or place them in different places inside the same letter on each name).
9. Once all your stamps & pearls are placed where you want them, then click on first window. Go to "Objects" on tool bar > select all objects > Merge as Single object.
Do the same to the remaining two windows.
10. Now we are going to get rid of unnecessary space around the letters. Click on first window, Go to Edit > Crop. Do the same to the remaining two windows.
11. The next thing we are going to do is add a white background & save each window as a ufo file. Click on first window, Go to Objects > Merge All. Do the same to the remaining two windows. Save each Window /Frame as filename1.ufo. File > Save as > Filename1.ufo, filename2.ufo & filename3.ufo.
(***Note: The "Merge All" will put the white background behind your image. This is needed as when you bring the files into Ulead Animation, & save it as a gif file, if it is not on white background the shadow of the letters does not give you the crisp image you are looking for as it gets "fuzzy" upon the optimization process)
12. Once all files are saved, Click on "Switch" which is located at the top right corner of your screen. Click on Ulead Gif Animator.
13. Click on Gif animator wizard (size leave at 500 X 300 on that screen to ensure you do not cut off anything) & add images (a.k.a files)~ Filename1.ufo, filename2.ufo & filename3.ufo. Follow wizard instructions.. [Frame speed=45]
14. When the animation is done, to get rid of excess space go to Edit>Crop Canvas.
15. View animation by going to View > Play Animation. (To stop animation go to View> Stop Animation.)
16. File >Save as > aqualetters.gif Voila!!!!
Photo Impact sample
********Note: Tutorial Written & owned by Christa File. Linking is permitted. No copying or posting to any websites or forums.********
