
Hardware
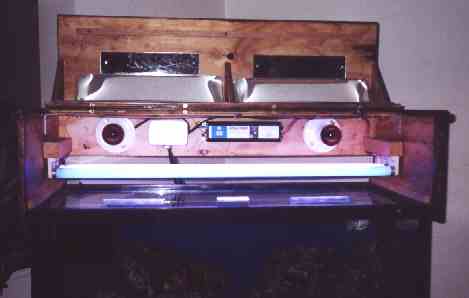
This is my DIY canopy, its made of 5/8 plywood and maple tape to hide the edges. The current lighting is via 4 HO (high output) T8 fluorescent lights, 2 Daylight and 2 Actinic 03. There is also 2 low wattage red party bulbs for night viewing. Seeing as this lighting system was built on misinformation, I plan to upgrade to VHO (very high output) Fluorescents or add a 250W MH (metal halide) and us the current fluorescent setup for the actinics. This would allow me to simulate a sunrise/sunset effect as well as provide the needed light intensity for many of the life forms I plan to keep.

This is my DIY wet/dry trickle filter. water drains from the main tank via a 6' cube skimmer box and 2 1" pvc bulkheads through the back of the tank. Water passes through filter floss in the "Drippy Drawer" over the bio balls(Now Removed) down under a partition and up through any chemical filtration I use. The last section is where the heater and pump should be, but aren't *I'll get to that* and the protein skimmer will hang on the side.
So where's the pump? its in a cardboard box lined with a garbage bag filled with water. Which is suiting because its a piece of garbage! Upon initial setup, with the pump in the sump, the tank went from about 65o F to 85o F overnight. I could not bring the temp down, my house is cool, I do live in Canada after all, and I hadn't even installed the heater yet. My solution was to use the pump inline instead of submersed. However, this only brought the temp down to 82o F, it wasn't until I added a refugium that it dropped below 80. The problem then was the pump make so much noise that the people upstairs thought I was operating a skill saw in my living room. I suffered through that for 2 days before I came up with the Box'O'Water to dampen the noise. The pump is a Lifetech AP 5400, the lfs told me it was a copy of a Premium Mag Drive 12, but went for half as much. I should have known better. The new pump "The Real McCoy" is on order and I'll post new pics when its installed.
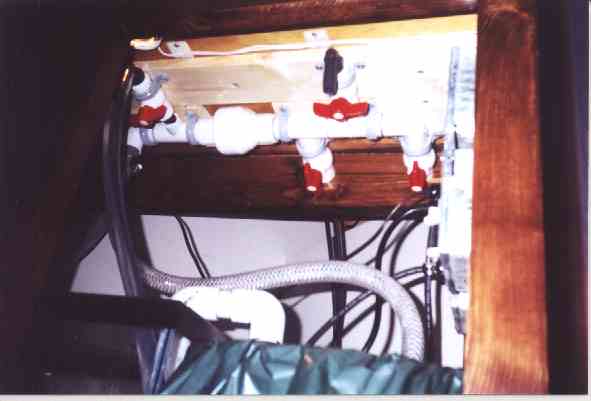
Here is a picture of the water manifold mounted to the underside of the top of my stand. Water exits the sump through the intake pipe I fabricated, then through the pump and up into the manifold. The first ball valve is a bleed off so I can limit flow without choking the pump. Notice how its before the check valve, this is very important. The next valve goes to a spray bar behind my live rock via a 1" bulkhead about 6" above the bottom of the tank. Notice how its after the check valve, this is also very important. Third is the tank drain, and lastly, the main water return through yet another 1" bulkhead. The bleed off has since been used to supply water to my refugium, which is alright because I'm happy with the amount of flow going to my tank.

Since I'm an electrician I had to think of something fancy for my aquarium, and there it is. Power comes from a water proof plug plugged into the wall and goes into a GFI (Ground Fault Interrupter). This allows the entire electrical on the stand to be GFI protected. The top 6 outlets are switched by the switch on their right. Ill plug anything in here that needs to be turned off during a water change. The lights are on a timer plugged into the GFI. The top left receptacle on the bottom bank is switched by the rightmost switch and is used for the red night lights in the canopy. The other 3 are switched by the bottom switch of the 2 pole 2 throw next to the red light switch, they are for anything that can stay on during a water change (Internal circulation, heater, etc.) Finally, the top switch on the 2 pole 2 throw controls a small light above my sump, for maintenance purposes.
