Karen's Piggy Page!
Welcome to my piggie page!
You have come to the world of cute little critters running around in great joy! =)
Note: newest pictures are at the bottom.


Well, this world is part of my own. I got two guinea pigs from Petsmart on January 11th, 2004. They were sooo tiny and adorable! I had, of course, researched extensively on them. I knew all about their housing, nutritional needs, and their exercise needs. I knew they would be very vocal, would need lots of attention, and I knew they did well in pairs of the same sex. I read countless books about them--all the books in the libraries for 10+ miles! So I finally got two pigs.
Little did I know that the books all had the wrong information. I mean, sure the old books were a bit out-dated, but I didn't think they would be that bad. Now I know better.
I found a site online, Cavy Cages. It is the best site about cavies out there! They have forums, photo galleries, and tons of guidelines for everything guinea pig! It's definitely worth a visit. But enough about the site, on to the pigs!
I read the information online about how commercial cages were WAY too tiny even for one piggie. So, I decided to make a new cage for my pets. I looked at photos of other cages people made online out of organizational cubes and coroplast (explanation below). I got many ideas and formed my own with help from the pictures. I've described how I made it in detail below.
The pigs would be in their shiny new cage now, but unfortunately they have mites. While they are undergoing treatment I have decided to keep them in their current cage. Otherwise their new cage will get infected. Also, I need to clean and disinfect so often that it would b a HUGE waste of bedding if they were in the big cage. I'll keep you updated. Here are the pig-tures! =)
July 24/25, 2004
The piggies went into their new cage late July, after we got back from Tomahawk. I think they went in on the 24th or the 25th. Their mites are all gone!
Aug. 4, 2004
Cleaned the top layer on the 4th, after buying some Kaytee Aspen Bedding. I've decided to use that as a base, with CareFresh on top. It's working out so far! I took the top off this layer because it was really hard to get in there, and I've decided the piggies will probably stay in there without the top anyway. =)
Aug. 5, 2004
I cleaned the bottom layer out. I had to take the column out to get all the bedding out. I decided to keep that out, and I also decided against using newspaper as a base for this layer. It's easier just to use a dustpan on this layer, both because of size and some access issues.
Aug. 7, 2004
I found some online directions to make cavy cozies, and I bought some material and made one! Wow, with my patience I thought it would be difficult. It was really easy, though! No pictures yet, coming later.
Aug. 8, 2004
I helped Josh make a cozy for Pig today out of some leftover fabric and yellow fleece. The only part he really needed me to do was the one where you sew two layers together all the way around... Hard to explain here, see the directions here. There are also some other cool craft ideas there, so check it out!
August 20?, 2004
Around this date, I removed the cover from the Cavy Cafe (the upper level.)
September 18, 2004
At the beginning of this month, I made another small loft on the right side of the cage. Pictures will come soon, hopefully! Actually, today. I also added coroplast guards for both hayracks, and I rearranged the upper one. The lower lid came off then as well.
November 12, 2004
Added pictures of floortime!


This is the entire cage--before (left) and after (right).


This shows you how I decorated the cage.


There is the bottom, 2x5-grid level on the left. The top, 2x3-grid level is on the right. The top is cafe-themed and the bottom is tropical.


This is another "before and after." This time, it shows the "Cavy Cafe."


The left shows you the storage/stand underneath the cage. On the right is the ramp from the bottom to the top of the cage. It's covered with a rubber-bottomed bathmat so it doesn't slip through the holes in the grids. The bathmat is secured to the side of the cage with safety pins. The bottom grid can flip up out of the way for easy cleaning.


This view of the ramp (left) shows you the supporting column I made with a scrap piece of Coroplast. The photo on the right shows you the hinged top to the ramp for access. It can be secured with a binder clip.


This shows you the door to my cage. It hinges with cable ties and locks with a large binder clip.


On the left there is my hay storage bin. The front closes to keep the hay away from my grass-eating doggie! =)


The couch on the left was my first design. However, I had to change it to the one on the right because I had to cable-tie it to the side of the cage.I secured the towel to the bent grid with safety pins. The good thing about using the towel for the cushion is it's easy to clean!


I made the tunnel on the left out of a bent grid and a bandana. The bandana is easy to clean and is ties to the corners of the grid. It is also safety-pinned on to the grid. The house on the right was made out of scrap coroplast. It has a lid both because it's easier to get at the pigs inside AND because I didn't have a large enough piece of plastic to make a 5-sided box. I decorated it with printouts.

This is the piggies' veggie dish. I think it's funny because of Gary (the meow-ing snail from Spongebob--shame on you if you didn't know that! =) ), and because I have a few pictures of Spongebob and Gary over the cage. It fits in with the cafe because of its checkered rim, and it also fits into the tropical theme of the lower level because of the fish on its sides (though this picture doesn't show them).


This is the piggies' current cage. They used to have hideouts in there, but now they have mites so we have to disinfect all of their toys. Also, they don't seem to like them anymore as they don't go in them! They will be out asap and into their new cage!


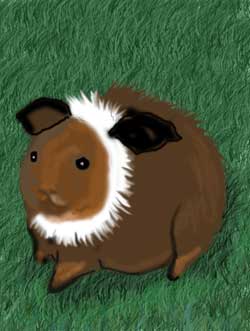
The piggies, munching happily away! =)


The piggies, in front of their new futon! Pig is on the left, and Chut is on the right.

Chut near the new tunnel, covered with a bandana.


On the left is the piggies' box playpen I made for them for when we would clean the little cage. We hung their little hay rack we used to use in there by pushing the ends into the corrugation holes. We put a water bottle in there by using the hangar and making a hole for the dripper to go through. They don't really need it anymore, so we recycled it. I made it myself by cutting holes and taping the boxes together. It may sound simple, but it was harder than it seems! On the right is Chut with the hay rack.


On the left, Chut enjoys the new cozy I made for him out of a scrap of fleece and material. Josh made pig's with my help. You can see his on the right.


This is a "chutloo" I made out of an old plastic ice cream pail. I ran it under hot water to soften the plastic, then I cut out two holes, one on each side like a tunnel. That way, one can easily escape if the other wants in! I also punched many ventilation holes in the top with an awl. They love it, as you can see on the left.


Two views of the recent change--the cover is removed from the upper level. It was too hard to reach back in there to clean and get the pigs.

Looking at the entire cage, it gives you a better sense of the change.


My first order of Kleenmama's Hay came on the 25th of August--yay! It came in the large box to the left, but expanded. I ordered 35 lbs, half bluegrass and half timmy. The timmy alone filled that big box! The rest filled the boxes on the right, some of the boxes in the hay storage area on the cage, and there is still some in the bag! I'll be using that first. On the right, you can see the new upper loft I made. I put the small hayrack in there. It used up the extra coroplast I had.


On the left, you can see how they are able to hop up into the top level. It's a breeze for them, as they are used to jumping half a grid to get onto the ramp anyhow. On the right, you can see how dramatically this change has affected the cage.

This is another view of the entire cage after the most recent remodeling procedure.


These two pictures show the piggies' floor-time area in the basement, close to their cage. I also keep them in the kitchen sometimes, but I have no photos of that as of yet. I just used a set fo 24 grids and cable-tied them together. That way, the flex into any shape, and they fold up easily for storage. I laid down some towels, added pellets, hay, and water, put in some hidey houses, and into the play area the piggies went! They love staying in there for hours, supervised of course.


This photo shows Pig and Chut during floor time in the play area, wallowing in the hay--silly piggies! The one on the right shows Chut in the cage, tunneling in kleenmama's hay. The stuff is delicious, I'm sure!
The new cage I built for my piggies took about $110 to make TOTAL!!! My cage is a lot bigger than most, since most only make one level on the ground. The one got in the pet store was $150 and it's dinky! Sure, I put a lot of time into my cage, but it costed less than my old pet store cage. Plus, it's 523% larger! If you got an increase in living space of 523%, you'd be pretty happy, right? And if that luxury mansion costed less than your closet-sized apartment, wouldn't that be so great you wouldn't care if the earth blew up tomorrow? That's what my reaction would be, at least. I made the cage with four packages of 24 grids from Target. They were each $15. That makes $60. The Coroplast was from FastSigns. I got two 4'x8' sheets for $15 each. That makes the total $90 so far. The cable ties were $5 from Home Depot, and the wire closet shelving was about $15. Now the total is $110. Not much considering it's more than 5 times bigger than the old cage! The price for 5 of those cages would be about $750! The price for a typical C&C cage is $35-40, depending if you have a cover or not. All you really need to buy is a 4'x8' sheet of Coroplast and a box of cubes. That would be $30-35. If you want cable ties for extra security and/or a top (wire shelving) to your cage, that adds a few extra dollars. So it really is cheap. I'd recommend this to anyone! =)
My cage took a few days to fully make because it was so large. I put most of the cubes together and ordered the Coroplast sheets in one day--a big feat considering there are three levels I'm getting together. The next day, I put the Coroplast inside and finished the cubes. I also made the side door and the Coroplast hay storage bin. I got the top doors done the next time I worked on the cage along with the ramp, ramp top, the original futon, and one hay rack. I made the Coroplast support, the Coroplast house, and the new futon a couple days later. I made the Cavy Cafe sign later, along with adding the second hay rack and the bathmat on the ramp. The next time I worked on my cage, I searched for and printed out many pictures for decorations. I made several of my own as well. I made a Cavy Cafe specials and desserts menu (the one in the frame) the next day. That was also the day I cut out the pictures I had printed and put them on the hay storage bin, along the Coroplast on the upper and lower levels of the cage, and on the wall above the cage. The day after that I put in the bedding and finished the tunnel. I also put all the toys in the new cage. I took pictures with the digital camera and posted them on www.cavycages.com. Then today I made this entire page and worked on some other pages on this site. It's for my Girl Scout Gold Award dealing with pets. I thought I might as well just include this anyway, as something to put on CavyCages and to show others the site. =) Thanks for reading!
7/2/04 8:46 pm --Karen

last revised: January 17, 2005 3:57 pm


