Difficulty: Beginner Tools Needed for this Tutorial:
Paint Shop Pro ~~I used version 7.04~~
Mouse Image .PSP File- Get it Here
Image of your choice, or you may use mine,
which is available for download Get It Here.
Font: Sloop Script 2
Note:
I made this tutorial very flexible,
so you may choose what you the individual artist would like.
Use your imagination and make it however you'd like it to be.
I encourage creativity and the individual artists tastes.
But I also provide the option to do it exactly as shown. Just have FUN!! Ok Let's Get Started !! 1. Open a new transparent image,
Settings 450 x 450, transparent.
I like to have a lot of room to work and play with.
And large enough for experimenting. *Tip* (remember you can always resize and sharpen afterwards)  Remember to save your work often!!
| | | 2. Select the  tool and go to tool options tool and go to tool options  and set to rounded rectangle . and set to rounded rectangle .
Draw a rectangle approximately 366 x 300 you can measure this by looking in the bottom left corner  of your program. of your program.
As in the examples below.  
Now go to file, open and select the image that you want for your mousepad and open it then go to edit, copy. Close out your image and come back to your selection layer and click edit and select "paste into selection" 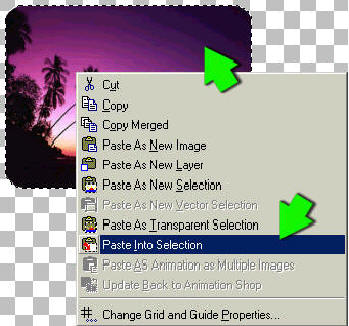 Then go to layers and click properties, go to name &
Rename this layer Pad. Remember to save your work often!!
| | | 3. Go to Effects, Texture Effects, Texture, and apply the following:
 Then selections, select none. Remember to save your work often!!
| | | 4. Go to Effects, 3D effects, Drop Shadow & Apply the following Drop Shadow:
Vertical: 0, Horizontal: 1, Opacity: 100, Blur: 2  Right now would be a good time to save !! | | | 5. Go to Image, Rotate, Left, Free, 9.
Make sure All Layers is not checked.  Remember to save your work often!!
| | | | 6. Go to file, Open the mouse tube included.
Go to Edit, Copy.
Close the mouse image.
Go back to your mouse pad and choose Edit, Paste as a New Layer.
Then go to layers and click properties, go to name &
Rename this layer Mouse.
Position your mouse on your mouse pad,
where you will still have sufficient space for your signature.
 Then go to effects, 3d effects, drop shadow with these settings:
Remember to save your work often!!
| | | 7. You should have something that resembles the image below.  Now Save!
| | | 8. Now on to the signature part of our mousepad.
Go to your toolbar and select  then left click on your image, then left click on your image,
and add the signature of your name.
The font of your choice, With these settings below.
TIP : If you use another image besides the one I provided.
Then you should choose your text color to match.
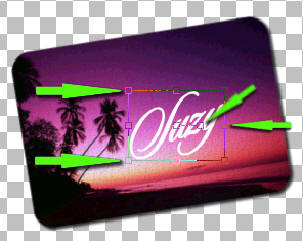
 Since the text will be in vector format you can adjust the size and angle of your text by moving the nodes that surround the text.
As shown here:
 When you have your text the way you want it to look
Go to layers, convert to raster layer. Optional: you can also apply a drop shadow to your name using the same settings as before.
After you convert to raster layer.
Remember to save your work often ! !
| | | 9. Now for our "desk" or background layer.
Go to layers, new raster layer, rename this layer "desk"
Now go back to layers, arrange, send to bottom. We are going to use the flood fill tool 
And fill the layer "desk" With a background of your choice.
I chose a wood texture that looks like my computer desk
and comes as a standard texture with PSP 7.04. To use the pattern that I used.
Go to styles
on your color palette to the right of the program
and make these changes as in the examples below.
 
  | HINT: To use a different style/pattern to something else,
just click on the pattern and the pattern window pops up. |
Now, once you have your choice of patterns
RIGHT CLICK your image to flood fill your "desk" layer.
You should have something that resembles the image below.

| | | 10. When you have everything the way you want it to look,
Go to Layers, Merge, Merge All.
And save as psp for sharing and jpg, gif for uploading photo albums etc.
And there you have your Very Own Signature Mousepad !
Hope you have enjoyed this fun tutorial ! |
If you have any problems or questions, please feel free to contact me. Contact Suzy Tutorial Feedback CreatedOctober 23, 2003 This Page Last Updated Saturday November 22, 2003 12:29 PM This Site Created and Maintained
By Suzy Sunshine© 2000-2003 All screenshots are the property of
©Suzy Sunshine 2000-2003 Tut #1 in series

|


