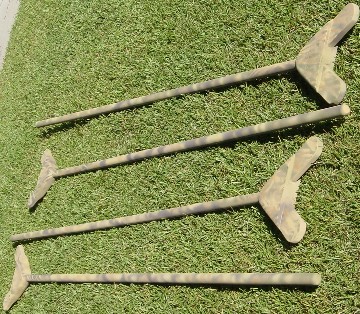
Here's a pushpole that can be built from some scrap lumber and an 8 foot closet rod. Yeah, I know,
you can just put one of those metal duckbills on the end of a pole and be done with it. There are two
problems with that: 1. The duckbill is noisy. If you're trying to sneak up on your quarry, you'll spook them
with a duckbill. 2. The duckbill will rust. If you get a year out of one in saltwater, you're doing good.
I've found that I like the 1 1/4" 8 foot closet rods the best. I've built poles with the 1 1/2" rods, and they're
heavy. The 1 1/4" rods are strong enough.
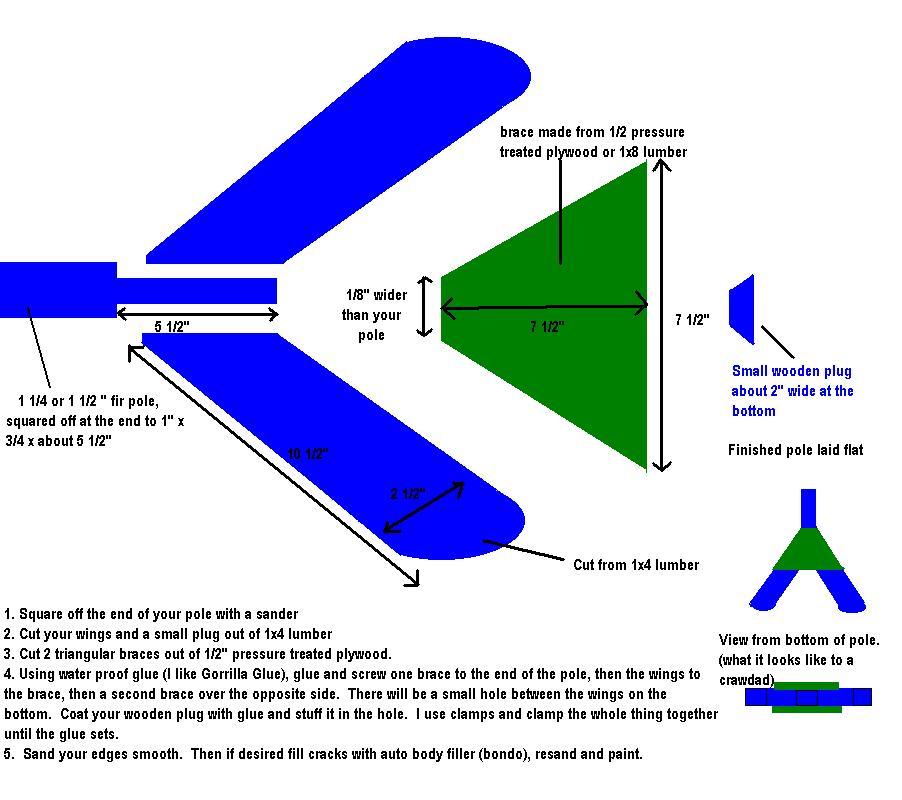
O.K., now lets look at the above diagram. It's pretty self explanatory. The pushpole is made from 6 pieces, two wings cut from
1x4 pressure treated fir, a small plug cut from a 1x4, two triangles of 1/2" pressure treated fir (cut the tip off the top of the
triangle so you have a line about 1/8" wider than the pole), and the pole itself. The lower 5 1/2" or so (these measurements
don't have to be carved in stone) of the pole is made into a cuboid shape, all the sides are flat. The cubed end of the pole
needs to be 3/4" wide or less, so the two wings and the end of the pole can be covered on both sides by the plywood triangles.
Some details not mentioned in the diagram: 1. The most forward point of the wings is cut off, so there's a about a 1/8" to 1/4"
flat spot. 2. The plug (cut from 1x lumber) is about 1/2" wide, 1" long on top, 2" long on the bottom. That's if you
make your wings the same angle as I did. Don't ask me what the angle is. I'm guessing the angle between the wings at the bottom
of the pole is about 60 degrees, because it looks like an isosceles triange. 3. You should make the wings and square off the pole first,
then make the triangular braces. Lay the pole and the wings together over a piece of the plywood ,and then trace the borders of
the wings out on the plywood to figure out the dimensions of the braces. You need to run the lower edge of the braces about 1/2"
below the bottom of the pole. Cut about 1/4" outside the wing border when cutting your braces, making them a little wider than you
really need. Later, you'll sand the braces even and create a smooth, curved edge with the wings.
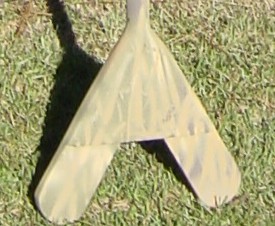
Here's what it looks like assembled in real life, before sanding, putty (I use Bondo) and painting. By the way, I don't
use Gorilla glue too much anymore as I've found it gets brittle with age. I use "Premium Urethane Construction Adhesive". You can
use Gorilla glue or any waterproof glue, however. None of my poles made with Gorilla glue have failed due to the glue. They
fail due to the pole, usually due to misuse of the pole, like using it for an anchor. I think it is important to use 1" stainless
steel wood screws and not galvanized. Galvanized will rust. What I do is apply some glue to one brace, spreading it evenly, then
lay it over the pole, and attach with 2 screws. The flip the pole over, put some glue on the side of the wings that will touch
the pole, lay the wings on top of the brace in place, and attach with a screw into each wing screwing them to the brace. Then
put glue on the other brace, slap it into place and put 2 screws into each wing and 2 into the pole. Then flip it over, screw the
brace on the other side to each wing, 2 screws each. Then coat the plug with some glue, slide it in, clamp the assembly and let the
glue cure.
Now all you have to do is sand the
edges of the braces at an angle down to the edge of the wings, and at the top of the brace even with the pole. You need
to sand the wings even with the pole, so it looks like one smooth piece. I won't come out quite perfect. After you do this, a
all you need to do is paint it. However, I like my poles to look nice and smooth, so I take a knife, cut off all the excess
glue, and fill the cracks with Bondo auto body filler. I always have some around and it doesn't take much. It's not necessary
to do this. It's just a pushpole, anyway. Now if this pushpole is for a Kara Hummer by any chance, take a tape measure
and measuring from the bottom of the wings, measure up the pole to 96 1/2", and cut the pole off there. The pole will now
fit comfortably inside the Kara.
This is what it looks like finished. Have fun building your pushpole.
Legal Disclaimer: This website
is intended for entertainment purposes only. The author is not an engineer or professional designer.
Many of the methods used building these poles are
untested. It is not recommended that anyone follow the example on this website
to construct a pole or anything else for that matter. If you do use any of these
methods you, your family, friends, and anyone else you can think of could be
hurt, drowned, maimed, exposed to toxic chemicals know to the State of California to cause cancer, or otherwise be killed due to the faulty
construction or dangerous construction methods.